
Hello! Welcome back to our journey into the Anchor framework.
In the last lesson, we established how to define the "cast of characters" for an instruction using the #[derive(Accounts)] macro. You learned to specify which accounts an instruction needs and what their basic types are (Account, Signer, Program). We also touched on fundamental constraints like mut for writability and init for creation.
Today, we move from defining the cast to defining their rules of engagement. It's not enough to know that an instruction needs a Signer and a data account; we need to prove that the signer is the authorized user for that specific data account. This is the bedrock of security in multi-user applications.
This lesson directly addresses the learning outcome: to implement security checks by applying constraints like signer, mut, and has_one to accounts. We will build upon your knowledge of mut and signer, and introduce the powerful has_one constraint, which is essential for enforcing ownership and permissions.
The Foundation: signer and mut
Let's start with a quick recap. The two most fundamental security constraints are:
signer: This constraint, which can be applied to anAccountInfoor used via theSigner<'info>type, verifies that the account's private key was used to sign the transaction. It answers the question: "Who authorized this transaction?"mut: This constraint verifies that the account was marked as writable in the transaction's account list. It answers the question: "Which accounts can I modify?"
Any instruction that changes data or debits lamports from an account requires these two constraints to be used correctly. But on their own, they are not enough. If an increment instruction takes a Signer and a mutable Counter account, what stops me from signing a transaction to increment your counter?
This leads us to the core security pattern in Solana programs.
The Authority Pattern
To solve this problem, we need to create an explicit link between a piece of data and the key that is allowed to authorize changes to it. This is commonly known as the "authority pattern".
The logic is simple: when we create a data account, we store the public key of its owner or "authority" inside the account's data structure.
#[account]
pub struct Counter {
    pub authority: Pubkey, // The owner of this counter
    pub count: u64,
}
Now, any instruction that wants to modify this Counter must not only be signed (Signer), but it must prove that the signer's public key matches the authority field stored in the Counter account it's trying to modify.
Before Anchor, you had to write this check manually in your instruction logic.
Modifying accounts using different signers
The article "Modifying accounts using different signers" from RareSkills provides an excellent explanation of this pattern. It starts by showing how you would implement this check manually using a require! macro, which makes the value of Anchor's constraints very clear.
Read the sections "Restricting writes to Solana accounts" and "Building a proto-ERC20 program". Pay close attention to how the authority field is added to the Player struct and how the transfer_points function uses require!(ctx.accounts.from.authority == ctx.accounts.signer.key(), ...) to enforce the security check.
This manual check works, but it's boilerplate code that you have to remember to add to every sensitive instruction. It's also easy to get wrong. Anchor provides a much more elegant and secure way to express this relationship.
Declarative Security with the has_one Constraint
The has_one constraint is Anchor's declarative solution to the authority pattern. You apply it to a data account field in your Accounts struct to tell Anchor that this account has a field that must match the key of another account in the struct.
Let's see how we can refactor the require! check from the RareSkills article into a has_one constraint.
Modifying accounts using different signers
Now, let's continue with the same RareSkills article to see how has_one simplifies our code.
Read the sections "Using Anchor Constraints to replace require! macros" and "Anchor has_one constraint". Focus on the diagram and the explanation of how has_one connects the authority field in the Player account to the Signer account in the TransferPoints struct.
As the article explains, the has_one constraint creates a "shared key" check. Let's look at the structure:
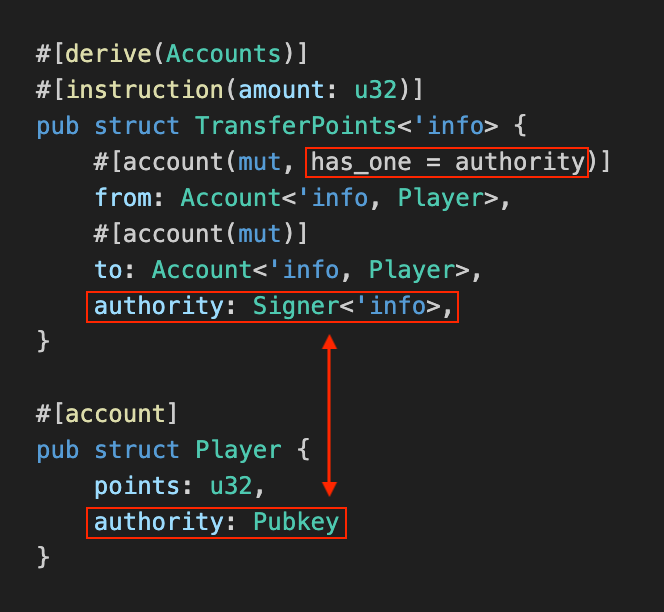
This diagram from the RareSkills article illustrates the has_one constraint. It shows that #[account(has_one = authority)] on the from account checks if from.authority (the Pubkey stored in the account's data) is equal to the public key of the authority: Signer<'info> account passed into the same Accounts struct.
Here is the updated TransferPoints struct using has_one:
#[derive(Accounts)]
pub struct TransferPoints<'info> {
    #[account(
        mut,
        has_one = authority // This replaces the require! macro
    )]
    from: Account<'info, Player>,

    #[account(mut)]
    to: Account<'info, Player>,

    authority: Signer<'info>, // Must be the same name as in has_one
}

#[account]
pub struct Player {
    points: u32,
    authority: Pubkey
}
By adding has_one = authority to the from account, Anchor automatically performs the following check before your instruction code ever runs:from.authority == authority.key()
If this check fails, the transaction is rejected. This is incredibly powerful. You have declared your security intent directly in the account structure, making your code cleaner, safer, and easier to audit.
Test your understanding!
You are building a program to manage user profiles. A UserProfile account stores a user's username and the authority who can change it.
#[account]
pub struct UserProfile {
    pub authority: Pubkey,
    pub username: String,
}
Write the Accounts struct for an UpdateUsername instruction. It should take the user_profile to be updated and the authority signer. Use constraints to ensure the profile is mutable and that the signer is the correct authority for that profile.
Show answer
#[derive(Accounts)]
pub struct UpdateUsername<'info> {
    // This account must be mutable to change the username.
    // The `has_one` constraint ensures that the `authority` signer
    // is the one stored in this user_profile account.
    #[account(mut, has_one = authority)]
    pub user_profile: Account<'info, UserProfile>,

    // This account must sign the transaction to authorize the change.
    pub authority: Signer<'info>,
}
Custom Logic with the constraint Attribute
Sometimes your security logic is more complex than a simple ownership check. For example, in the points transfer example, you also need to check that the from account has enough points to send.
The require!(ctx.accounts.from.points >= amount, ...) macro handles this, but Anchor also provides a constraint for this kind of custom logic: the aptly named constraint attribute.
How to Use Account Constraints in Your Solana Anchor ...
The QuickNode guide on constraints provides a comprehensive reference table for all available attributes. Let's look it up to see the syntax for constraint and other useful checks.
Review the large table in this guide. Locate the has_one attribute we just discussed, and then find the constraint attribute. Notice how it allows you to write a custom boolean expression. Also, browse the other attributes like address and owner to get a sense of the wide range of checks available.
As the reference shows, the constraint attribute lets you write any valid Rust expression that evaluates to a boolean. Anchor will reject the transaction if the expression is false.
Let's see how the RareSkills article uses this to check the points balance.
Modifying accounts using different signers
Let's return to the RareSkills article to see constraint in a practical context.
Read the section "Anchor constraint constraint". It shows how to replace the balance check require! macro with constraint = from.points >= amount. Note how the #[instruction(amount: u32)] attribute is needed to make the amount from the function arguments available to the constraint.
By combining has_one and constraint, the TransferPoints struct becomes a fully self-validating definition of the instruction's security requirements:
#[derive(Accounts)]
#[instruction(amount: u32)] // Make `amount` available to constraints
pub struct TransferPoints<'info> {
    #[account(
        mut,
        has_one = authority,
        constraint = from.points >= amount
    )]
    from: Account<'info, Player>,
    // ...
}
Providing Better Error Messages
When a constraint fails, Anchor returns a specific error. While helpful for debugging, these default errors aren't always user-friendly. You can provide custom errors by adding the @ symbol followed by your error enum variant.
Modifying accounts using different signers
Finally, let's see how to attach our own custom errors to these constraints, which is crucial for building good client-side experiences.
Read the section "Adding custom error messages to Anchor constraints". This short section demonstrates the clean @ syntax for both the has_one and constraint attributes.
Here is the final, fully-featured TransferPoints struct with custom errors:
#[derive(Accounts)]
#[instruction(amount: u32)]
pub struct TransferPoints<'info> {
    #[account(
        mut,
        has_one = authority @ Errors::SignerIsNotAuthority,
        constraint = from.points >= amount @ Errors::InsufficientPoints
    )]
    from: Account<'info, Player>,

    #[account(mut)]
    to: Account<'info, Player>,

    authority: Signer<'info>,
}

#[error_code]
pub enum Errors {
    #[msg("The signer is not the authority for this account.")]
    SignerIsNotAuthority,
    #[msg("Insufficient points for this transfer.")]
    InsufficientPoints
}
This code is now exceptionally clear. The security rules are not buried in imperative code; they are declared right alongside the accounts they protect.
Conclusion
In this lesson, you've learned how to implement the most critical security checks in an Anchor program. By moving beyond basic signer and mut checks, you can now build robust, multi-user applications where data access is properly controlled.
Here are the key takeaways:
- The Authority Pattern is a fundamental security concept where you store an authorized public key inside a data account.
- The
has_oneconstraint is Anchor's declarative way to enforce the authority pattern, automatically checking that a signer's key matches the authority field in an account. - The
constraintattribute provides a powerful way to add any custom business logic check directly into theAccountsstruct. - Using the
@symbol allows you to attach custom errors to your constraints, making your program easier to debug and use.
You have now mastered the core components of Anchor's account validation system. This strong security foundation is essential as we move on to more complex topics.
In the next lesson, we will explore Cross-Program Invocations (CPIs). You will learn how your program can call other programs on the Solana blockchain, such as using the System Program to create accounts or transfer SOL. The validation skills you've acquired here will be crucial for ensuring those calls are made safely and securely.
Can't find a good explanation? Sign up and we'll make it for you
Sign up