
Hello again. In the last lesson, you learned that repeated reaching, twisting, and leaning are usually signs that the workspace needs adjustment, not that you should force your body into a difficult position. A well-arranged tray is one of the simplest ways to protect neutral posture while making the procedure smoother.
This lesson applies that idea to a basic procedure setup. You will learn to organize a tray and nearby dental-unit items so that instruments appear in a predictable sequence of use, frequently needed items are easy to reach, and the workspace remains clear rather than crowded. The aim is not to memorize one universal tray layout. Individual offices, providers, and procedures differ. The aim is to use a reliable organizing method and then follow your practice’s approved setup protocol.
Think in workflow, not in a pile of instruments
A tray is not simply a place to put instruments. It is a physical plan for the procedure.
When an operator begins treatment, they generally need instruments in a recognizable progression:
- Assessment and access: Instruments used to examine, see, retract, or place small items.
- Procedure-specific work: Instruments and supplies that perform the main clinical task.
- Finishing and verification: Items used to refine, check, or complete the treatment.
A basic tray therefore answers three questions:
- What will be used first?
- What will be used repeatedly?
- What must be available later without cluttering the immediate work area?
The Safco Dental Supply guide calls this general flow diagnostic instruments, procedure-specific instruments, and finishing or accessory items. Its central recommendation is to arrange the tray in the order instruments will be needed.
Dental Tray Setups Complete Guide | Safco Dental Supply
Read the opening “Understanding the Basics of Dental Tray Setup” section from Safco Dental Supply. It introduces the core categories used to organize a basic tray and several practical safety principles.
In “Understanding the Basics of Dental Tray Setup,” read from the core framework. Focus on the three instrument categories, the idea of placing items in procedural order, and the guidance on keeping sharp ends directed inward. Treat the specific instrument list as a general example; your clinic’s approved setup and the provider’s preferences determine the exact contents.
The phrase “left to right” is common in tray-set-up teaching because it gives beginners a consistent visual direction. But do not treat left-to-right as a rigid rule. A tray may be arranged differently because of the operator’s handedness, the tray position, a cassette design, or office protocol. What must remain consistent is the sequence and accessibility: the next likely item should be easier to locate than an item needed much later.
Read the tray as four working areas
The procedure tray image below shows a useful approach: divide the tray into clear sections rather than scattering instruments and supplies wherever there is open space.
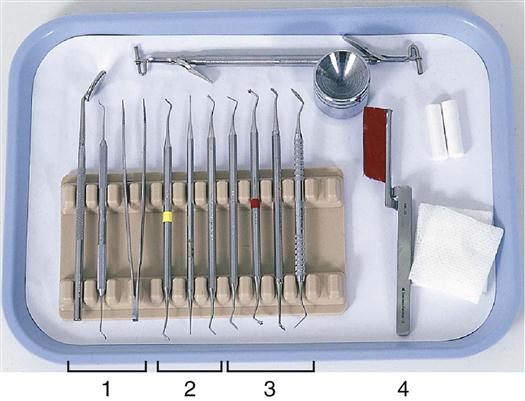
For a basic setup, use four practical areas:
| Tray area | Typical contents | Why it belongs there |
|---|---|---|
| 1. Diagnostic / initial instruments | Mirror, explorer, cotton pliers; probe when required | These are commonly needed at the beginning and may be used again during the procedure. |
| 2. Main procedure instruments | Instruments specific to the planned procedure, such as an excavator, placement instrument, or restorative hand instruments | Keeping the main working group together supports fast, predictable transfers. |
| 3. Finishing and verification items | Articulating paper and holder, finishing instruments, floss, polishing items, or other procedure-dependent items | These are usually needed after the central treatment step, so they should not obstruct the early sequence. |
| 4. Auxiliary supplies | Gauze, cotton rolls, topical products, matrix components, disposable tips, or other approved materials | Supplies should be organized, visible, and available without mixing loosely with sharp reusable instruments. |
This is a mental map, not a fixed instrument inventory. A simple examination setup will have few procedure-specific and finishing items. A composite restoration may require a larger middle section. A surgical tray is organized differently because sterile technique and sharps management become much more prominent.
A good setup is therefore both standardized and adaptable:
- Standardized enough that you can find an item without searching.
- Adaptable enough that you add only what the planned procedure and provider require.
Build the tray from the treatment plan
Before opening instruments or collecting materials, identify the procedure. A tray assembled for a basic examination is not the same as a tray for a restoration, and a posterior composite is not identical to an anterior composite.
Use this brief planning sequence:
-
Confirm the planned procedure and tooth or area.
This determines the core tray, special instruments, and likely materials. -
Check the provider’s preferences.
Providers may differ in instrument order, matrix system, rotary sequence, material brands, and preferred backup items. A preference card or standardized office template is useful, but direct clarification is better than guessing. -
Start with the standard tray or cassette.
A cassette helps maintain order from processing through setup. If loose instruments are used, reproduce the approved office arrangement each time. -
Add only procedure-specific items.
For example, a restoration may require matrix components, composite instruments, and finishing supplies. Do not place every possible item on the tray “just in case.” -
Separate later-use items from immediate-use instruments.
Articulating paper, floss, or polishing materials should be easy to access later but should not cover the mirror or main working instruments.
The principle is anticipation without overcrowding. An overly sparse tray causes interruptions; an overloaded tray makes it hard to see what is present, increases searching, and can create transfer and contamination risks.
An example: sequence for a basic composite restoration
A composite tray is a useful example because it makes the workflow visible. The exact instruments and materials will vary by tooth, restorative system, and operator preference, but the overall sequence remains logical.
The Composite Tray Set-up video demonstrates that sequence: examination instruments appear first, followed by hand-cutting and restorative instruments, then auxiliary items and materials.
Watch Stephanie Derfus’s “Composite Tray Set-up” for a visual example of arranging a restorative tray by the order in which the operator is likely to need items. Notice that the presenter emphasizes both sequence and provider preference.
Watch the setup overview to see the overall sequence: examination tools first, then procedure instruments, restorative equipment, and auxiliary items. Then watch the materials tray to see how etchant, adhesive, composite, shade selection, and preparation and finishing burs can be grouped by their roles. The video is an example of a composite setup, not a substitute for your specific clinic’s tray standard.
A simplified sequence might look like this:
| Phase of treatment | Tray or workspace preparation |
|---|---|
| Examination | Mirror, explorer, cotton pliers |
| Tooth preparation | Required hand instruments and the planned rotary setup, according to the provider’s directions |
| Isolation and contour control | Cotton products or isolation items; matrix system and wedges when indicated |
| Restoration | Placement and contouring instruments; required liner or restorative materials |
| Finishing and check | Finishing items, articulating paper, floss, and polishing products as indicated |
Notice what this table does not say: it does not claim every composite procedure needs every listed item. A matrix system, liner, finishing strip, or particular bur may or may not be needed. Your responsibility is to verify the plan and prepare the approved items in a usable sequence.
Arrange the dental-unit workspace, not only the tray
The tray is only one part of the setup. The dental-unit workspace includes equipment that must be reached quickly during treatment:
- High-volume evacuation and saliva ejector
- Air-water syringe
- Handpieces and their attachments as indicated
- Curing light when a light-cured material is planned
- Materials that must remain protected but available
- The tray, cart, or delivery surface itself
Position these items to support the assistant’s working position. In practical terms, that means no repeated backward reaches, no twisting toward a distant counter, and no tubing that pulls the hand away from the body.
The Magnadent operatory setup guide makes the same connection between efficiency and ergonomics: keep frequently used items close to the working side, pre-position equipment, and avoid unnecessary clutter.
How to Set Up a Dental Operatory Like a Pro | Magnadent
Read the relevant steps from Magnadent’s operatory setup guide to connect tray organization with the positioning of suction, the air-water syringe, handpieces, materials, and the final readiness scan.
Read “Step 1: Review the Procedure Before Setting Up” through “Step 5: Confirm Suction and Evacuation Systems,” beginning at the preparation steps. Then continue through “Step 8: Perform a Final Setup Check,” from the final setup scan. Focus on the recurring ideas: know the planned procedure, arrange items in use order, keep common items near the working side, and keep only necessary items on the immediate work surface.
Place items by frequency of use
A useful decision rule is to classify each item by how often you expect to use it.
- Immediate, repeated-use items belong closest to the assistant’s active work area. Examples include evacuation, the air-water syringe, gauze, and commonly transferred instruments.
- Next-phase items remain on the tray or a nearby organized surface, clearly visible but not in the way.
- Backup supplies belong in a designated drawer, cabinet, or backup area according to office procedure. They should be available, but they do not belong on the active tray unless the procedure is likely to require them.
This solves two problems at once. It shortens retrieval time and reduces the awkward reaching that you identified in the previous lesson as an ergonomic warning sign.
Keep the field clear and materials protected
A tray should look intentional rather than full. Avoid:
- Stacking instruments on top of each other.
- Covering small instruments with gauze or packaging.
- Leaving loose, ungrouped supplies scattered around the tray.
- Placing sharps where someone may reach across them.
- Opening materials too early if doing so compromises their protection, working time, or the office’s infection-control protocol.
In later modules, you will study barriers, aseptic technique, and operatory turnover in detail. For now, keep the foundational distinction clear: an efficient setup is not merely fast. It is orderly, minimizes unnecessary contact and movement, and follows the practice’s infection-control and manufacturer instructions.
Use a consistent setup loop
Efficiency begins before the patient is seated. Rather than making repeated trips for individual items, collect needed supplies in a planned pass through the operatory and supply areas. The Smart DA School demonstration shows a basic setup in which the assistant gathers disposable items together before organizing the chairside area.
Watch this portion of Smart DA School’s “Dental Treatment Room Set Up” to see an example of collecting standard disposable supplies as a group before arranging the work area.
Watch the supply gathering. Focus on the planning habit: identify the standard disposable items needed for the appointment, gather them together, and organize them before treatment begins. The precise quantity of barriers, tips, gauze, and cotton products is specific to the demonstrated school setup; always follow your own clinic’s procedure and infection-control protocol.
A practical setup loop has five stages:
- Review the schedule, treatment plan, and provider preferences.
- Gather the approved tray, instruments, materials, and disposables in one organized collection step.
- Arrange the tray by sequence of use and separate auxiliary supplies from hand instruments.
- Position unit equipment so that frequently used items can be reached without twisting or overreaching.
- Scan the completed setup before the patient enters: complete, ordered, accessible, and uncluttered.
This loop is more reliable than relying on memory during a busy appointment. It also prepares you for the next lesson, where you will perform a more detailed pre-procedure check of the chair and clinical equipment.
A quick chairside self-check
Before seating the patient, pause for a brief visual scan. Ask:
- Is the tray matched to the planned procedure, not just a generic setup?
- Are diagnostic instruments positioned first and procedure-specific instruments grouped logically?
- Are finishing items present but separated from the immediate working group?
- Are frequently used supplies and equipment within a comfortable reach zone?
- Are suction, air-water syringe, handpieces, and other required equipment positioned according to office protocol?
- Is the tray free of unnecessary clutter?
- Can you identify the next likely instrument or supply without moving other items first?
- Have you confirmed any special materials, sizes, shades, or provider preferences?
If the answer to one of these questions is no, correct it before treatment starts. A ten-second review is much easier than interrupting a procedure to search for an item.
Key takeaways
An efficient procedure tray is organized around the clinical sequence, not around where empty space happens to be. Begin with diagnostic instruments, group the procedure-specific working instruments, place finishing items later in the layout, and keep auxiliary supplies organized and accessible.
For the dental-unit workspace, keep frequently used items close, position equipment to prevent twisting and overreaching, and avoid placing backup supplies on the active tray. Use the same approved arrangement consistently, while adapting the exact instruments and materials to the procedure and the provider’s preferences.
Next, you will build on this setup by learning a systematic pre-procedure check of the dental chair, light, suction, air-water syringe, and required supplies.
Can't find a good explanation? Sign up and we'll make it for you
Sign up