Hello! Welcome back.
Introduction
In our last lesson, we explored Envoy, a proxy designed for modern, dynamic, cloud-native environments. We learned its core architectural concepts—Listeners, Filters, and Clusters—and configured basic path-based routing.
Today, we return to nginx to master a fundamental performance optimization technique crucial for any high-load system. We will address the learning outcome: Configure nginx upstream connection pooling and analyze its impact on latency and resource utilization.
Establishing new connections, especially with TLS, is computationally expensive. For the high-throughput, low-latency systems you build, reusing connections is not just an optimization; it's a necessity. This lesson will cover the "why" (the overhead of connections), the "how" (the specific nginx directives), and the "impact" (analyzing performance metrics to quantify the benefits).
1. The Cost of Connections and the Pooling Solution
Before we configure anything, let's establish why this matters. Every time nginx proxies a request to an upstream server without connection pooling, it typically opens a new TCP connection. This involves a three-way handshake (SYN, SYN-ACK, ACK). If the connection is over TLS/SSL, a much more expensive TLS handshake follows, involving multiple round trips and cryptographic computations.
In a high-load scenario, this constant churn of creating and tearing down connections introduces significant latency and consumes substantial CPU resources on both nginx and the upstream servers.
The solution is to maintain a pool of warm, ready-to-use connections. When a new request arrives, nginx can grab an idle connection from its pool, send the request, and return the connection to the pool once the response is received. This is known as upstream connection pooling or using keepalive connections.
This diagram illustrates the concept. Each nginx worker process maintains its own cache of idle connections to upstream servers, ready to be reused for new requests.
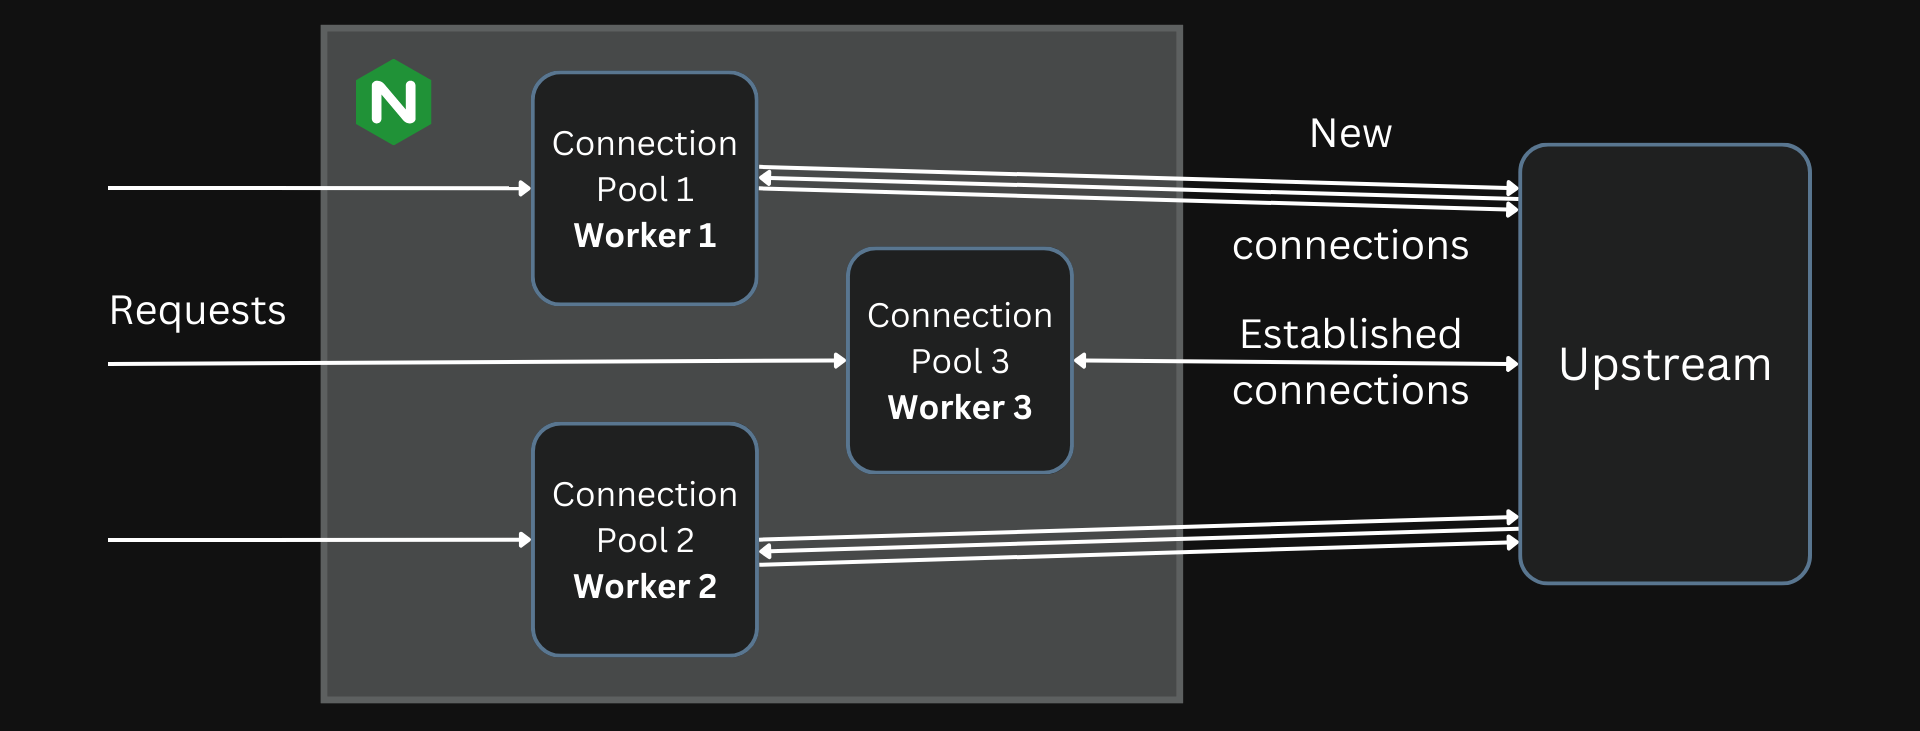
To understand the performance implications in more detail, let's start with a brief reading.
Troubleshooting Application Performance and Slow TCP ...
The NGINX blog post 'Troubleshooting Application Performance and Slow TCP ...' provides an excellent introduction to why keepalive connections are critical for performance, especially when using SSL/TLS.
Please read the 'Introduction to Keepalive Connections' and 'NGINX Keepalive Directive and its Benefits' sections. Focus on the explanation of the overhead associated with creating new connections and the benefits of reusing them, such as reducing the number of sockets in a TIME-WAIT state.
2. Configuring Upstream Connection Pooling
Now that we understand the "why," let's focus on the "how." Configuring upstream keepalives in nginx requires a few specific directives working together. The primary directive is keepalive, located within an upstream block.
For the definitive guide on these directives, we'll turn to the official nginx documentation.
Module ngx_http_upstream_module
The official documentation for the ngx_http_upstream_module is the source of truth for all related directives. We will focus on the keepalive directive and its associated parameters.
Please read the sections for the following directives: keepalive: Pay close attention to the connections parameter and the example configuration for HTTP. Note the requirement to set proxy_http_version and clear the Connection header. keepalive_requests: Understand its role in recycling connections to manage memory. keepalive_timeout: Learn how it controls the idle timeout for pooled connections.
Based on the documentation, here is a complete and correct configuration for enabling keepalive connections to an HTTP upstream:
# Define the group of upstream servers
upstream backend_service {
    server 10.0.0.101:80;
    server 10.0.0.102:80;

    # Activates the cache for connections.
    # Each worker process will keep up to 32 idle connections open.
    keepalive 32;
}

server {
    listen 80;

    location / {
        proxy_pass http://backend_service;

        # These two directives are ESSENTIAL for HTTP keepalives.
        # 1. Use HTTP/1.1, which supports persistent connections.
        proxy_http_version 1.1;

        # 2. Clear the 'Connection' header to prevent nginx from sending
        #    'Connection: close' to the upstream.
        proxy_set_header Connection "";

        # Other headers you would typically pass
        proxy_set_header Host $host;
    }
}
Key Configuration Points:
keepalive connections;: This is the master switch. It enables the connection pool and sets the maximum number of idle keepalive connections per worker process. This value should be large enough to handle bursts of traffic but not so large that it exhausts memory or file descriptors on the nginx server.proxy_http_version 1.1;: HTTP/1.1 is the first version of the protocol where keep-alive is the default behavior. This directive is mandatory.proxy_set_header Connection "";: This is a crucial and often overlooked step. By default, nginx sends aConnection: closeheader in requests to upstream servers. This directive removes that header, signaling to the upstream server that it should keep the connection open after sending its response.keepalive_timeout: (Default:60s) Sets how long an idle connection remains in the pool before being closed. This should be balanced with the upstream server's own keepalive timeout to prevent attempts to use a connection that the upstream has already closed.keepalive_requests: (Default:1000) Sets the maximum number of requests that can be served over a single keepalive connection. This is a practical measure to prevent potential memory leaks or resource issues in long-lived connections by forcing them to be periodically recycled.
3. Analyzing the Performance Impact
Configuring connection pooling is only half the battle. You need to verify its impact. In a high-load environment, the difference is not subtle.
We will now analyze a case study that benchmarks performance with and without keepalives. The key metrics to watch are:
upstream.connect.time: The time it takes to establish a connection with the upstream server. With effective pooling, this should drop to zero for most requests.upstream.request.count: The number of requests per second (throughput). This should increase significantly as the connection overhead is removed.upstream.response.time: The time from sending the request to receiving the full response. This should become lower and more consistent.
Let's return to the NGINX blog post, which provides clear data from a load test.
Troubleshooting Application Performance and Slow TCP ...
This reading focuses on the results of a load test comparing a system with and without upstream keepalives. The performance graphs vividly illustrate the benefits.
Please read the section 'Test Results Under Load'. Focus on the two graphs comparing metrics for the heavily loaded server. Analyze the dramatic differences in upstream.connect.time and upstream.request.count between the two scenarios.
Analysis of Results
As the case study demonstrates, enabling keepalives on a heavily loaded server yields dramatic improvements:
-
Connection Time Annihilated: The
upstream.connect.timefor the median and 95th percentile requests drops to zero. This is the most direct proof that connections are being reused, as the TCP/TLS handshake is skipped entirely for most requests. You may still see occasional non-zero values when the pool needs to grow or a connection is recycled. -
Throughput Skyrockets: The blog post reports a nearly five-fold increase in
upstream.request.count. By eliminating the connection setup latency for each request, nginx and the upstream can spend their time processing actual application logic, leading to a massive increase in system capacity. -
Latency Becomes More Consistent: By removing the variable and significant latency of the handshake process, the overall
upstream.response.timebecomes more predictable, reducing high-percentile latency (tail latency).
Resource Utilization Trade-off
The primary trade-off is performance versus resource consumption.
- Benefit: Drastically reduced latency and CPU usage on both nginx and upstream servers.
- Cost: Increased memory usage on nginx to maintain the pool of idle connections. Each idle connection holds a file descriptor and associated kernel memory buffers.
The keepalive parameter is your control knob for this trade-off. It should be tuned based on the expected traffic patterns and available system memory. For a system handling thousands of requests per second, a keepalive value in the hundreds might be appropriate, whereas a smaller system might only need a few dozen.
Conclusion
In this lesson, we moved from theory to practice in optimizing one of the most critical paths in a distributed system: the connection between the proxy and the upstream service.
Key Takeaways:
- Connection Overhead is High: New TCP and especially TLS handshakes are a major source of latency and CPU load in high-throughput systems.
- Connection Pooling is the Solution: Nginx's
keepalivefunctionality allows it to maintain a cache of warm connections to upstream servers, eliminating handshake overhead for most requests. - Configuration is Precise: Enabling HTTP keepalives requires a specific combination of directives:
keepalivein theupstreamblock,proxy_http_version 1.1, andproxy_set_header Connection "". - Impact is Measurable and Significant: The benefits are clearly visible in metrics like
upstream.connect.time(which drops to near zero) andupstream.request.count(which increases substantially).
Preview of the Next Lesson:
We have just optimized our upstream connections for speed and efficiency. But what happens when an upstream service becomes slow or unresponsive? Our next lesson, "Configure proxy timeouts in nginx and analyze their effect on system resilience and user experience," will address this. We will learn how to configure timeouts to fail fast, prevent cascading failures, and protect the user experience when backend services misbehave.