
Good scene organization is a small habit with a large payoff. Your Core Escape Greybox now has visible geometry, collision, and a physics probe; the next task is to make its structure readable before the scene becomes crowded.
In the previous lesson, you built Test Floor, four walls, Pillar, Angled Barrier, Core Marker, and Drop Probe. Today you will arrange those entities into meaningful groups, retain their existing world positions, and use names that make the purpose of each object obvious. This is the same scene-management discipline that prevents a prototype from becoming difficult to edit, debug, or extend.
The Hierarchy is the scene’s map
Every object in a PlayCanvas scene is an entity. An entity has a name and a transform: its position, rotation, and scale. The Hierarchy panel displays every entity in a tree, starting with the scene’s Root entity.
A parent-child relationship means that a child is attached structurally to a parent. The parent’s transform is applied to its children. So if you move or rotate a parent entity, its children move or rotate with it.
That is useful when the relationship represents a genuine whole:
- A character’s hand belongs under its arm.
- A set of walls belongs under an environment group.
- Several interface panels belong under a UI group.
- A rotating collectible’s visible mesh may belong under a single collectible entity.
It is less useful to parent one object simply because it happens to be nearby. A wall should not become the parent of another wall. Instead, both should be children of a shared Walls group.
Read the official PlayCanvas documentation before editing your scene. It establishes what the Hierarchy displays, how reparenting works, and a useful caution about scale.
Hierarchy Panel | PlayCanvas Developer Site
Read “Hierarchy Panel” from the official PlayCanvas Developer Site to understand the editor’s tree structure before restructuring your greybox.
In the opening overview, read the panel overview. Then read the full “Organizing the Hierarchy” section, beginning with parent transforms. Focus especially on the fact that dragging an entity to a new parent normally preserves its world-space position, rotation, and scale. Finally, in “Searching the Hierarchy,” read the search explanation; clear names make this tool genuinely useful.
A key distinction is between an entity’s world transform and its local transform:
- Its world transform is where it appears in the overall scene.
- Its local transform is its position, rotation, and scale relative to its parent.
When you reparent an entity by dragging it in PlayCanvas, the editor normally preserves its world transform. In practical terms, the object should remain visually in place, even though it has acquired a new parent in the Hierarchy. That makes it safe to organize the greybox without rebuilding it.
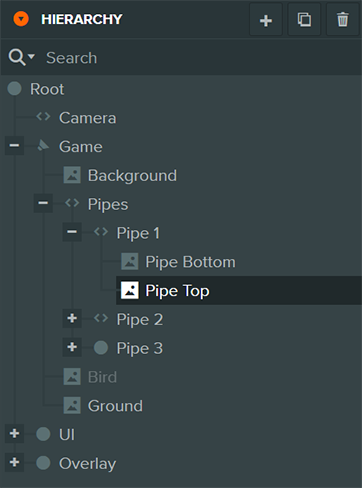
The PlayCanvas Hierarchy panel image shows an important pattern: broad groups such as Game, UI, and Overlay sit high in the tree, while specific objects such as Pipe Top sit lower. The organization answers two questions quickly: “Where is this object?” and “What is it for?”
Choose names and groups based on game meaning
A hierarchy should describe the game, not merely the shapes used to build it. “Box 4” tells you how something was created; North Wall tells you what it does. This becomes especially important once scripts, UI, collectibles, and hazards arrive.
Use these naming rules for this prototype:
-
Name an entity for its role.
Use Test Floor, not Box; Drop Probe, not Sphere. -
Add location or direction when several entities share a role.
Use North Wall, South Wall, East Wall, and West Wall. -
Use plural names for group entities.
Use Walls, Obstacles, and Landmarks. -
Keep one convention consistently.
Your current names use capitalized words with spaces. Continue that convention rather than mixing formats such as north_wall, WALL2, and Wall-East. -
Do not encode temporary editor details in a name.
A name such as Blue Box Near Center Final will become wrong as soon as you recolor, move, or revise the object.
Here is a useful comparison:
| Unclear name | Clear replacement | Why it is better |
|---|---|---|
| Box | Test Floor | States the object’s gameplay purpose. |
| Cube 2 | Pillar | Identifies a landmark and obstacle. |
| Wall 1 | North Wall | Identifies both type and direction. |
| Sphere | Drop Probe | Explains that it is a physics-testing tool. |
| Empty | Obstacles | Explains the purpose of its child group. |
For the current greybox, aim for this structure:
Root
  Camera
  Directional Light
  Environment
    Test Floor
    Walls
      North Wall
      South Wall
      East Wall
      West Wall
    Obstacles
      Pillar
      Angled Barrier
    Landmarks
      Core Marker
  Test Objects
    Drop Probe
Your scene may have a slightly different light name, or it may include other default entities. That is fine. The important part is the structure below Environment and Test Objects.
Notice the design logic:
- Environment contains the static physical space the player will move through.
- Walls is a subgroup because the four wall entities form one conceptual boundary.
- Obstacles contains objects that block movement inside the room.
- Landmarks contains a visual point of interest. Core Marker is not an obstacle yet, so it does not belong under Obstacles.
- Test Objects separates temporary development tools, such as Drop Probe, from the actual playable space.
This distinction will help later: deleting or disabling a testing object will not risk removing a part of the level.
Reorganize Core Escape Greybox
Open your saved Core Escape Greybox scene. Before changing the tree, launch it once and confirm that Drop Probe still falls and rests on Test Floor. This gives you a baseline: if anything later behaves unexpectedly, you know the scene worked before the reorganization.
1. Create the group entities
Create five empty entities. Empty entities need no Render, Collision, or Rigid Body components; their purpose is organization.
Create and name them:
- Environment
- Walls
- Obstacles
- Landmarks
- Test Objects
Use the Hierarchy panel’s add-entity control or its context menu. Create Environment and Test Objects as children of Root. Then create Walls, Obstacles, and Landmarks as children of Environment.
For every group entity, keep the transform at its default:
| Group | Position | Rotation | Scale |
|---|---|---|---|
| Environment | |||
| Walls | |||
| Obstacles | |||
| Landmarks | |||
| Test Objects |
This matters because Pillar and Angled Barrier use non-uniform scale. Keeping their new parents unrotated and at scale avoids confusing transform combinations. For now, treat group entities as organizational containers, not as objects to move or scale.
2. Reparent the existing entities
In the Hierarchy, drag each existing object onto its intended group:
| Entity | New parent |
|---|---|
| Test Floor | Environment |
| North Wall | Walls |
| South Wall | Walls |
| East Wall | Walls |
| West Wall | Walls |
| Pillar | Obstacles |
| Angled Barrier | Obstacles |
| Core Marker | Landmarks |
| Drop Probe | Test Objects |
When dragging, wait until the intended parent row is visibly highlighted, then release. The child should appear indented underneath its new parent.
After each reparenting action, look in the viewport. The object should stay where it was. If it visibly jumps, press Undo and check that you dropped it onto the target entity rather than merely above or below it in the list.
Use this short demonstration from Daniel Wood to see the parent-child workflow in action.
PlayCanvas Tutorial 1 - Getting started with PlayCanvas
Watch “PlayCanvas Tutorial 1 – Getting started with PlayCanvas” by Daniel Wood for a visual demonstration of nesting an entity beneath another entity in the Hierarchy.
Watch the parenting demonstration. Focus on the moment the sphere is dragged onto the box in the Hierarchy, then observe that moving the box moves both entities while moving the sphere affects only the sphere.
3. Verify the hierarchy, not only the viewport
Expand Environment, Walls, Obstacles, and Landmarks using the disclosure controls beside their names. Your tree should match the planned structure.
Then test two safe checks:
- Select Walls. Its four wall children should highlight as part of the selected group in the Hierarchy, while the group itself has no visible geometry.
- Select Drop Probe and confirm that its Collision and Dynamic Rigid Body components are still attached. Parenting it under Test Objects organizes it; it does not remove its components.
Do not move Environment, Walls, or Test Objects in this lesson. A parent transform would move all descendants together, which is powerful when intentional but makes it harder to confirm that your collision test room still matches its original layout.
4. Test the organization with search
Use the Search field at the top of the Hierarchy panel:
- Search wall and confirm that the four walls are easy to find.
- Search probe and confirm that Drop Probe appears.
- Search marker and confirm that Core Marker appears.
This is a quick test of whether your names communicate purpose. If you cannot predict what search term would find an entity, improve its name now.
Finally, save the scene and launch it again. Drop Probe should still fall, collide with the floor, and remain inside the room. A hierarchy change alone should not change that behavior because the organizational parents were left at their default transforms.
What parent-child relationships are for
It helps to make parenting decisions using one question:
“If I moved, rotated, or disabled this parent, should these children be affected together?”
For the current scene:
| Parent | Why its children belong together |
|---|---|
| Environment | They are parts of the playable physical space. |
| Walls | They form one perimeter boundary. |
| Obstacles | They block routes within the room. |
| Landmarks | They help players recognize a location without acting as physical barriers. |
| Test Objects | They are development aids rather than level content. |
This same reasoning protects you from two common beginner mistakes.
Mistake 1: Parenting because two objects touch visually.
The pillar might stand on the floor, but it should not be a child of Test Floor. The two objects are independently meaningful: one is the ground surface and one is an obstacle. They only share the broader Environment parent.
Mistake 2: Using a transformed parent as a folder.
A group entity is still an entity. If you scale Walls wider or rotate Environment, all descendants inherit that change. This can be desirable for a carefully constructed prefab-like object, but it is not a substitute for editing the correct individual wall or obstacle.
One extra benefit will matter soon: disabling a parent also disables its children. Later, an organized group can make it easier to turn a whole category of scene content on or off deliberately. For now, simply recognize that hierarchy is not cosmetic; it controls behavior as well as visibility and selection.
Completion check
Before moving on, confirm that:
- Your scene contains group entities named Environment, Walls, Obstacles, Landmarks, and Test Objects.
- Test Floor is directly inside Environment.
- All four directional wall entities are children of Walls.
- Pillar and Angled Barrier are children of Obstacles.
- Core Marker is a child of Landmarks.
- Drop Probe is a child of Test Objects.
- All organizational parent entities have default transforms.
- Existing object positions, rotations, scales, Collision components, and Rigid Body components remain intact.
- Searching wall, probe, and marker finds the expected entities.
- The project is saved and the physics probe still behaves correctly when launched.
Key takeaways
The Hierarchy panel is a structural map of the scene. Parent entities affect their children, so a parent-child relationship should represent a meaningful unit that you may want to move, rotate, disable, or manage together.
You organized the greybox into Environment, Walls, Obstacles, Landmarks, and Test Objects, while retaining clear role-based names for individual entities. Keeping group transforms at their defaults makes this organizational structure safe for the existing physics setup.
Next, you will begin the JavaScript foundations needed to make the scene respond over time: attaching a PlayCanvas script to an entity and distinguishing one-time setup from per-frame behavior.
Can't find a good explanation? Sign up and we'll make it for you
Sign up