
Welcome back. Your prototype has a deliberately small purpose: test whether collecting three energy cores and escaping through an unlocked exit creates satisfying exploration and route choices. The scope is now clear; today you create the browser-based workspace where that idea will become a playable 3D greybox.
By the end of this lesson, you will have a saved PlayCanvas project named for your prototype and be able to identify the editor areas you will use throughout the course. You are not building the level yet—that begins next lesson. First, establish a clean, reliable project home.
A PlayCanvas project is the home for your game
A PlayCanvas project is the online container for your game. It holds scenes, entities, materials, scripts, 3D models, textures, and later versions of the playable build. Since PlayCanvas runs in the browser, this suits your Chromebook workflow: there is no engine installation or local project folder to manage before you begin.
For the moment, distinguish three terms:
| Term | Meaning in your prototype |
|---|---|
| Project | The complete game workspace: Core Escape Greybox. |
| Scene | One game environment within the project, such as your future playable level. |
| Entity | An individual object in a scene: a wall, camera, energy core, light, or player. |
A project can eventually contain multiple scenes—for example, a title screen and a game level—but your first prototype needs only one playable scene. Keep that simplicity in mind whenever the editor presents many options.
Before creating your project, read the short official instructions. They establish the important point that every PlayCanvas project begins with a starter kit.
Creating Projects | PlayCanvas Developer Site
Read “Creating Projects” from the PlayCanvas Developer Site. It explains the new-project dialog and the starter-kit choice you are about to make.
In “Create a New Project from a Starter Kit”, then the subsection “Selecting a Starter Kit,” read from project setup. Focus on the choices you make before pressing Create: starter kit, project name, description, owner, and visibility. The diagrams may look slightly different from your current browser interface, but the workflow is the same.
Create your prototype project
Open PlayCanvas in Chrome, sign in, and navigate to your Projects page. If PlayCanvas displays an onboarding guide or a sample project, you can close it for now; this course will build your own project step by step.
Choose NEW to open the new-project dialog. It should contain several starter-kit tiles, as illustrated below.

Complete the dialog with these choices:
-
Starter kit: Select Blank Project.
A blank project is appropriate because our immediate goal is a custom top-down collect-and-escape prototype, not a model viewer, VR experience, or first-person shooter. Starting empty also makes every object you add purposeful and easy to understand. -
Name: Enter:
Core Escape Greybox“Greybox” is a useful production label: it signals that this project is focused on gameplay layout and testing, not final art.
-
Description: Enter a short design statement, such as:
A top-down 3D prototype about collecting three energy cores and escaping the ruin.This may feel minor for a solo project, but concise project descriptions are a good professional habit. They help a future collaborator—or future you—remember the project’s intended experience.
-
Owner: Leave your own account selected.
-
Visibility: Choose the setting available to your account that you are comfortable with. The official documentation notes that private-project availability depends on the plan. A public project is still a valid place to learn; avoid publishing personal information in its description or assets.
-
Select CREATE.
After the project is created, you will usually arrive at a project page or dashboard. Select EDITOR to open the PlayCanvas Editor in a new tab.
What “saved” means here
Your project is saved in your PlayCanvas account when it is created; it should appear in your Projects list whenever you sign in. This differs from a traditional desktop program where you first choose a folder and repeatedly save a file yourself.
As you work in the editor, PlayCanvas saves project changes online automatically. Still, develop a useful habit: after an important change, pause briefly before closing the tab, then revisit the Projects page or refresh the editor later to confirm that your project and scene remain available. Verification is safer than assuming a change was recorded.
For this lesson, your save check is simple:
- Return to the Projects page in another tab, or open it after closing the editor.
- Confirm that Core Escape Greybox appears in your project list.
- Reopen it and select EDITOR again.
- Confirm that the scene loads.
Do not download a project file or build a playable release yet. Those are publishing tasks for much later in the course.
Orient yourself: five editor areas
The editor can look dense at first because it combines world-building, asset management, programming, and testing in one browser tab. You only need a functional map of it today.
Watch this focused tour from Daniel Wood’s PlayCanvas Tutorial 1 – Getting started with PlayCanvas. Ignore any temporary sample objects or interface details that differ from your own blank project; concentrate on what each area is for.
PlayCanvas Tutorial 1 - Getting started with PlayCanvas
Watch “PlayCanvas Tutorial 1 – Getting started with PlayCanvas” by Daniel Wood. It gives a practical orientation to the browser-based workflow and the main editor panels.
First watch project creation to reinforce the route from the Projects page into the Editor. Then watch scene navigation for the central scene view, entity creation concept, and left-side tools. Finish with editor panels, focusing on the distinct jobs of the Hierarchy, Assets, and Inspector panels. You do not need to follow the later object-manipulation demonstration yet.
Here is the same workspace divided into practical responsibilities.
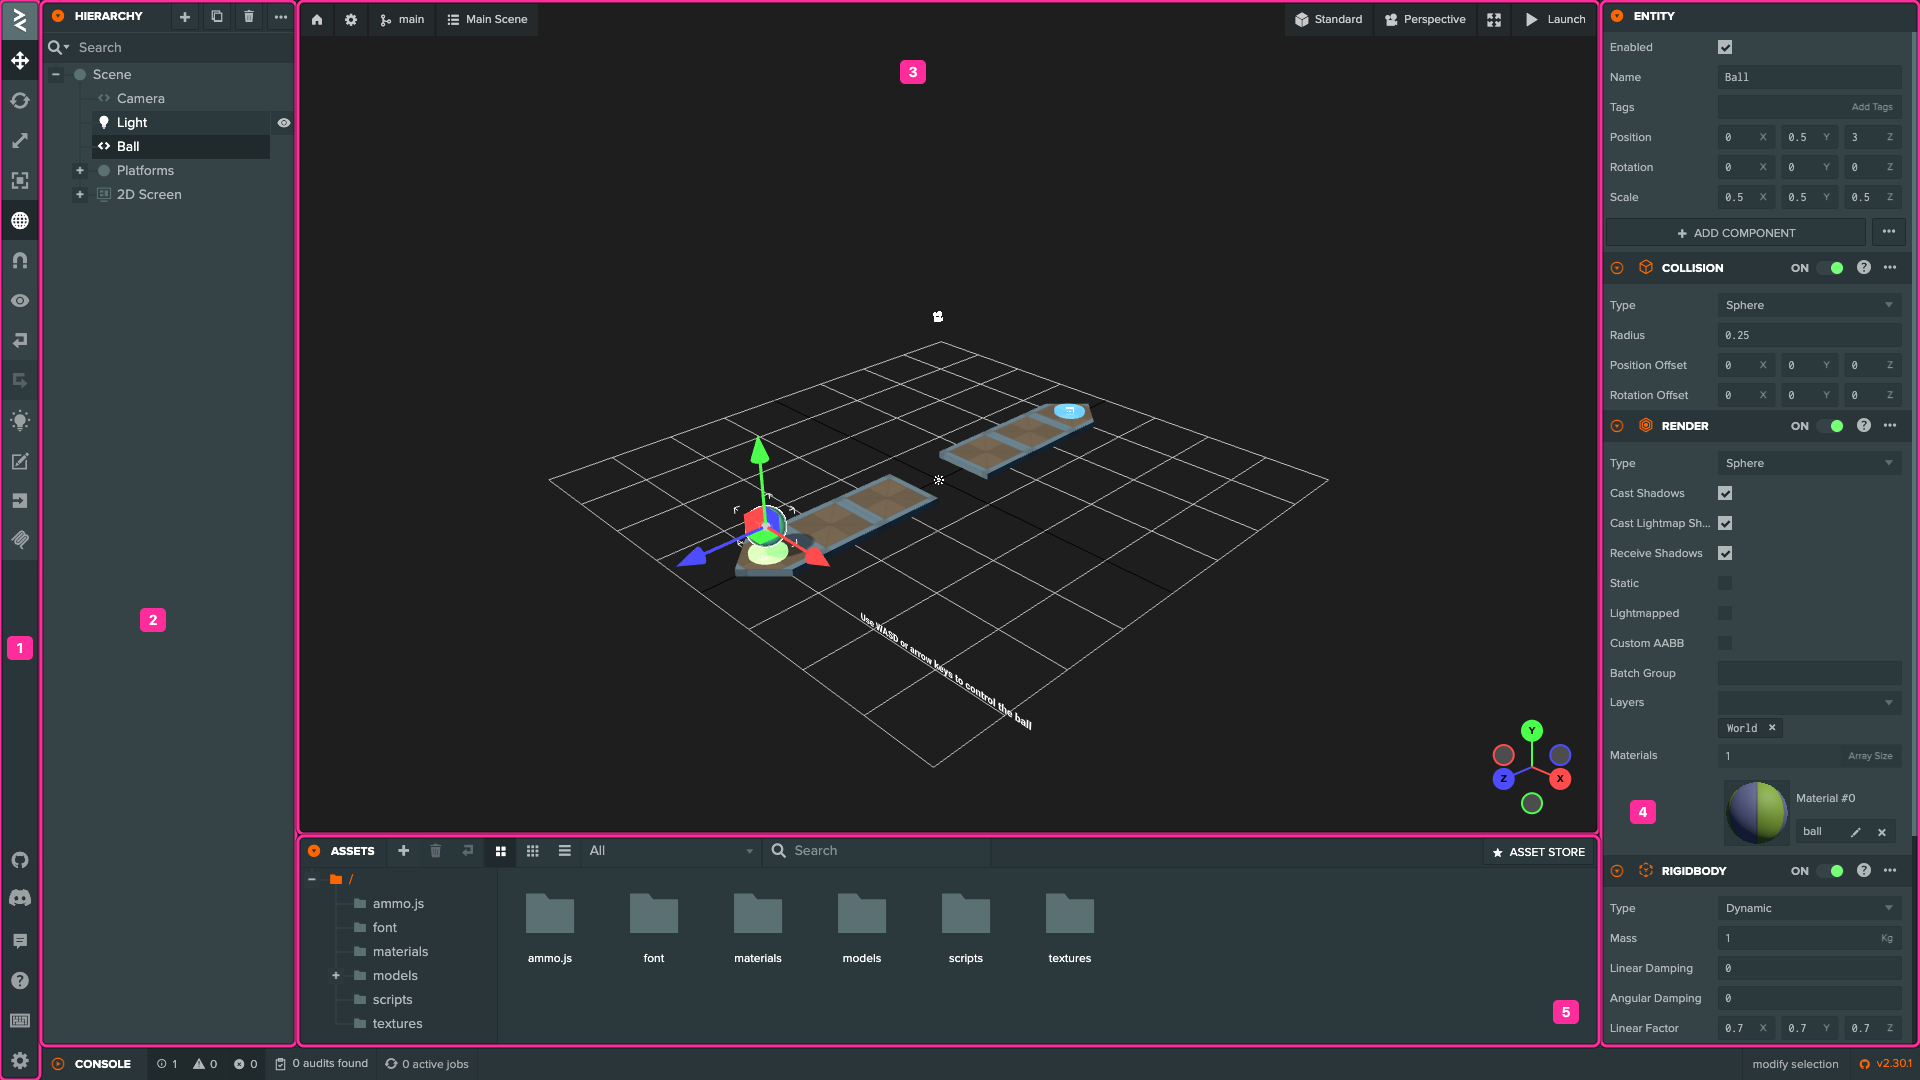
1. Scene View: the 3D workspace
The large central area is the Scene View. This is where you visually arrange the 3D world: floors, walls, energy cores, lights, camera, and later hazards.
At this stage, treat it like a small architectural model of the level. You look around it, select objects, and eventually position them precisely. The Scene View is not necessarily what the player sees; the player’s view will come from the camera entity that you configure later.
You may see a perspective grid. That grid helps you judge position and scale in three dimensions:
- X is left and right.
- Y is up and down.
- Z is forward and backward across the ground plane.
Do not worry about memorizing controls today. Next lesson focuses specifically on positioning, rotating, and scaling primitives. For now, click in the Scene View and notice that it is the place where scene objects are visibly represented.
2. Hierarchy: what exists in the active scene
The Hierarchy panel, usually on the left, lists every entity currently in the open scene. It answers the question:
“What objects are part of this level?”
A camera and light may already appear, depending on the starter kit and current editor setup. Later, this list will contain clearly named items such as:
PlayerFloorWall NorthEnergy Core 1Exit
The Hierarchy is not a folder of files. It is the structure of the currently active scene. Selecting an entity here selects the same object in the Scene View.
3. Inspector: properties of the selected item
The panel on the right is the Inspector. It answers a different question:
“What is this selected item, and how is it configured?”
Click an entity in the Hierarchy. The Inspector changes to show its name, position, rotation, scale, and any attached components. Later, it is where you will configure a wall’s render shape, add collision, adjust a light, and attach scripts.
Click an asset in the Assets panel instead, and the Inspector will show information for that asset. The Inspector is therefore context-sensitive: it displays settings for whatever you have selected.
For now, do not change settings just to see what happens. Exploration is useful, but uncontrolled changes make it harder to know what caused a result. Select, observe, and leave the scene unchanged.
4. Assets: reusable project files
The Assets panel, typically at the bottom, is the project’s library of reusable files. It will eventually contain materials, scripts, textures, audio, and imported 3D models.
The key distinction is:
- An entity exists in one scene as an object in the game world.
- An asset is reusable project content that can be assigned to one or more entities.
For example, you might eventually create one glowing blue material asset and apply it to all three energy-core entities. If you later change the material, all entities using it can update consistently.
Your project may contain few or no custom assets today. That is expected. In early greyboxing, primitive entities and clear gameplay matter more than collected art files.
5. Toolbar and launch controls: editing versus testing
Along the left side of the Scene View, you will find tools for selecting, moving, rotating, and scaling entities. These are editing tools, not player controls. You will use them extensively in the next lesson.
Near the top of the editor, you should also find a Launch or play control. This runs the project in a browser tab so you can test what a player experiences. Building and testing are separate activities:
- In the editor, you construct and configure the game.
- In the launched game, you test the current playable result.
Your scene is not playable yet, so there is no need to launch it today. Knowing where that control is will make the transition less confusing when we add game objects and behavior.
A short first-session routine
Use this routine whenever you return to work on the prototype:
- Open Core Escape Greybox from the Projects page.
- Open the Editor and identify the active scene in the Hierarchy and Scene View.
- Make one purposeful change, rather than experimenting with many unrelated changes at once.
- Check the Inspector to confirm the selected entity or asset is the one you intended.
- Give PlayCanvas a moment to save the change online before closing the tab.
- Launch the game only when there is a specific behavior or layout decision to test.
This routine supports the project-first approach: each editing session should move the collect-and-escape prototype toward a testable design question.
Completion check
Before continuing, ensure all of the following are true:
- Core Escape Greybox appears on your PlayCanvas Projects page.
- Its description refers to collecting three energy cores and escaping.
- You can open the project in the PlayCanvas Editor on your Chromebook.
- You can point to the Scene View, Hierarchy, Inspector, Assets panel, and Launch control.
- You understand that a project contains scenes, and scenes contain entities.
Key takeaways
You now have a saved cloud-based workspace for your first game prototype. A PlayCanvas project contains the full game; a scene is a specific game environment; and entities are the objects that populate that environment.
The editor’s central Scene View lets you construct the 3D world, the Hierarchy lists scene entities, the Inspector exposes the selected item’s settings, and the Assets panel holds reusable files. These areas will become familiar through use rather than memorization.
Next, you will create a few primitive entities and learn to position, rotate, and scale them—your first concrete steps toward the prototype’s 3D greybox.
Can't find a good explanation? Sign up and we'll make it for you
Sign up