
Hello! Welcome back to our course on mastering TanStack Start.
In the previous module, you learned the fundamentals of JWT-based authentication in an SSR context, including how to store a JWT in an HTTP-only cookie and protect routes on the server.
This lesson kicks off Module 4, "Advanced Session Management & Logout." We'll address a critical aspect of robust authentication systems: the trade-off between security and user experience. You'll learn how to modify your authentication process to issue a secure, HTTP-only refresh token alongside the access token. This two-token strategy is the industry standard for building systems that are both secure and user-friendly.
By the end of this lesson, you will understand the role of refresh tokens and be able to implement the server-side logic to generate and issue both access and refresh tokens upon a successful user login.
The Problem: Security vs. User Experience
In our previous setup, we issued a single JWT (an access token) stored in an HTTP-only cookie. A key decision for this token is its expiration time.
- Short Expiration (e.g., 15 minutes): This is great for security. If an access token is somehow compromised, the window of opportunity for an attacker is very small. However, this leads to a poor user experience, as the user would be forced to log in again every 15 minutes.
- Long Expiration (e.g., 30 days): This provides a great user experience, as the user stays logged in for a long time. However, it's a significant security risk. A compromised token would give an attacker long-term access to the user's account.
So, how do we get the best of both worlds? The solution is a two-token system: a short-lived access token and a long-lived refresh token.
The Refresh Token Flow: A High-Level View
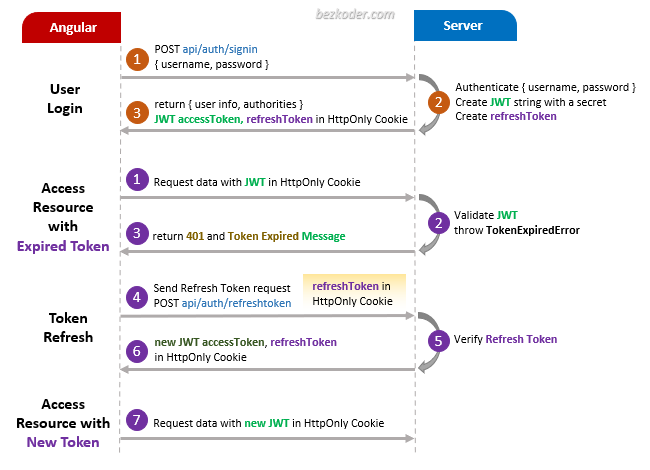
Here's the standard authentication flow using this two-token strategy:
- Login: The user provides their credentials. The server validates them and issues two tokens:
- A short-lived access token (e.g., 15 minutes).
- A long-lived refresh token (e.g., 7 days).
- Accessing Protected Resources: The client sends the access token with every request to a protected API endpoint. The server validates the token and grants access.
- Access Token Expiration: After 15 minutes, the access token expires. When the client tries to use it, the server rejects the request (typically with a
401 Unauthorizedstatus). - Refreshing the Session: The client, seeing the
401error, sends the refresh token to a special/refresh-tokenendpoint on the server. - Issuing New Tokens: The server validates the refresh token. If it's valid, the server generates a new access token and, often, a new refresh token (a technique called refresh token rotation, which we'll cover later). It then sends these back to the client.
- Retrying the Request: The client replaces its expired access token with the new one and automatically retries the original failed request. The user perceives this as a seamless experience, with no interruption.
The diagram below illustrates this entire process. For this lesson, we are focusing on Step 1: The Login & Token Issuance.
To solidify your understanding of why this pattern is so important, please watch the beginning of the following video.
Master Refresh Tokens in ASP.NET Core (building from scratch)
This video, from the Milan Jovanović channel, clearly explains the problem with short-lived access tokens and introduces the refresh token as the solution to improve both security and user experience.
Watch the section 'Introduction to Refresh Tokens and Access Token Expiration' from the beginning until 01:43. Focus on the explanation of the security benefits of short-lived access tokens and how refresh tokens avoid the negative UX impact.
Storing Tokens Securely: A Tale of Two Tokens
Now that we have two tokens, we need a strategy for storing them.
-
Refresh Token: This token is extremely powerful. Anyone who has it can generate new access tokens. Therefore, it must be protected with the highest level of security available in a browser context. As we established in Module 3, this means storing it in a
secure,httpOnly,SameSite=Strictcookie. This prevents it from being accessed by client-side JavaScript, mitigating XSS attacks. -
Access Token: The storage strategy for the access token is more debated, with two common patterns:
- In-memory: The token is stored in a JavaScript variable (e.g., in a React context or state management library). It is sent to the API via the
Authorization: Bearer <token>header. This is the pattern advocated for in many SPAs. - HTTP-Only Cookie: The access token is also stored in an
httpOnlycookie, just like the refresh token. The browser then automatically sends it with every request.
- In-memory: The token is stored in a JavaScript variable (e.g., in a React context or state management library). It is sent to the API via the
For a modern SSR framework like TanStack Start, storing both tokens in httpOnly cookies is a very effective and straightforward pattern. It simplifies logic because both the server (for SSR data loading) and the browser (for client-side fetching) have a consistent way of handling authentication: the cookies are sent automatically.
This article provides a great rationale for using httpOnly cookies for your refresh token.
Part 3/3: How to Implement Refresh Tokens through Http-Only Cookie...
This article from dev.to discusses implementing refresh tokens with HTTP-only cookies in a NestJS and React application. The principles are directly applicable to our TanStack Start context.
Read the sections 'Why Use HTTP-Only Cookies?' and 'Why Not Store Both Access and Refresh Tokens in HTTP-Only Cookies?'. The author argues for keeping the access token out of cookies to prevent CSRF, which is a valid concern. However, with SameSite=Strict cookies, this risk is largely mitigated, making the dual-cookie approach a strong choice for SSR apps.
Implementation: Modifying the Login Process
Let's outline the steps to modify our server-side login function to issue both tokens.
1. Generate Two Types of Tokens
Your login function will now generate two distinct JWTs, signed with different secrets and having different expiration times.
// In your environment variables (.env)
JWT_ACCESS_SECRET="your-super-secret-access-key"
JWT_REFRESH_SECRET="your-even-more-secret-refresh-key"

// In your login server function
import jwt from 'jsonwebtoken';

// ... after validating user credentials

const userPayload = { userId: user.id, role: user.role };

const accessToken = jwt.sign(userPayload, process.env.JWT_ACCESS_SECRET, {
  expiresIn: '15m', // Short-lived
});

const refreshToken = jwt.sign({ userId: user.id }, process.env.JWT_REFRESH_SECRET, {
  expiresIn: '7d', // Long-lived
});
Notice the refresh token's payload is minimal; it only needs to identify the user. It shouldn't contain permission data, as its only purpose is to be exchanged for a new access token.
2. Persist the Refresh Token Server-Side
A critical security practice is to store a reference to the issued refresh token in your database. This gives you the ability to revoke it if you suspect it has been compromised, effectively logging the user out everywhere. Without this, a stolen refresh token would be valid until it expires.
The following video demonstrates this concept clearly. While the implementation is in ASP.NET Core, the data modeling and logic are universal.
Master Refresh Tokens in ASP.NET Core (building from scratch)
Let's return to the 'Master Refresh Tokens' video. This segment shows how to create a database table for refresh tokens and how to generate and save a new one during the login process.
Watch the sections from 01:43 to 06:40. Pay attention to: The properties of the RefreshToken entity (linking it to a user, storing the token value, and an expiry date). The use of a cryptographically strong random number generator for the token value. The process of saving the new refresh token to the database when the user logs in.
In a Node.js/TypeScript context, you would use a library like crypto to generate a secure random string for the refresh token value before storing its hash in the database.
import { randomBytes } from 'crypto';

// This is the value you'd store in the database (ideally hashed)
// and use as the content of the JWT refresh token.
const refreshTokenValue = randomBytes(32).toString('hex');
3. Set Both Tokens as HTTP-Only Cookies
Finally, you'll use your server framework's response object to set both cookies. In TanStack Start, server functions have access to a Web standard Response object, but the principle is the same as in Express.js. You'll set two Set-Cookie headers.
This article provides a perfect, concise example of this in an Express.js context.
Ultimate Guide to Securing JWT Authentication ...
This guide from wisp.blog provides an excellent server-side example of issuing both an access token and a refresh token as separate, secure, HTTP-only cookies.
Study the code block under the 'Server-Side Implementation' heading. Focus specifically on the /api/login endpoint. Notice how res.cookie() is called twice to set both the accessToken and refreshToken with distinct options (maxAge, path).
Here are the key takeaways from that example, which you would adapt for your TanStack Start server function:
- Two
res.cookie()calls: One for theaccessToken, one for therefreshToken. httpOnly: true: Prevents JavaScript access for both.secure: true: Ensures the cookies are only sent over HTTPS (a must in production).sameSite: 'strict': Provides strong protection against CSRF attacks.- Different
maxAge: ThemaxAgefor each cookie should match theexpiresInof its corresponding JWT. - Different
path(Optional but recommended): The refresh token cookie can be restricted to the specific path of your refresh endpoint (e.g.,/api/auth/refresh). This is a great security hardening technique, as it prevents the refresh token from being sent with any other request.
Putting it all together, your login function's return statement would look something like this (using an Express-like syntax for clarity):
// Example using Express-like response object
res.cookie('accessToken', accessToken, {
  httpOnly: true,
  secure: process.env.NODE_ENV === 'production',
  sameSite: 'strict',
  maxAge: 15 * 60 * 1000, // 15 minutes
  path: '/',
});

res.cookie('refreshToken', refreshToken, {
  httpOnly: true,
  secure: process.env.NODE_ENV === 'production',
  sameSite: 'strict',
  maxAge: 7 * 24 * 60 * 60 * 1000, // 7 days
  path: '/api/auth/refresh', // IMPORTANT: Restrict to refresh endpoint
});

res.status(200).json({ message: 'Login successful' });
Conclusion
In this lesson, you've taken a major step toward building a production-grade authentication system. You now understand the vital role of refresh tokens and how to securely implement the first part of this pattern.
Key Takeaways:
- The two-token strategy (short-lived access token, long-lived refresh token) resolves the conflict between security and user experience.
- Refresh tokens are highly sensitive and must be stored in a
secure,httpOnlycookie. - For enhanced security, refresh tokens should also be persisted (e.g., in a database) on the server to allow for revocation.
- The login process must be modified on the server to generate, store, and issue both tokens as separate cookies with appropriate security flags and expiration times.
What's Next?
We've successfully issued the tokens, but our application doesn't know how to use the refresh token yet. In the next lesson, we will build the other half of this mechanism. You will learn how to:
- Create a dedicated server function to handle token refresh requests.
- Implement refresh token rotation, a security pattern where a new refresh token is issued every time one is used.
Can't find a good explanation? Sign up and we'll make it for you
Sign up