
Welcome back. In the previous lesson, you installed the tools for your local development workspace: VS Code for editing, Node.js and npm for running JavaScript and managing packages, and Git for recording project history. This lesson is about using the terminal to work in the right folder and run those tools deliberately.
A terminal is a text-based way to communicate with your computer. For development, it is not a replacement for VS Code’s file explorer; it is a precise way to ask Windows to inspect folders and run project commands. The key habit is simple: before running a command, know your current location.
By the end, you will be able to navigate safely in PowerShell, create a dedicated development workspace, open that workspace in VS Code, and run basic Node, npm, and Git commands from the correct directory.
The prompt tells you where you are
Open PowerShell from the Start menu. You may see a prompt resembling this:
PS C:\Users\YourName>
The text after PS is your current working directory: the folder in which PowerShell will interpret relative file paths and run project commands.
Your name and folder location will differ. Do not type the prompt itself; type only the commands that follow it.
Start by asking PowerShell to state its current location:
Get-Location
You may see output like:
Path
----
C:\Users\YourName
Get-Location is the full PowerShell command. Like many developer tools, PowerShell provides shorter aliases. You can also use:
pwd
Here, pwd means “print working directory.” It is a widely used terminal convention.
Now inspect what is inside your current folder:
Get-ChildItem
The familiar aliases are:
dir
or:
ls
All three list the contents of the current folder. In this course, use dir or ls when working quickly, but recognize Get-ChildItem when you see it in PowerShell documentation.
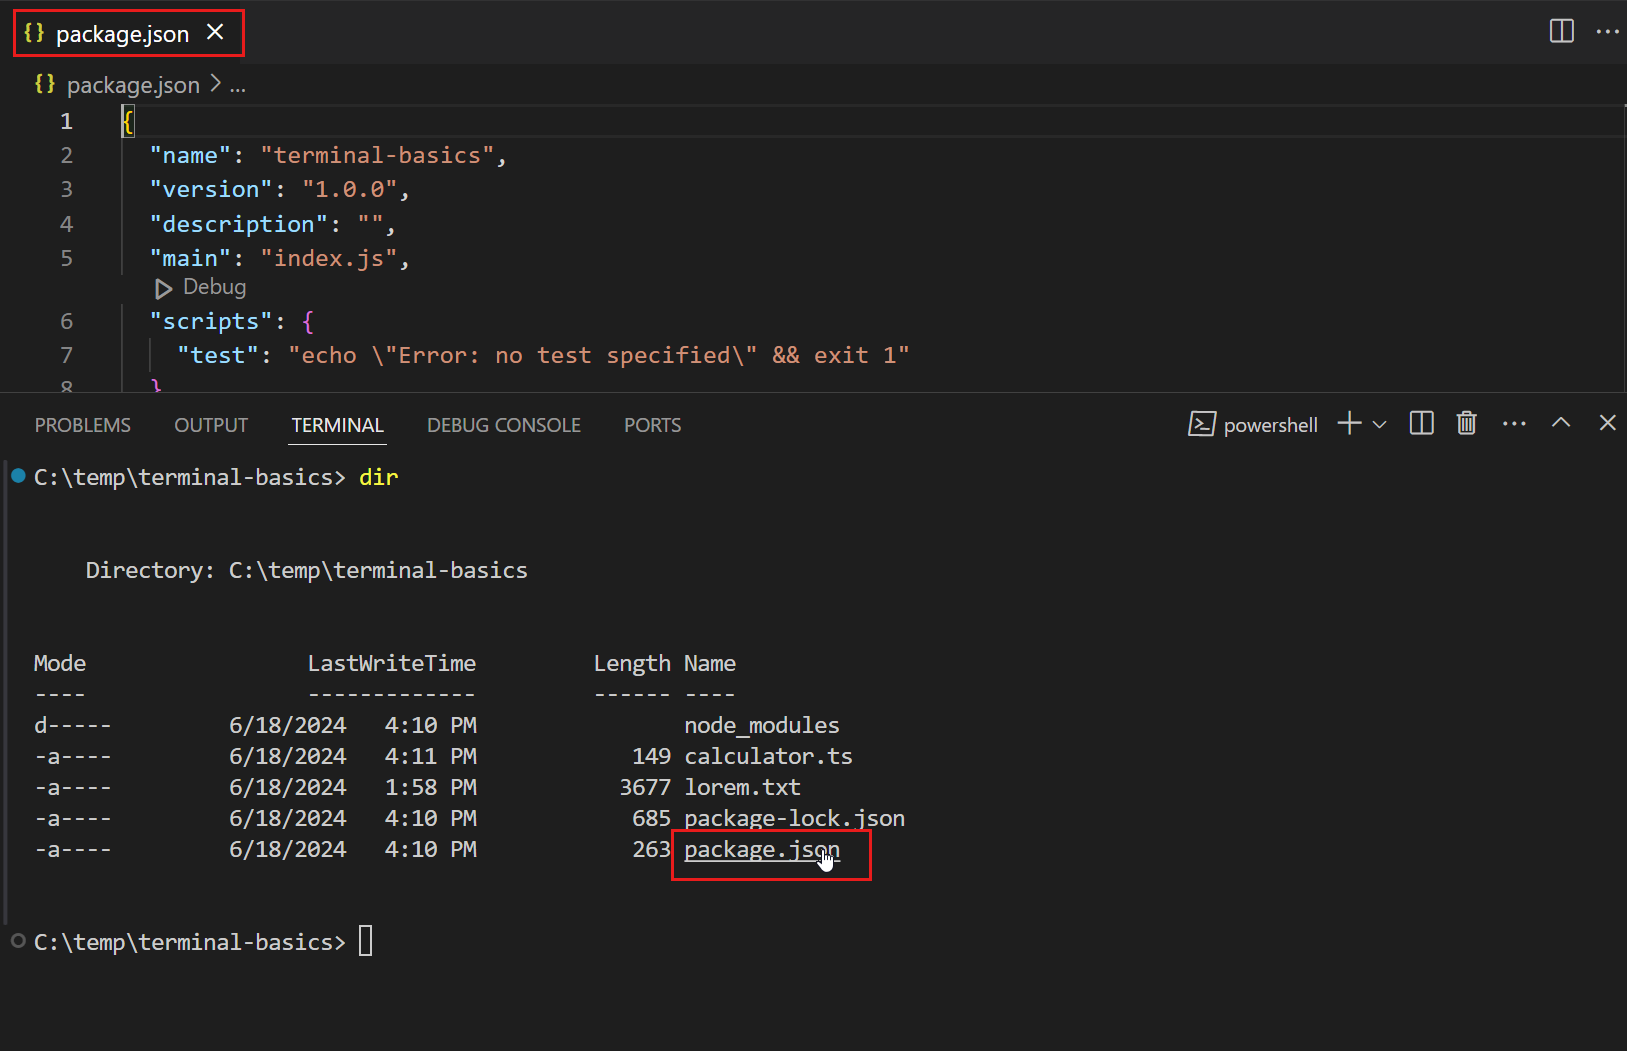
PowerShell distinguishes folders from files in its listing. A folder typically has a d at the beginning of its Mode value; files have a different mode and often show a size in the Length column. For now, the names are the most important part.
Use VS Code’s integrated terminal
You can use standalone PowerShell, but once you are editing a project, the integrated terminal in VS Code is usually more convenient. It keeps your code, folder structure, and command output in one place.
Getting started with the terminal - Visual Studio Code
Read the opening tutorial section from Visual Studio Code documentation. It shows how the integrated terminal works and why opening the correct workspace folder matters.
In the subsection “Run your first command in the terminal,” read from the terminal overview. Then follow the steps that begin with opening a folder or workspace and use View > Terminal or Ctrl+` to open the panel. Notice that the terminal begins at the workspace folder’s root, so its location corresponds to the folder you opened in VS Code.
For now, return to your standalone PowerShell window. We will create a single predictable place for your future projects, then open it in VS Code.
Paths: the address system for files and folders
A path is an address for a folder or file. On Windows, paths use backslashes.
For example:
C:\Users\YourName\Documents
This is an absolute path because it begins at the drive letter, C:. It identifies the location regardless of where PowerShell is currently working.
A relative path is interpreted from your current location. If your prompt is:
PS C:\Users\YourName>
then this command refers to the Documents folder inside your user folder:
cd Documents
cd means “change directory.” In PowerShell, it is an alias for the longer command Set-Location.
Use this short navigation sequence now:
Get-Location
dir
cd Documents
Get-Location
If your Documents folder is in a cloud-synced location such as OneDrive, the first cd Documents might report that the folder does not exist. Run dir in your user folder, look for a folder such as OneDrive, and then navigate through it:
cd OneDrive
dir
cd Documents
Do not guess folder names: use dir to inspect what actually exists.
The two navigation patterns to remember are:
| Goal | Command | Meaning |
|---|---|---|
| Enter a child folder | cd Documents | Move into a folder inside the current one |
| Move up one folder | cd .. | Move to the parent folder |
| Go to a known location | cd "C:\Users\YourName\Documents" | Move using an absolute path |
The .. has a specific meaning: the parent directory. It is not an abbreviation you need to expand mentally; treat it as the standard notation for “one level up.”
If a folder name contains spaces, surround the path with quotation marks:
cd "C:\Program Files"
Without the quotation marks, PowerShell would interpret C:\Program and Files as separate pieces of the command.
Use Tab completion rather than typing long names manually. Type enough of a folder name to identify it, then press the Tab key:
cd Doc
Press Tab to complete Documents if it is the matching folder. Press Tab repeatedly if more than one possible match exists. Tab completion prevents small spelling errors and makes navigation much faster.
Mastering Windows File System Navigation with PowerShell
Watch ITPro Today’s “Mastering Windows File System Navigation with PowerShell” for a short visual demonstration of the core navigation actions.
Watch basic navigation. Focus on the practical meanings of cd .. and dir: moving to a parent folder and listing the contents of the active folder. The historical discussion of DOS explains why these short commands remain available, but the commands themselves are what you need to retain.
Create one safe development home
Software projects can be scattered across Downloads, Desktop, and temporary folders, but that becomes difficult to manage. Create one dedicated parent folder for coursework and future projects.
First, ensure that you are in Documents:
Get-Location
If the displayed path does not end in Documents, navigate there. Then create a folder named projects:
mkdir projects
mkdir means “make directory.” Verify that it exists:
dir
Then enter it:
cd projects
Get-Location
Your location should now resemble:
C:\Users\YourName\Documents\projects
If mkdir projects says the item already exists, that is fine. It means you have already created the folder; simply use:
cd projects
This projects folder is a workspace parent, not a project by itself. In later lessons, each application will receive its own folder inside it. Keeping that distinction clear helps prevent a common early mistake: running commands in one folder while editing files in another.
At this point, pause and check your location one more time:
pwd
When a future command behaves unexpectedly, pwd or Get-Location is usually the first diagnostic step.
Open the current folder in VS Code
From inside your projects folder, run:
code .
The period means the current directory. So code . asks VS Code to open the folder that PowerShell is currently using.
If VS Code opens, look at the Explorer panel on the left. It should show your projects folder. Now open the integrated terminal with View > Terminal or Ctrl+`.
The prompt in the VS Code terminal should end with the same folder path:
...\Documents\projects>
This is an important architectural habit in miniature: tools have context. VS Code’s Explorer shows the workspace context; PowerShell’s prompt shows the command context. When both point to the same project folder, commands and files stay aligned.
If code . is not recognized, VS Code may still work perfectly through the Start menu. Open VS Code normally, choose File > Open Folder, select your projects folder, and then open the integrated terminal. You can revisit the command-line launcher later without blocking your progress.
Run development commands, not just navigation commands
PowerShell runs many kinds of commands:
- PowerShell commands, such as
Get-LocationandGet-ChildItem - Programs installed on your computer, such as
node,npm,git, andcode - Later, project scripts defined by a project
The command name is followed by zero or more arguments. For example:
node --version
Here, node starts the Node.js runtime and --version asks it to print its installed version.
From the VS Code integrated terminal, run:
node --version
npm --version
git --version
Each should produce version information, as it did in the previous lesson. These commands work from almost any folder because they ask Windows to locate installed programs through PATH. But many development commands depend on the current folder.
For example, run:
git status
Because projects is only a parent workspace and not yet a Git repository, Git will likely report:
fatal: not a git repository
This is useful information, not a broken installation. It means:
- Git itself ran successfully.
- Git looked in the current folder and its parent folders for repository information.
- It did not find a repository because you have not initialized one yet.
Later, when you create a project and initialize Git inside that project, the same command will give a meaningful status report. This is why working location matters.
You can ask npm for help without creating or changing anything:
npm --help
This produces a long list. You do not need to read it all. Look only long enough to see that npm recognizes commands such as install, run, and init. In later modules, these will install project packages and run scripts.
A safe rule for beginner terminal work:
Read a command before pressing Enter, and identify both the command and the folder in which it will run.
Avoid pasting commands from random websites, especially commands that request administrator permissions, change execution policies, download remote scripts, or delete files. Development involves experimentation, but good experimentation is bounded and understandable.
A compact command reference
Keep this small set available while you work:
| Command | Purpose |
|---|---|
Get-Location or pwd | Show the current working directory |
Get-ChildItem, dir, or ls | List folder contents |
cd folder-name | Enter a folder |
cd .. | Move up to the parent folder |
cd "full path" | Move to an absolute path, especially one containing spaces |
mkdir folder-name | Create a folder |
code . | Open the current folder in VS Code |
node --version | Verify Node.js |
npm --version | Verify npm |
git --version | Verify Git |
git status | Inspect Git status for the current project folder |
You can reuse a previous command without retyping it: press the Up Arrow key in PowerShell. Edit the recalled command if needed, then press Enter. This is especially useful for long paths, but always inspect the command before rerunning it.
A short working routine
Whenever you begin a development session, use this routine:
- Open your project folder in VS Code.
- Open the integrated terminal.
- Run
pwdto confirm the terminal’s location. - Run
dirto see the files and folders you expect. - Run the project command appropriate to that folder.
For the moment, your workspace routine can end with this check:
pwd
dir
node --version
git status
The final command is expected to say that no repository exists until the Git lesson. Its value is that you can now interpret the message: it describes the state of the current folder, rather than an installation failure.
Wrap-up
You can now use PowerShell as a practical development tool:
- The prompt and
pwdidentify your current working directory. dirorlslets you inspect the current folder before acting.cd folder-name,cd .., and absolute paths let you navigate predictably.mkdir projectsgave you a stable parent workspace for future applications.code .connects the terminal’s current folder to VS Code’s workspace.- Commands such as
node --version,npm --version, andgit statusdemonstrate that development commands run in a context.
Next, you will create and organize the actual folders and files of a small web project. The navigation habits from this lesson will make that structure much easier to create without losing track of where each command belongs.
Can't find a good explanation? Sign up and we'll make it for you
Sign up