
Hello! Welcome back to our module on Containerization with Docker.
In our last lesson, we explored why containerization is the standard for modern microservices. We established that containers provide consistency across environments, are highly resource-efficient, and enable the rapid deployment and scaling essential for a microservices architecture.
Today, we transition from the "why" to the "how." Knowing that we need to package our Spring Boot application into a container is the first step, but doing it effectively is what distinguishes a production-ready engineer. Your goal for this lesson is to learn how to create optimized Dockerfiles for Spring Boot microservices using multi-stage builds.
We'll dissect what "optimized" means in this context—smaller image sizes, faster build times, and improved security—and walk through the specific techniques to achieve it. This is a topic that frequently comes up in technical interviews, as it demonstrates a practical understanding of building for the cloud.
1. The Problem with the Naive Approach
Let's start with the most straightforward way to Dockerize a Spring Boot application. You might be tempted to create a Dockerfile that looks something like this:
A Simple (but flawed) Dockerfile:
# Stage 1: Build the application
FROM maven:3.8.5-openjdk-17
WORKDIR /app
COPY . .
RUN mvn clean package -DskipTests

# Stage 2: Run the application
FROM openjdk:17-jre-slim
WORKDIR /app
COPY --from=0 /app/target/*.jar app.jar
ENTRYPOINT ["java", "-jar", "app.jar"]
At first glance, this looks like a multi-stage build, which is good! We are separating the build environment (with Maven and a full JDK) from the runtime environment (with just a JRE). However, it has a major flaw related to how Docker builds images. To understand it, we need to talk about layers.
2. Understanding Docker's Layered Filesystem
A Docker image is not a single, monolithic file. It's a collection of read-only layers stacked on top of each other. Each instruction in a Dockerfile (FROM, COPY, RUN, etc.) creates a new layer.
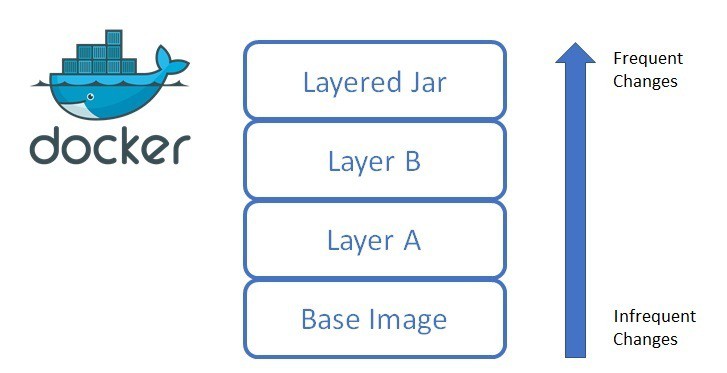
Docker is smart about these layers. When you rebuild an image, it caches each layer. If an instruction and its source files haven't changed, Docker reuses the cached layer instead of re-executing the instruction. This is called layer caching, and it's the key to fast, efficient builds.
Now, look back at our "naive" Dockerfile. The instruction COPY . . copies all our source code at once. What happens if you change just a single line of code in one Java file?
- The
COPY . .instruction's input has changed, so its cache is invalidated. - The
RUN mvn clean packagecommand must be re-executed, which can be slow. - A brand new "fat JAR" is created.
- In the final stage, this new fat JAR is copied, creating a large new layer. When you push this image to a registry, you have to upload this entire large layer, even though the change was tiny.
This approach fails to leverage layer caching effectively and leads to slow builds and inefficient use of registry storage.
3. The Multi-Stage Build: Separating Build from Runtime
The first step to optimization is a proper multi-stage build, which separates the build environment from the final runtime environment. This is a fundamental concept in creating secure and lean containers.
The official Docker documentation provides an excellent guide on multi-stage builds. It walks through creating a bulky single-stage image first and then refactoring it into a much smaller multi-stage image.
Please read from the beginning of the page down to the end of the section 'Use multi-stage builds'. Pay close attention to the initial Dockerfile, the resulting large image size, and how the multi-stage Dockerfile drastically reduces the final image size by separating the JDK build environment from the JRE runtime environment.
As the article demonstrates, the core benefits of a multi-stage build are:
- Reduced Image Size: The final image contains only what's necessary to run the application (the JRE and the JAR), not to build it (the JDK, Maven, source code, etc.).
- Improved Security: By excluding build tools from the final image, you reduce the potential attack surface of your production container.
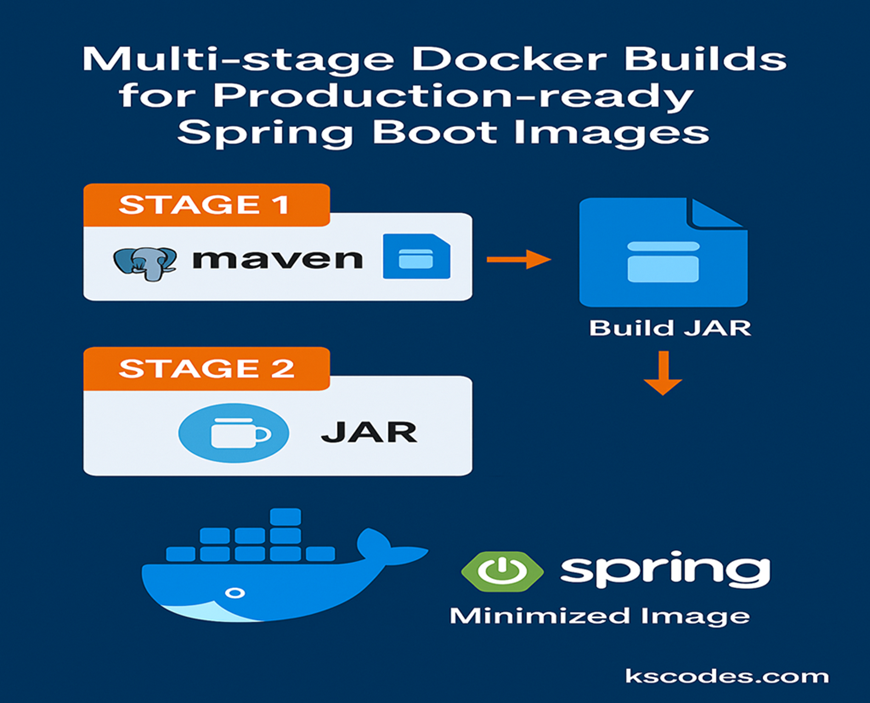
However, as we discussed, just copying the final fat JAR is still not fully optimized. We can do better by leveraging a specific feature of Spring Boot.
4. The Optimized Approach: Spring Boot Layered Jars
Since Spring Boot 2.3, the build plugins can create a special "layered" JAR. The framework understands that an application consists of parts that change at different frequencies:
- External dependencies (change rarely).
- Snapshot dependencies (might change more often during development).
- Spring Boot loader code (changes only on framework upgrade).
- Your own application code (changes frequently).
By enabling this feature, we can create a Dockerfile that copies these parts as separate layers, perfectly aligning with Docker's caching mechanism.
Step 1: Enable Layering in Your Build
Before writing the Dockerfile, you need to configure your pom.xml (if you're using Maven) to produce a layered JAR.
In your spring-boot-maven-plugin configuration, add the <layers><enabled>true</enabled></layers> block:
<build>
    <plugins>
        <plugin>
            <groupId>org.springframework.boot</groupId>
            <artifactId>spring-boot-maven-plugin</artifactId>
            <configuration>
                <layers>
                    <enabled>true</enabled>
                </layers>
            </configuration>
        </plugin>
    </plugins>
</build>
Now, when you build your project (mvn clean package), Spring Boot will organize the JAR internally and include tools to extract these layers.
Step 2: Create the Optimized Multi-Stage Dockerfile
Now we can create a Dockerfile that takes full advantage of these layers.
The official Spring Boot documentation provides the definitive template for an optimized, multi-stage Dockerfile. This is the pattern you should aim to use in production.
Read the first two sections of the document. The first section introduces the jarmode=tools command and provides the complete multi-stage Dockerfile. Focus on understanding the role of the builder stage and how it uses java -Djarmode=tools -jar application.jar extract to split the application into layers. Then, observe how the final stage copies these layers individually.
Let's break down the key parts of the Dockerfile from the documentation:
# Use a specific, consistent base image for the builder
FROM bellsoft/liberica-openjdk-debian:17 AS builder
WORKDIR /builder
# Pass the path to the JAR as an argument
ARG JAR_FILE=target/*.jar
# Copy the single fat JAR
COPY ${JAR_FILE} application.jar
# The magic command: extract the layers
RUN java -Djarmode=tools -jar application.jar extract --destination extracted

# The final, lean runtime stage
FROM bellsoft/liberica-openjdk-debian:17-jre
WORKDIR /application
# Copy layers from the builder stage in order of least to most frequently changing
COPY --from=builder /builder/extracted/dependencies/ ./
COPY --from=builder /builder/extracted/spring-boot-loader/ ./
COPY --from=builder /builder/extracted/snapshot-dependencies/ ./
COPY --from=builder /builder/extracted/application/ ./

# Run the application
ENTRYPOINT ["java", "org.springframework.boot.loader.JarLauncher"]
(Note: The ENTRYPOINT might differ slightly. java -jar application.jar also works with the extracted layout, but JarLauncher is often used to be explicit).
Why This is Optimized:
- Builder Stage: It simply takes your fat JAR and runs the Spring Boot extractor tool. This stage contains the full JDK.
- Final Stage: It starts from a minimal JRE image. Crucially, it copies the layers one by one.
dependencies/: This layer is large but will almost never change. It gets cached and forgotten.spring-boot-loader/: This only changes when you update Spring Boot.application/: This contains your compiled classes and resources. It's small and is the only layer that will be rebuilt when you change your code.
The result? When you push a code change, you are only sending the tiny application layer to the container registry, making deployments much faster and cheaper.
Test your understanding!
An interviewer shows you the following Dockerfile for a Spring Boot application and asks you to critique it. What are the two main issues with this file, and how would you fix them using the principles you've learned today?
FROM openjdk:17-jdk
WORKDIR /app
COPY . .
RUN ./mvnw clean package
EXPOSE 8080
ENTRYPOINT ["java", "-jar", "target/my-app-0.0.1-SNAPSHOT.jar"]
Show answer
This Dockerfile has two primary issues:
- It's a single-stage build. The final image is based on
openjdk:17-jdkand contains the full JDK, all the Maven build tools, and the entire project source code. This makes the image unnecessarily large and increases the security attack surface. - It has poor layer caching. The
COPY . .instruction copies the entire project context at once. Any small change to a source file will invalidate this layer and every subsequent layer, forcing a slowmvn clean packageon every build.
How to fix it:
You would propose refactoring it into a multi-stage build that leverages Spring Boot's layering feature.
- Fix 1 (Multi-stage): Create a
builderstage based on a Maven/JDK image to build the JAR. Create a final, separate stage based on a minimal JRE image (likeopenjdk:17-jre-slim). - Fix 2 (Layer Caching):
- First, ensure the
pom.xmlis configured to enable layers. - In the
builderstage, after copying the JAR, use thejava -Djarmode=tools -jar application.jar extractcommand to unpack the layers. - In the final stage,
COPYthedependencies,spring-boot-loader, andapplicationdirectories from the builder stage as separate layers. This ensures that only the smallapplicationlayer is rebuilt during code changes.
- First, ensure the
This demonstrates a deep understanding of both Docker best practices and framework-specific optimizations.
Conclusion
You've now learned the industry-standard method for creating optimized, production-ready Docker images for Spring Boot microservices. Mastering this technique is not just about making builds faster; it's about demonstrating a commitment to professional development practices that impact cost, security, and deployment velocity.
Key Takeaways:
- Avoid simple, single-stage Dockerfiles that bundle build tools and source code into your final image.
- Always use multi-stage builds to create lean, secure runtime images by separating the build environment from the runtime environment.
- Maximize Docker's layer caching by structuring your
Dockerfileto place infrequently changing content (like dependencies) before frequently changing content (like application code). - For Spring Boot, combine these principles by enabling layered JARs and using
jarmode=toolsto extract these layers into your final image, resulting in minimal rebuilds and fast deployments.
In our next lesson, we'll address the next step in the container lifecycle. Now that you can build an optimized image, we need a robust way to manage its versions. We will cover how to describe and apply image tagging strategies (e.g., semantic versioning, Git SHA) for production versioning.
Can't find a good explanation? Sign up and we'll make it for you
Sign up