
Hello! Welcome to your first full LLD case study.
In our previous lesson, we established a five-step framework for communicating a low-level design solution in an interview. This framework is your roadmap to turning a vague problem statement into a well-structured and convincing design.
Today, we put that framework into practice. Your learning outcome is to design a parking lot system, handling multiple vehicle types, spot allocation, and pricing. This is a classic interview question that tests your ability to model a real-world system using object-oriented principles. We will walk through this problem step-by-step, applying the communication strategy you just learned.
Let's quickly recap the framework:
- Clarify Requirements & Scope
- Identify Core Entities & Relationships
- Design Classes & Interactions (with Patterns)
- Implement Core Logic
- Verify & Discuss Extensions
By the end of this lesson, you will have a complete LLD for a parking lot and a deeper understanding of how to apply our structured approach to a concrete problem.
Step 1: Clarify Requirements & Scope
An interview always starts with a simple prompt: "Design a parking lot system." Your first task is to act as a product manager and architect, asking questions to define the system's boundaries. Making assumptions without clarification is a common pitfall.
To see how this works in practice, let's watch how an expert approaches this initial phase.
Design Parking Lot | Low Level Design (LLD), UML, Concurrency & Code Explained
The video 'Design Parking Lot' by Shubh Patel provides a great example of structured requirement gathering. The presenter categorizes requirements into 'Extensible,' 'Dynamic,' and 'Concurrency,' which is a very effective way to organize your thoughts.
Watch the section from 07:04 to 15:09. Pay attention to the questions asked about vehicle types, spot types, pricing, payment, number of floors, and handling simultaneous entries. This is exactly the kind of dialogue you should have with an interviewer.
Based on that discovery process, here is a solid set of requirements for our system. In an interview, you would write these down in the shared document as you confirm them with the interviewer.
Functional Requirements:
- Vehicle Types: The system must support different types of vehicles (e.g.,
Motorcycle,Car,Truck). The design should be extensible to add more types in the future (e.g.,Bus). - Parking Spots: The lot has multiple floors, and each floor has multiple spots. Each parking spot is designed for a specific vehicle type (
Motorcyclespot,Compactspot,Largespot). - Spot Allocation: The system must be able to find the first available spot for a given vehicle type.
- Ticketing:
- An entry gate issues a ticket when a vehicle enters. The ticket should contain the vehicle details, spot number, and entry time.
- An exit gate processes the ticket upon leaving.
- Pricing: The pricing is calculated based on the duration of the stay. The pricing model should be extensible (e.g., time-based, event-based).
- Payment: The system must support multiple payment methods (e.g.,
Cash,Credit Card,UPI) and be extensible to add new ones.
Non-Functional Requirements:
- Concurrency: The system must handle multiple vehicles entering and trying to park simultaneously. Specifically, two vehicles should not be assigned the same spot.
- Scalability/Extensibility: The design should make it easy to add new vehicle types, pricing strategies, and payment methods without major code changes.
Step 2: Identify Core Entities & Relationships
With clear requirements, we can now identify the main actors and components of our system. We do this by looking for the key "nouns" in our requirements list.
Vehicle,Motorcycle,Car,TruckParkingSpot,ParkingFloor,ParkingLotGate(EntryGate,ExitGate)TicketPricingStrategyPaymentStrategy
Now, let's think about their relationships:
- A
ParkingLothas multipleParkingFloors. - A
ParkingFloorhas multipleParkingSpots. - A
ParkingSpotcan have oneVehicleparked in it. - An
EntryGatecreates aTicket. - A
Ticketis associated with aVehicleand aParkingSpot. - The
ParkingLotuses aPricingStrategyto calculate fees.
To see a detailed breakdown of these entities, let's turn to a helpful article.
Parking Lot System Design (LLD in Action)
The article 'Parking Lot System Design (LLD in Action)' provides a concise summary of the core components and their responsibilities.
Read the section titled 'Parking Lot LLD – Component Summary'. This list clearly defines each class and its primary roles, which is a great way to structure your thoughts before diving into detailed design.
Step 3: Design Classes & Interactions (with Patterns)
This is where we flesh out our entities into classes, define their attributes and methods, and apply design patterns to meet our extensibility and maintainability goals.
Here's a visual representation of how these classes might interact.
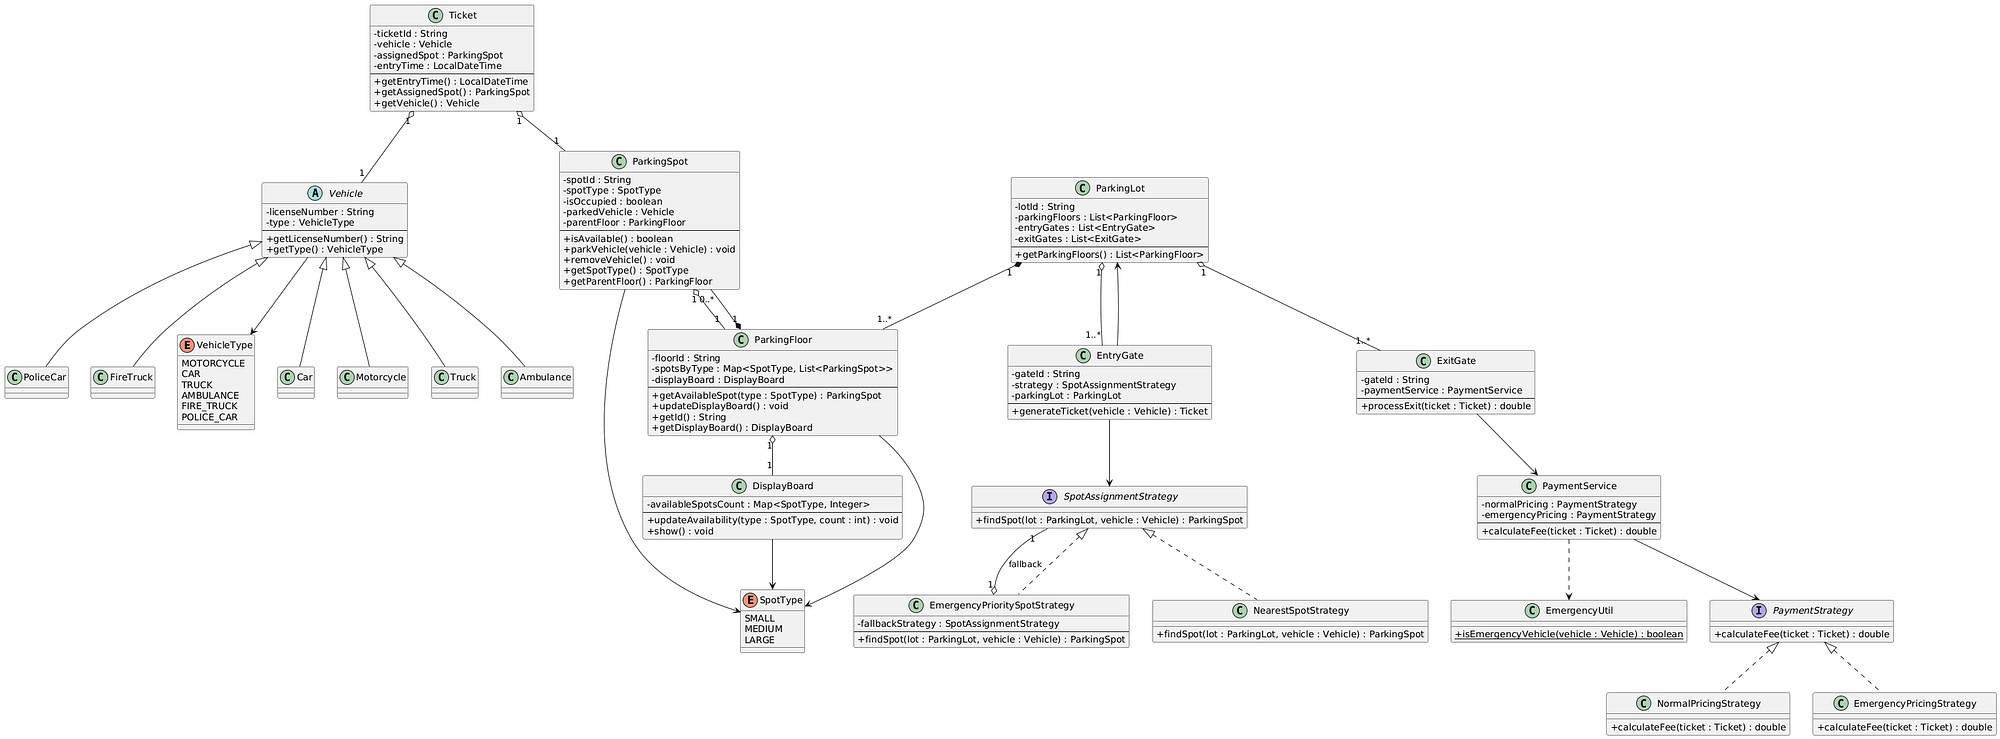
Let's break down the design choices for our key components.
Vehicle Hierarchy
- Requirement: Support different, extensible vehicle types.
- Design: An abstract class
Vehiclewith common properties likelicensePlateandvehicleType. Concrete classes likeCar,Motorcycle, andTruckwill extendVehicle. - Pattern: Factory Pattern. To decouple the client from the creation of specific vehicle objects, we can use a
VehicleFactory. The client requests a vehicle of a certain type, and the factory handles thenew Car()ornew Motorcycle()instantiation.
Pricing and Payment Flexibility
- Requirement: Support multiple, extensible pricing and payment methods.
- Design: This is a classic use case for the Strategy Pattern.
- Pricing: We'll define a
PricingStrategyinterface with acalculateFee()method. Concrete classes likeTimeBasedPricingStrategyandEventBasedPricingStrategywill implement this interface. - Payment: Similarly, a
PaymentStrategyinterface with aprocessPayment()method will be implemented byCardPaymentStrategy,UpiPaymentStrategy, etc.
- Pricing: We'll define a
- Benefit: The
ParkingLotorPaymentProcessorclass will depend on the interface, not the concrete implementation. This follows the Open/Closed Principle and Dependency Inversion Principle. We can add a new pricing model (e.g.,FlatRateStrategy) without changing any existing code.
The Central ParkingLot
- Requirement: A single, central point of coordination for the entire system.
- Design: We need to ensure there is only one
ParkingLotobject managing all floors, spots, and tickets. - Pattern: Singleton Pattern. Making the
ParkingLotclass a Singleton ensures a single, globally accessible instance.
Spot Allocation and Concurrency
- Requirement: Find available spots and prevent two vehicles from being assigned the same spot simultaneously.
- Design:
- The
ParkingLotwill iterate through itsParkingFloors, and eachParkingFloorwill iterate through itsParkingSpots to find one that is available and matches the vehicle type. - For concurrency, a simple
boolean isOccupiedon theParkingSpotis not thread-safe. A race condition could occur where two threads see a spot as free at the same time. - Given your Java background, you know we need an atomic operation. Instead of using a heavy
synchronizedlock on the entire parking method (which would be a performance bottleneck), we can use a more fine-grained approach.AtomicBooleanin Java is perfect for this. ItscompareAndSet()method allows a thread to atomically change the state of a spot fromfalse(free) totrue(occupied) only if it's currentlyfalse. This prevents the race condition efficiently.
- The
The following video provides an excellent walkthrough of a class diagram that incorporates these patterns and relationships.
Design Parking Lot | Low Level Design (LLD), UML, Concurrency & Code Explained
Let's watch a detailed walkthrough of the class diagram from the 'Design Parking Lot' video. This will solidify your understanding of how all the components we've discussed fit together.
First, watch from 15:09 to 18:55 to see how the entities are identified and how the Strategy and Factory patterns are introduced. Then, watch the detailed class diagram explanation from 18:55 to 31:41. Pay close attention to how the ParkingLot class acts as the central coordinator and how the strategy interfaces are used.
Test your understanding!
Why is using AtomicBoolean on each ParkingSpot a better approach for handling concurrent parking requests than putting a synchronized block around the entire parkVehicle method in the ParkingLot class?
Show answer
Synchronizing the entire parkVehicle method would create a system-wide bottleneck. Only one vehicle could be processed for parking at a time, even if a car and a bike were looking for different types of spots on different floors.
Using AtomicBoolean on each individual ParkingSpot provides fine-grained locking. It only locks the specific resource (the spot) for a very brief moment during the state change. This allows many vehicles to search for spots concurrently across the entire parking lot, leading to much higher throughput and better performance.
Step 4: Implement Core Logic
In an interview, you won't write all the code. You'll focus on the most critical parts. Let's see how the core logic for parking and unparking is implemented.
We'll continue with the same video, which now transitions from the class diagram to a full Java code implementation.
Design Parking Lot | Low Level Design (LLD), UML, Concurrency & Code Explained
This part of the video walks through the Java code, demonstrating how the design is translated into a working application. It's a great way to see the theory in action.
Please watch the following segments: Client Code and High-Level Flow (31:41 - 37:48): See how a client would interact with the system to park and unpark a car. Concurrency Demo (37:48 - 39:22): Watch the demonstration of two vehicles trying to park in a single available spot to see the AtomicBoolean logic in action. ParkingLot Class Logic (56:20 - 1:01:16): Focus on the implementation of the parkVehicle and unparkVehicle methods. This is the heart of the system.
Step 5: Verify & Discuss Extensions
The final step is to prove your design works by walking through a use case and discussing how it could be extended.
Verification:
Let's verbally trace the "unpark" flow:
- A client calls
unparkVehicle()on theExitGate, providing theTicket. - The
ExitGatedelegates to theParkingLot'sunparkVehicle(ticket)method. - The
ParkingLotretrieves the vehicle, spot, and entry time from theTicket. - It uses its configured
PricingStrategy(e.g.,TimeBasedPricingStrategy) to calculate the fee based on the duration. - It uses the selected
PaymentStrategy(e.g.,UpiPaymentStrategy) to process the payment. - If payment is successful, it calls
vacate()on theParkingSpot, which atomically sets itsisOccupiedflag back tofalse. - The ticket is marked as
PAIDand removed from the active tickets map.
Extensions:
A common follow-up question is "How would you extend this to handle multiple floors?"
🚗 Parking Lot Design | System Design + LLD + Full Code Implementation
The video by codeWithAryan offers a clear explanation of how to extend the design for multi-floor support using the Builder pattern. This is a great example of showing an interviewer you're thinking about scalability.
Watch the section on extensibility and multi-floor parking from 37:57 to 43:48. Notice how a ParkingLotBuilder is introduced to construct a complex ParkingLot object with multiple floors, each with its own configuration of spots.
Using the Builder pattern is an elegant solution for constructing a complex ParkingLot object. It allows you to create a parking lot with different numbers of floors, and different spot configurations on each floor, in a clean, readable way.
Conclusion
Excellent work! You have just completed a full low-level design for a parking lot system. You started with a vague requirement and systematically progressed through clarification, entity identification, detailed design with patterns, and implementation strategy, all while considering future extensions.
Key Takeaways from this Case Study:
- Structure is Key: Following the 5-step framework keeps you on track and ensures you cover all bases.
- Patterns Solve Problems: We didn't use patterns for the sake of it. We used them to solve specific problems:
- Strategy: For flexible and extensible pricing/payment.
- Singleton: To ensure a single control point for the parking lot.
- Factory: To decouple vehicle creation.
- Builder: To construct a complex, multi-floor parking lot.
- Concurrency Matters: Identifying and solving concurrency issues (like spot allocation) with the right tools (
AtomicBoolean) is a hallmark of a strong backend engineer. - Communication is the Goal: The ultimate objective was not just to design a parking lot, but to practice communicating that design, justifying your choices along the way.
In our next lesson, we will continue to hone these skills by tackling another LLD case study: designing a library management system. You'll find that the same structured thinking and design principles apply, further strengthening your problem-solving abilities.