
Hello! Welcome back to our course.
In our last lesson, we built a fully functional speech recognition API using FastAPI and Whisper. We now have a service that works perfectly on our local machine. However, the real challenge in MLOps is moving from "it works on my machine" to "it works reliably, everywhere." Our application depends on a specific Python version, a list of libraries, and even a system-level tool like ffmpeg. Managing these dependencies across different environments (development, testing, production) is a classic source of problems.
This is where containerization comes in. Today, we'll address the learning outcome: Containerize the speech application and its dependencies using Docker. We'll package our entire application—the code, the Python environment, and all its dependencies—into a single, portable unit called a container. This ensures that our service runs identically, regardless of where it's deployed.
1. What is a Container, Really?
Before we write any code, it's important to understand what a container is at a fundamental level, especially since you have a strong background in computer science and operating systems. A container isn't a lightweight virtual machine; it's a standard Linux process that is isolated from other processes on the same host using kernel features.
To understand this, let's look at the core Linux primitives that make containers possible.
Linux Container Primitives: cgroups, namespaces, and more!
This presentation from linuxfestnorthwest provides a clear explanation of the Linux kernel technologies that underpin containers. We'll focus on the three key primitives.
Please watch these segments to understand the building blocks of containerization: Overview (01:00 - 02:03): Get an introduction to the three main primitives: control groups, namespaces, and file systems. Control Groups (cgroups) (02:13 - 04:10): Focus on how cgroups are used to track and limit resource usage (like CPU and memory). This is critical for managing ML workloads. Namespaces (10:09 - 12:28): Pay attention to how namespaces provide isolation. A process in a network namespace sees a different set of network interfaces, and a process in a mount namespace sees a different file system. Layered File Systems (20:37 - 22:35): Understand how union file systems like OverlayFS create layers, which is the basis for Docker's efficient image storage and copy-on-write mechanism.
To summarize, when you run a Docker container, you're leveraging:
- Namespaces: To give the application process its own isolated view of the system (its own process tree, network stack, user IDs, etc.). This is why your app inside the container thinks it's the only thing running on the machine.
- Control Groups (
cgroups): To allocate and limit the resources the application can use (e.g., "this container can use at most 2 CPU cores and 8GB of RAM"). This prevents one misbehaving application from taking down the entire server. - Union File Systems: To stack read-only layers (from the base image) with a thin, writable layer for your container. This is incredibly efficient, as multiple containers can share the same base layers without duplicating files.
This layered architecture is fundamental to deploying GPU-accelerated applications.
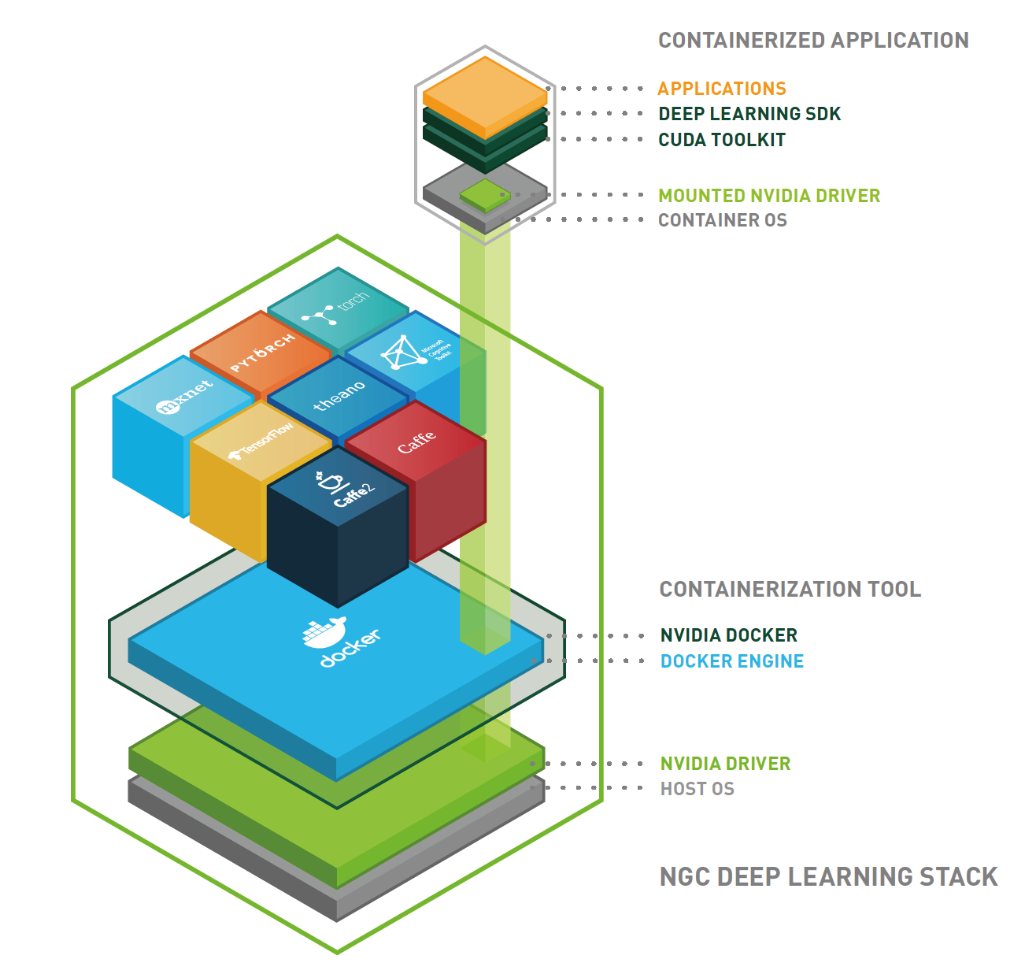
2. The Dockerfile: A Blueprint for Your Speech Service
Now that we understand the "what," let's focus on the "how." We'll create a Dockerfile, which is a text file containing a set of instructions that Docker uses to build a container image. This image is the static, portable package containing our application.
We'll follow the process demonstrated in the video we used in the last lesson, but this time focusing on the Docker-related steps.
Build a Containerized Transcription API using Whisper Model and FastAPI
Let's revisit the 'Build a Containerized Transcription API' video from AI Anytime. The presenter does an excellent job of walking through the creation of a Dockerfile for our exact use case.
Please watch the segment from 02:31 to 08:33. The presenter will write a Dockerfile from scratch. As you watch, I'll break down each command and its purpose below.
Let's dissect the Dockerfile you saw being created. It's the recipe for our speech service image.
# 1. Start from an official Python base image
FROM python:3.10-slim


# 2. Set the working directory inside the container
WORKDIR /app


# 3. Copy the Python dependencies file first
COPY requirements.txt .


# 4. Install system dependencies (ffmpeg) and Python packages
# Using '--no-cache-dir' reduces image size
RUN apt-get update && \
    apt-get install -y --no-install-recommends ffmpeg && \
    pip install --no-cache-dir -r requirements.txt && \
    apt-get clean && \
    rm -rf /var/lib/apt/lists/*


# 5. Copy the rest of your application code
COPY . .


# 6. Expose the port your FastAPI app runs on
EXPOSE 8000


# 7. Define the command to run your application
CMD ["uvicorn", "main:app", "--host", "0.0.0.0", "--port", "8000"]
Instruction Breakdown:
FROM python:3.10-slim: EveryDockerfilestarts with a base image. We're using a pre-built image that has Python 3.10 installed. Theslimtag indicates it's a smaller version with only the essential packages needed to run Python applications, which helps keep our final image size down.WORKDIR /app: This sets the working directory for all subsequent commands (RUN,COPY,CMD). It's good practice to keep your application code in a dedicated directory.COPY requirements.txt .: We copy the requirements file separately first. Docker builds images in layers, and it caches layers that haven't changed. By separating the requirements installation from the application code copy, we can avoid reinstalling all Python packages every time we change our source code, speeding up builds significantly.RUN ...: This is the workhorse command. We use it to execute shell commands inside the image during the build process.apt-get update && apt-get install -y ffmpeg: This installs our crucial system-level dependency,ffmpeg. Without this, Whisper would fail.pip install ...: This installs all our Python libraries.
COPY . .: Now we copy our Python source code (e.g.,main.py,models.py) into the/appdirectory inside the image.EXPOSE 8000: This instruction documents that the container listens on port 8000 at runtime. It doesn't actually publish the port; it's more of a signal to the person running the container.CMD ["uvicorn", ...]: This specifies the default command to execute when a container is started from this image. Here, we're starting our Uvicorn server. Note the--host 0.0.0.0is essential to make the server accessible from outside the container.
3. Building and Running Your Container
With the Dockerfile created, you can now build the image and run it as a container.
Build a Containerized Transcription API using Whisper Model and FastAPI
Let's return to the AI Anytime video to see the build and run commands in action.
Please watch from 19:16 to 23:22. The presenter will demonstrate: Building the image using the docker build command. Running the container using the docker run command, including port mapping. Testing the API by accessing the Swagger UI from the running container.
Let's review the commands you just saw:
Building the Image
# -t gives the image a memorable name (tag) like 'whisper-api'
# '.' tells Docker to look for the Dockerfile in the current directory
docker build -t whisper-api .
This command reads the Dockerfile, executes each instruction, and creates the static, portable whisper-api image on your local machine. You only need to rebuild the image when your code or its dependencies change.
Running the Container
# -d runs the container in detached (background) mode
# -p maps port 8080 on your host machine to port 8000 in the container
# --gpus all gives the container access to all available NVIDIA GPUs on the host
docker run -d -p 8080:8000 --gpus all whisper-api
This command takes your static whisper-api image and creates a live, running instance of it—a container. You can now access your API at http://localhost:8080/docs on your host machine, and Docker will forward the traffic to your application running inside the container.
4. Containerization in the Speech AI Ecosystem
Containerization is not just a deployment detail; it's a core part of the development and research workflow for modern speech AI. Major toolkits like Coqui TTS and ESPnet, which you're interested in, rely heavily on Docker.
How to Run Coqui TTS in Docker for Text-to-Speech
This article from OneUptime shows how to run Coqui TTS, a popular text-to-speech toolkit, using Docker. It's a great example of a real-world speech service in a container.
Please review this article, focusing on the code blocks: Quick Start: Notice the simple docker run command. They use -v to mount a volume, which is a way to persist data (like downloaded models) outside the container's ephemeral file system. Docker Compose Setup: Look at the docker-compose.yml file. Docker Compose is a tool for defining and running multi-container applications. Note the deploy section, which is how you reserve GPU resources in a Compose file. Using the XTTS Model: See how they specify a different, more powerful model (xtts_v2) just by changing a command-line argument. This shows the flexibility of containerized deployment.
Similarly, research-focused toolkits like ESPnet use Docker to ensure that complex experiments are reproducible.
The ESPnet documentation explains their Docker integration. They provide a wrapper script to simplify the process.
Quickly scan this documentation page. You don't need to understand every detail, but observe how they use flags like --docker-gpu to manage GPU allocation and --docker-folders to mount datasets into the container. This is a common pattern in research environments to provide a consistent training environment while keeping large datasets on the host machine.
These examples show that the skills you've learned today—writing a Dockerfile and using docker build/run—are directly applicable to both deploying production services and conducting reproducible research in speech AI.
Conclusion
Congratulations! You've taken your functional but fragile local application and transformed it into a robust, portable, and scalable service. This is a critical step in the MLOps lifecycle.
Key Takeaways:
- Containers provide process isolation and resource management using Linux kernel features like namespaces and cgroups.
- A
Dockerfileis the recipe used to build a container image, specifying the base image, dependencies, code, and runtime command. - For speech applications, your
Dockerfilemust install system-level dependencies likeffmpegin addition to Python packages. docker build -t <name> .creates your image, anddocker run -p <host_port>:<container_port> --gpus all <name>launches it with port mapping and GPU access.- Containerization is the industry standard for deploying AI services and is central to major speech toolkits like Coqui TTS and ESPnet.
Preview of the Next Lesson:
We have successfully containerized a single service. But most real-world applications are more complex. A conversational AI agent, for instance, needs both a Speech-to-Text (STT) service and a Text-to-Speech (TTS) service working together. In our next lesson, we will design the system architecture for a conversational AI agent, figuring out how to pipeline our STT and TTS components into a cohesive system.