
Hello again. Your arena.tscn scene now has a meaningful hierarchy and can run with F6 or F5. Until now, its nodes have supplied structure, geometry, light, and a camera—but no custom behaviour. This lesson gives the Arena root its first behaviour by attaching a GDScript and making Godot report, at runtime, that the scene is ready.
The immediate result will be a line of text in Godot’s Output panel. It may seem small, but this is the basic development loop you will use throughout the project: attach behaviour to a node, run the scene, inspect what the game reports, and revise the script.
A script gives a node behaviour
A GDScript file is a text file ending in .gd that contains instructions for Godot. A script is normally attached to a particular node in a scene. The node still provides its built-in responsibility; the script adds your game-specific logic.
For this lesson, attach the script to the Arena root node:
Arena (Node3D)  ← script attached here
├── Ground (Node3D)
│   └── Floor (MeshInstance3D)
├── DirectionalLight3D
└── Camera3D
This is a sensible location for a first script because Arena represents the complete scene. Later, the same pattern will apply at a smaller scale:
- a player script will be attached to the player’s
CharacterBody3D; - an enemy script will be attached to an enemy node;
- a health script will be attached to a health-related node.
When you attach a script to Arena, Godot creates a starting line such as:
extends Node3D
extends Node3D means that this script behaves as a Node3D script. It can use the properties and built-in functions that belong to Node3D, including its position, rotation, children, and place in the scene tree. The type must match the node you attached it to: because Arena is a Node3D, its new script should extend Node3D, not Camera3D or MeshInstance3D.
A useful distinction:
| File | Stores |
|---|---|
scenes/arena.tscn | The node hierarchy and Inspector configuration |
scripts/arena.gd | The code that gives Arena custom behaviour |
The scene contains the assembled object; the script contains its instructions.
See the workflow once
This short video uses a Node2D rather than our 3D Arena node, but the attachment workflow is the same. Watch it before working through the steps so the Script creation dialog, _ready(), indentation, and Output panel feel familiar.
Your First Code! Hello World in GDScript (Godot 4.5) | GDScript Basics
“Your First Code! Hello World in GDScript” by Godot Dev Checkpoint demonstrates the complete first-script loop: attaching a script, understanding the generated code, and verifying it with runtime output.
Watch script attachment to see the selected-node workflow and the important Language, Inherits, Template, and Path fields. Their node is Node2D; for your Arena, the Inherits field should instead be Node3D. Then watch ready and print. Focus on the difference between a one-time ready callback and per-frame processing, why the print line must be indented, and where the message appears after running the scene.
Godot’s official “Creating your first script” page provides a second, written view of the attachment process and explains the meaning of extends. Its example uses a 2D Sprite2D; transfer the procedure, not that exact node type.
Creating your first script - Godot Docs
Read the Godot documentation’s “Creating a new script” section to reinforce how a node and its script are connected, and why the generated extends line matters.
In the “Creating a new script” section, read from the attachment instructions through the explanation of inherited properties. The documentation selects “Object: Empty” for its clean-file Sprite2D example. For today, keep Godot’s default Node template so it creates the _ready() scaffold for you; the important transfer is that your selected Arena node produces extends Node3D.
Attach arena.gd to the Arena root
First, make sure the game is not running. If a game window or Game workspace is active, press F8 to stop it.
1. Create a scripts folder
In the FileSystem dock:
- Right-click
res://. - Choose New Folder.
- Name the folder
scripts.
Your project should now be organized approximately like this:
res://
├── scenes/
│   └── arena.tscn
├── scripts/
└── project.godot
Keeping scenes and scripts in separate folders will make the project much easier to navigate once it contains a player, several enemy types, weapons, UI, and arena logic.
2. Select the correct node
In the Scene dock, click Arena, the root node. Be deliberate here: Godot attaches the script to the currently selected node.
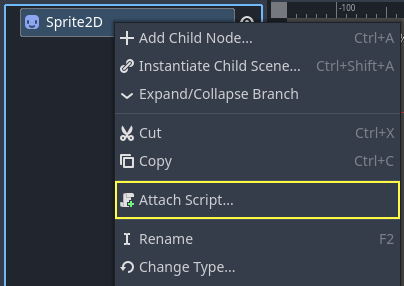
You can attach a script in either of two ways:
- Click the Attach Script button near the top of the Scene dock, which looks like a page with a small plus.
- Right-click
Arenaand choose Attach Script…
3. Configure the Attach Node Script window
Godot opens the Attach Node Script window. Use these settings:
| Field | Value to use | Why |
|---|---|---|
| Language | GDScript | This course uses Godot’s built-in language. |
| Inherits | Node3D | Godot should set this automatically because Arena is a Node3D. |
| Template | Node: Default | This gives you a useful _ready() starter function. |
| Path | res://scripts/arena.gd | Stores the script clearly inside your new scripts folder. |
| Built-in Script | Leave unchecked | Keeps code in a reusable .gd file rather than embedding it in the scene. |
Check the Inherits field before clicking Create. If it says Node3D, you have selected the correct Arena node. Click Create.
Godot should switch to the Script workspace and open arena.gd. In the Scene dock, Arena should now display a small script icon, showing that a script is attached.
_ready() is Godot’s “scene is prepared” callback
Your generated script will look similar to this:
extends Node3D


func _ready() -> void:
	pass
Godot may include comments or a disabled _process() example as well. Leave those alone for now. The essential parts are extends Node3D and _ready().
A function is a named block of instructions. _ready() is a special function name: rather than you calling it yourself, the Godot engine calls it automatically. That is why it is called a callback.
For a normal node in a running scene, _ready() runs once when the node is ready to operate in the scene tree. In practical terms, Arena._ready() runs when the game loads the Arena scene and its children are available.
This makes _ready() the right location for one-time setup, such as:
- setting initial game values;
- finding required child nodes;
- connecting event signals;
- printing a startup diagnostic while developing.
It is not for actions that must occur continuously. A future _process() function can run every rendered frame, which is very different. Do not add _process() today: printing every frame would rapidly fill the Output panel with thousands of messages.
Replace pass with a print instruction
pass is a placeholder. It means “this function currently does nothing.” Replace only that indented line with:
extends Node3D


func _ready() -> void:
	print("Arena loaded: script is running.")
Take a moment to read it from top to bottom:
extends Node3Dsays what kind of node this script belongs to.funcbegins a function named_ready.-> voidsays the function does not return a value. You do not need to change this part.- The indented
print(...)line is the instruction that belongs inside_ready(). - The quotation marks create a piece of text, called a string, that
print()will display.
Indentation is part of GDScript’s grammar
GDScript uses indentation to define what belongs inside a function. The print line must begin with one indentation level beneath func _ready().
Use the Tab key in Godot’s script editor to create that indentation. Do not move print flush against the left edge:
func _ready() -> void:
print("This will cause an indentation error.")
Godot cannot interpret that version because it cannot tell that print() belongs to _ready().
Save the script with Ctrl + S. If the arena.tscn scene also displays an unsaved-change marker because the script attachment changed it, save that scene as well.
Run the scene and inspect runtime output
Press F6 to run the current scene. Your game view may look exactly as it did last lesson: a lit plane viewed by the camera. That is expected. print() does not add text to the game world or the player’s screen; it sends a development message to the editor.
While the scene runs, open the bottom panel by clicking Output if it is hidden. You should find:
Arena loaded: script is running.
Then press F8 to stop the running scene.

The message is evidence of a complete chain of events:
- Godot loaded
arena.tscn. - It created the
Arenanode. - The script attached to that node became active.
- Godot called
_ready()once. - Your
print()instruction ran.
Run the scene again with F6. You should see a new occurrence of the same message, one for that new run. If you left the scene running for a while and still see only one message for that run, _ready() is behaving correctly: it is not a per-frame callback.
Diagnose the common first-script problems
When code fails, read the Output panel rather than guessing. The first relevant message often identifies the file and line number where Godot became confused.
| Symptom | Likely cause | What to do |
|---|---|---|
| No custom message appears | The script was not saved, attached to a different node, or the wrong scene was run | Confirm Arena has the script icon, save arena.gd, then run arena.tscn with F6. |
| An error says “Indented block expected” | print() is not indented beneath _ready() | Put the cursor before print and press Tab once. |
An error highlights the print line | Missing quotation mark, parenthesis, or typo in print | Compare the line carefully with the working example. |
The script starts with extends Camera3D or another unexpected type | You attached the script to the wrong node | Delete that test script if desired, select Arena, and attach a new script whose first line is extends Node3D. |
| The Output panel contains old messages | Output persists between runs | Look for the newest message near the bottom, or use the panel’s clear control before testing again. |
| The game does not launch | A script error prevents the project from running | Read the first red error in Output, fix the named line, save, and run again. |
The key habit is to treat messages as evidence. A visible scene issue may point to a camera or mesh; a code issue points to the script editor and Output panel.
Key takeaways
A GDScript is a .gd file that adds custom behaviour to a node. You attached scripts/arena.gd to the Arena root, so its script begins with extends Node3D. That line matches the type of node receiving the behaviour.
Inside the script, _ready() is a callback Godot invokes once when the node becomes ready in the running scene. By placing an indented print() instruction inside _ready(), you produced a runtime message in Godot’s Output panel and verified that your script is attached and executing.
Next, you will begin storing game state in scripts with typed variables and constants, then update those values with expressions.
Can't find a good explanation? Sign up and we'll make it for you
Sign up