
Custom Reply Keyboards
Hello! In our last lesson, we mastered the art of sending beautifully formatted messages, transforming your bot from a plain-text-spitter into a capable communicator. This was a crucial step towards building the polished "tech UIs" you're interested in. Now, it's time to make those UIs interactive.
This lesson marks our entry into the world of Telegram's interactive components. We'll start with the most fundamental building block: the reply keyboard. You will learn how to replace the user's standard keyboard with a set of custom buttons, guiding their input and creating a much more intuitive user experience. This is the first major step in moving your bot beyond a simple command-line interface.
What Are Reply Keyboards?
A reply keyboard, or a "custom keyboard" as it's also known, is a set of buttons that appears in place of the user's standard smartphone keyboard within your bot's chat.
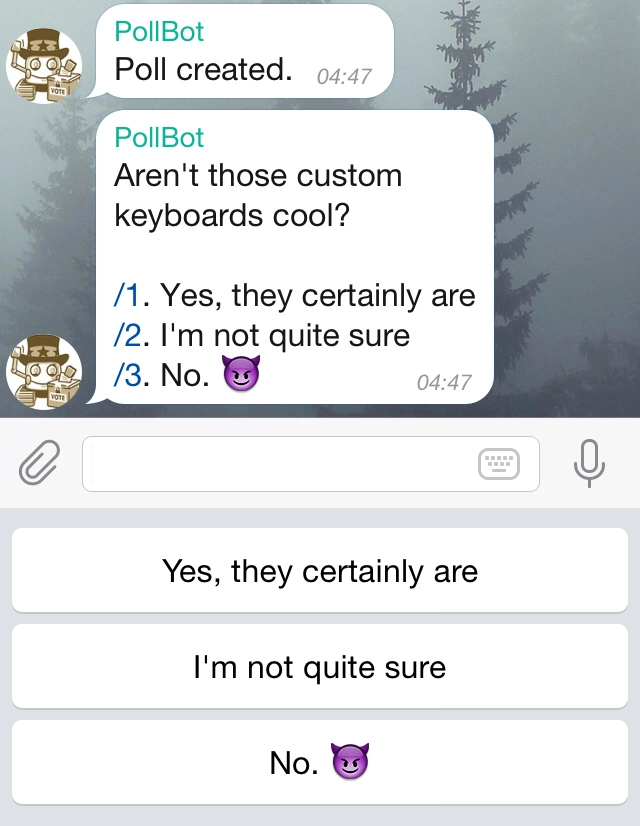
The most important thing to understand about reply keyboards is their mechanism: when a user taps a button, the Telegram client simply sends a regular text message containing the button's label to your bot.
This is a simple but powerful concept. It means you don't need to learn a new event-handling system to use them. You can rely on the same bot.hears() or bot.on("message:text") listeners you're already familiar with from our lesson on handling messages.
It's also crucial to distinguish these from inline keyboards, which we will cover in the next lesson. Reply keyboards replace the main keyboard area and send text messages. Inline keyboards, by contrast, are attached directly to a message bubble and send special "callback query" data when tapped.
Let's dive into the grammY documentation to solidify this concept.
Inline and Custom Keyboards (built-in) - grammY
This first section of the grammY guide on keyboards introduces the concept of custom (reply) keyboards and clarifies their primary function.
Read the section titled Custom Keyboards and the short paragraph that follows, ending just before the "Building a Custom Keyboard" heading. Focus on the core idea that clicking a button sends a simple text message.
Building Your First Keyboard
As you've just read, grammY provides a convenient Keyboard class that uses a builder pattern to construct your keyboard layouts. This API design makes creating complex button arrangements quite intuitive.
Let's start by importing the Keyboard class from grammy.
import { Bot, Keyboard } from "grammy";
Now, let's create a /menu command that greets the user with a keyboard offering a few options. The builder pattern involves chaining methods: .text() to add a button, and .row() to move to the next line of buttons.
// Create a new keyboard
const mainKeyboard = new Keyboard()
  .text("📊 Check Status").text("⚙️ Settings").row()
  .text("❓ Help");

// Register a command to show the keyboard
bot.command("menu", async (ctx) => {
  await ctx.reply("Welcome to the main menu. Please choose an option:", {
    reply_markup: mainKeyboard,
  });
});
Let's break this down:
- We instantiate a
new Keyboard(). - We add two buttons, "📊 Check Status" and "⚙️ Settings", on the first row using
.text(). - We call
.row()to create a line break. Any subsequent buttons will appear on the next row. - We add a final "❓ Help" button on the second row.
- In our command handler, we call
ctx.reply(). The second argument is theoptionsobject, where we pass ourmainKeyboardto thereply_markupproperty. This tells Telegram to display the keyboard along with our message.
Responding to Button Clicks
Since tapping a button just sends a text message, we can use bot.hears() to react to it.
// Listen for the specific text from the buttons
bot.hears("📊 Check Status", async (ctx) => {
  await ctx.reply("System status: All systems nominal.");
});

bot.hears("⚙️ Settings", async (ctx) => {
  await ctx.reply("There are no settings to configure yet.");
});

bot.hears("❓ Help", async (ctx) => {
  await ctx.reply("This is the help message. Use /menu to see options.");
});
This is the beauty of reply keyboards. The logic flows naturally from what you've already learned. There's no complex state or new event type to manage for this basic interaction.
Configuring Keyboard Behavior
A raw keyboard often feels a bit large on mobile devices. grammY provides several methods to fine-tune the keyboard's behavior and appearance. These are chained onto the Keyboard object, just like the button methods.
Let's read about the most common options.
Inline and Custom Keyboards (built-in) - grammY
This part of the guide covers the builder syntax in more detail and introduces the most important configuration options for controlling how the keyboard looks and behaves.
Start by reading the Building a Custom Keyboard section to see the builder pattern in action. Then, move to Sending a Custom Keyboard and review the subsections for the following common options: Resize Custom Keyboard (.resized()) One-Time Custom Keyboards (.oneTime()) Input Field Placeholder (.placeholder()) Pay attention to how these methods are chained to the Keyboard instance.
As you've seen, you can make your keyboard much more user-friendly with just a few extra method calls. Let's update our mainKeyboard to use some of these.
const mainKeyboard = new Keyboard()
  .text("📊 Check Status").text("⚙️ Settings").row()
  .text("❓ Help")
  .resized() // This is the key change
  .placeholder("Select an option..."); // And a nice UX touch
By simply adding .resized(), you are telling the Telegram client to resize the keyboard vertically to fit the buttons, which almost always looks better. The .placeholder() method adds a helpful prompt in the text input field.
The .oneTime() method is particularly useful for simple prompts, like asking for confirmation.
bot.command("delete", async (ctx) => {
    const confirmationKeyboard = new Keyboard()
        .text("Yes, delete everything").row()
        .text("No, cancel")
        .resized()
        .oneTime();

    await ctx.reply("Are you sure you want to delete everything?", {
        reply_markup: confirmationKeyboard
    });
});

// We can handle the response
bot.hears("Yes, delete everything", (ctx) => ctx.reply("Deleting... Done."));
bot.hears("No, cancel", (ctx) => ctx.reply("Operation cancelled."));
Here, .oneTime() ensures that after the user taps either "Yes" or "No", the custom keyboard disappears, returning them to the standard keyboard.
More Than Just Text Buttons
While text buttons are the most common, reply keyboards can do more. They can request the user's phone number, their location, or even have them select other users or chats. This is an advanced topic we won't implement today, but it's good to know what's possible. The Keyboard class has methods like .requestContact(), .requestLocation(), and more.
You can explore the full list of possibilities in the grammY API reference. This will be a valuable resource as you build more complex bots.
This is the API reference documentation for the Keyboard class. It's a comprehensive list of every available method.
Skim the Methods section. You don't need to memorize anything, just get a sense of the different types of request buttons available beyond .text(), such as requestContact, requestLocation, and requestPoll. This will show you there's a lot more to custom keyboards than just sending text.
Conclusion
Today you've added a fundamental tool to your bot-building arsenal: the reply keyboard. You now have the ability to guide user input, create simple menus, and build a more structured, app-like experience within Telegram.
Key Takeaways:
- Reply keyboards replace the standard system keyboard with custom buttons.
- Tapping a reply button sends its label as a plain text message.
- You build keyboards with the
grammYKeyboardclass, using a builder pattern (.text(),.row()). - Keyboards are sent via the
reply_markupoption inctx.reply(). - You can refine the keyboard's behavior with methods like
.resized(),.oneTime(), and.placeholder(). - You handle button presses using standard text listeners like
bot.hears().
In our next lesson, we will build on this foundation by exploring inline keyboards. You'll discover how they differ from reply keyboards, why they are better suited for building complex navigation menus, and how to handle the "callback query" data they generate. This will unlock a new level of interactivity for your bot.
Can't find a good explanation? Sign up and we'll make it for you
Sign up