
Hello! Welcome to your next lesson on securing microservices.
In our last session, we built a solid theoretical understanding of the OAuth 2.0 framework, its core roles, and the different grant types. We focused on the "why" behind choosing specific flows, particularly the Authorization Code grant type, which is the most common and secure flow for applications with a user present.
Today, we're moving from theory to practice. This lesson is all about implementation, directly addressing the learning outcome: Set up a Spring Authorization Server and register an OAuth2 client with support for the authorization_code grant type. By the end of this lesson, you will have a running, standalone authorization server—a critical component in any production-grade microservices ecosystem.
This is a foundational skill for the senior roles you're targeting. Interviewers at top tech companies will expect you to not only describe these patterns but also to have hands-on experience building them.
The Big Picture: Where Does the Authorization Server Fit?
Before we dive into the code, let's look at how an authorization server fits into a modern microservices architecture.
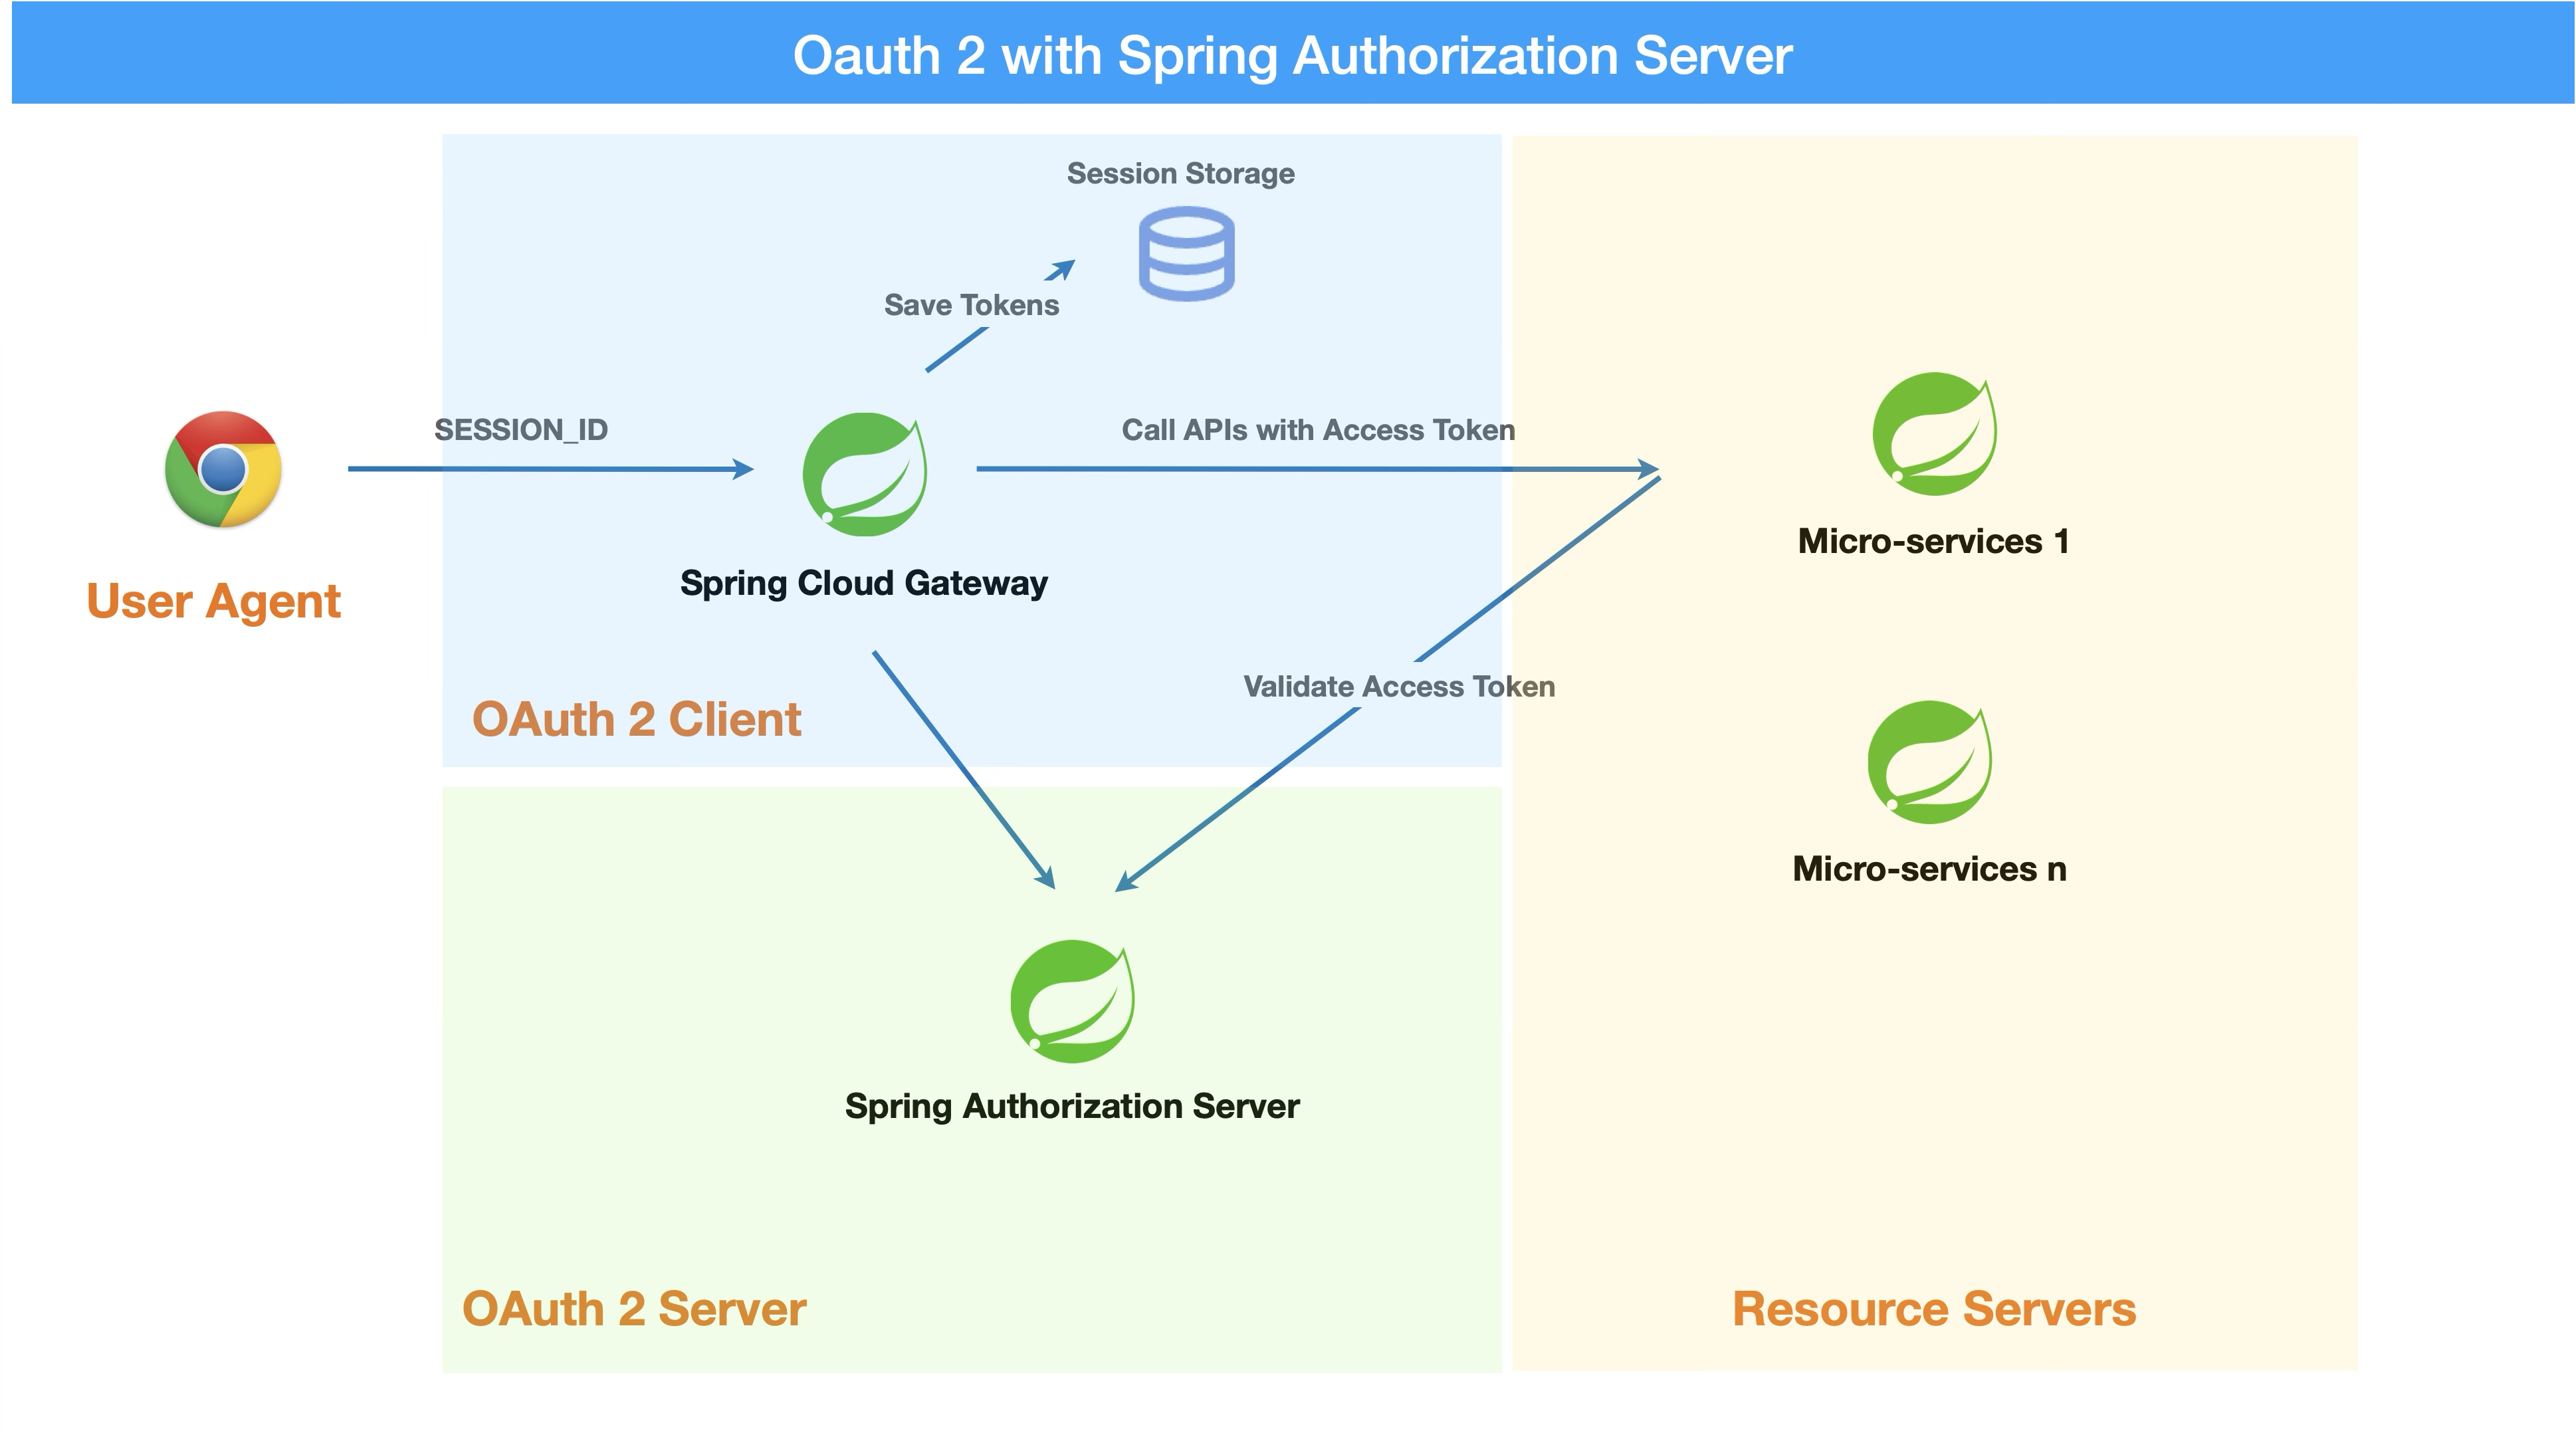
Our goal today is to build the "Spring Authorization Server" component from this diagram.
1. Project Setup: Creating the Authorization Server
Spring Authorization Server, which started as a community project, is now a first-class member of the Spring portfolio. This makes setting it up with Spring Boot straightforward.
First, create a new Spring Boot project using your preferred method (e.g., start.spring.io). Use the following configuration:
- Project: Gradle or Maven
- Language: Java
- Spring Boot: 3.x or later (e.g., 3.2.x)
- Java: 17 or later
- Dependencies:
Spring WebSpring SecurityOAuth2 Authorization Server
The most crucial dependency here is org.springframework.boot:spring-boot-starter-oauth2-authorization-server. The official "Getting Started" guide provides the exact dependency declarations.
Getting Started :: Spring Authorization Server
Refer to the official documentation to see the exact dependency declaration for Maven or Gradle.
Locate the section titled "Installing Spring Authorization Server" and review the dependency snippet for your chosen build tool.
2. The Core Configuration
With the project created, our next step is to configure the necessary Spring beans. All our work will be in a single configuration class, which we can call SecurityConfig. Since you're familiar with Spring, you know this will involve creating a class annotated with @Configuration and defining several @Bean methods.
The official Spring documentation provides an excellent, minimal Java-based configuration that we will use as our foundation.
Getting Started :: Spring Authorization Server
This is the most important resource for this lesson. It provides the full Java configuration for a minimal, functional authorization server. We will be implementing and dissecting this code.
Open the section "Defining Required Components" and copy the entire SecurityConfig.java example into your project. Don't worry about understanding every line yet; we will break it down piece by piece.
Now that you have the code in your IDE, let's break down the purpose of each bean. This is the "why" that's critical for interviews.
a. The Two SecurityFilterChain Beans
You'll notice two @Bean methods that return a SecurityFilterChain. This is a key concept in modern Spring Security.
-
authorizationServerSecurityFilterChain(@Order(1)): This filter chain is specifically for the OAuth 2.0 protocol endpoints (e.g.,/oauth2/authorize,/oauth2/token). TheOAuth2AuthorizationServerConfiguration.applyDefaultSecurity(http)helper configures all the standard endpoints required by the OAuth 2.0 and OIDC specifications. It's given higher precedence with@Order(1). -
defaultSecurityFilterChain(@Order(2)): This is the standard filter chain that protects the rest of your application. It's configured to use form-based login (.formLogin(...)), which the user will be redirected to when they need to authenticate with the authorization server.
b. User Management: UserDetailsService
The authorization server needs to authenticate the Resource Owner (the end-user). For this, it relies on a standard Spring Security UserDetailsService. For our demo, an in-memory user is sufficient. In a production system, this bean would be configured to connect to a database or an LDAP server.
@Bean
public UserDetailsService userDetailsService() {
    UserDetails userDetails = User.withDefaultPasswordEncoder()
            .username("user")
            .password("password")
            .roles("USER")
            .build();
    return new InMemoryUserDetailsManager(userDetails);
}
Note: withDefaultPasswordEncoder() is deprecated and not for production use, but it's acceptable for this initial setup.
c. Key Management: JWKSource
When the authorization server issues an access token, it needs to be digitally signed to prevent tampering. The JWKSource (JSON Web Key Source) bean is responsible for providing the cryptographic keys (in our case, an RSA key pair) used for signing the JWTs. The sample code generates a new key pair on startup.
d. Client Management: RegisteredClientRepository
This is the most important bean for our current learning outcome. The RegisteredClientRepository is a repository that stores the details of all clients allowed to interact with our authorization server.
Let's look closely at the client we registered:
@Bean
public RegisteredClientRepository registeredClientRepository() {
    RegisteredClient oidcClient = RegisteredClient.withId(UUID.randomUUID().toString())
            .clientId("oidc-client") // The client's ID
            .clientSecret("{noop}secret") // The client's secret
            .clientAuthenticationMethod(ClientAuthenticationMethod.CLIENT_SECRET_BASIC) // How the client authenticates
            .authorizationGrantType(AuthorizationGrantType.AUTHORIZATION_CODE) // The flow we are enabling
            .authorizationGrantType(AuthorizationGrantType.REFRESH_TOKEN) // Also allowing token refresh
            .redirectUri("http://127.0.0.1:8080/login/oauth2/code/oidc-client") // Where to send the user back to
            .scope(OidcScopes.OPENID)
            .scope("profile")
            .clientSettings(ClientSettings.builder().requireAuthorizationConsent(true).build())
            .build();

    return new InMemoryRegisteredClientRepository(oidcClient);
}
Breaking this down:
clientIdandclientSecret: These are the credentials for the client application itself. This configuration is for a confidential client (like a backend Spring Boot service) that can securely store a secret.clientAuthenticationMethod:CLIENT_SECRET_BASICspecifies that the client will send its ID and secret in a BasicAuthorizationheader when it calls the/oauth2/tokenendpoint.authorizationGrantType(AuthorizationGrantType.AUTHORIZATION_CODE): This explicitly enables the Authorization Code grant type for this client.redirectUri: This is a security measure. The authorization server will only redirect the user back to a pre-registered URI, preventing an attacker from redirecting the user and stealing the authorization code.scope: Defines the permissions this client is allowed to request.
Test your understanding!
Imagine you need to register a second client for a React single-page application (SPA). An SPA is a public client because it runs in the user's browser and cannot keep the clientSecret confidential.
Which parts of the RegisteredClient configuration above would you change to securely register this SPA for the authorization_code flow?
Show answer
To register a public client securely, you would make these key changes:
- Remove the
clientSecret: Public clients don't have a secret.// .clientSecret("{noop}secret") // This line would be removed. - Change the authentication method: Since there's no secret, the client can't use
CLIENT_SECRET_BASIC. You'd set the authentication method to none..clientAuthenticationMethod(ClientAuthenticationMethod.NONE) - Enforce PKCE: This is the most critical change. You must require Proof Key for Code Exchange (PKCE) to secure the flow for a public client.
.clientSettings(ClientSettings.builder().requireProofKey(true).build())
This ensures that even if an attacker intercepts the authorization code, they cannot exchange it for an access token without the secret code_verifier that only the legitimate client possesses.
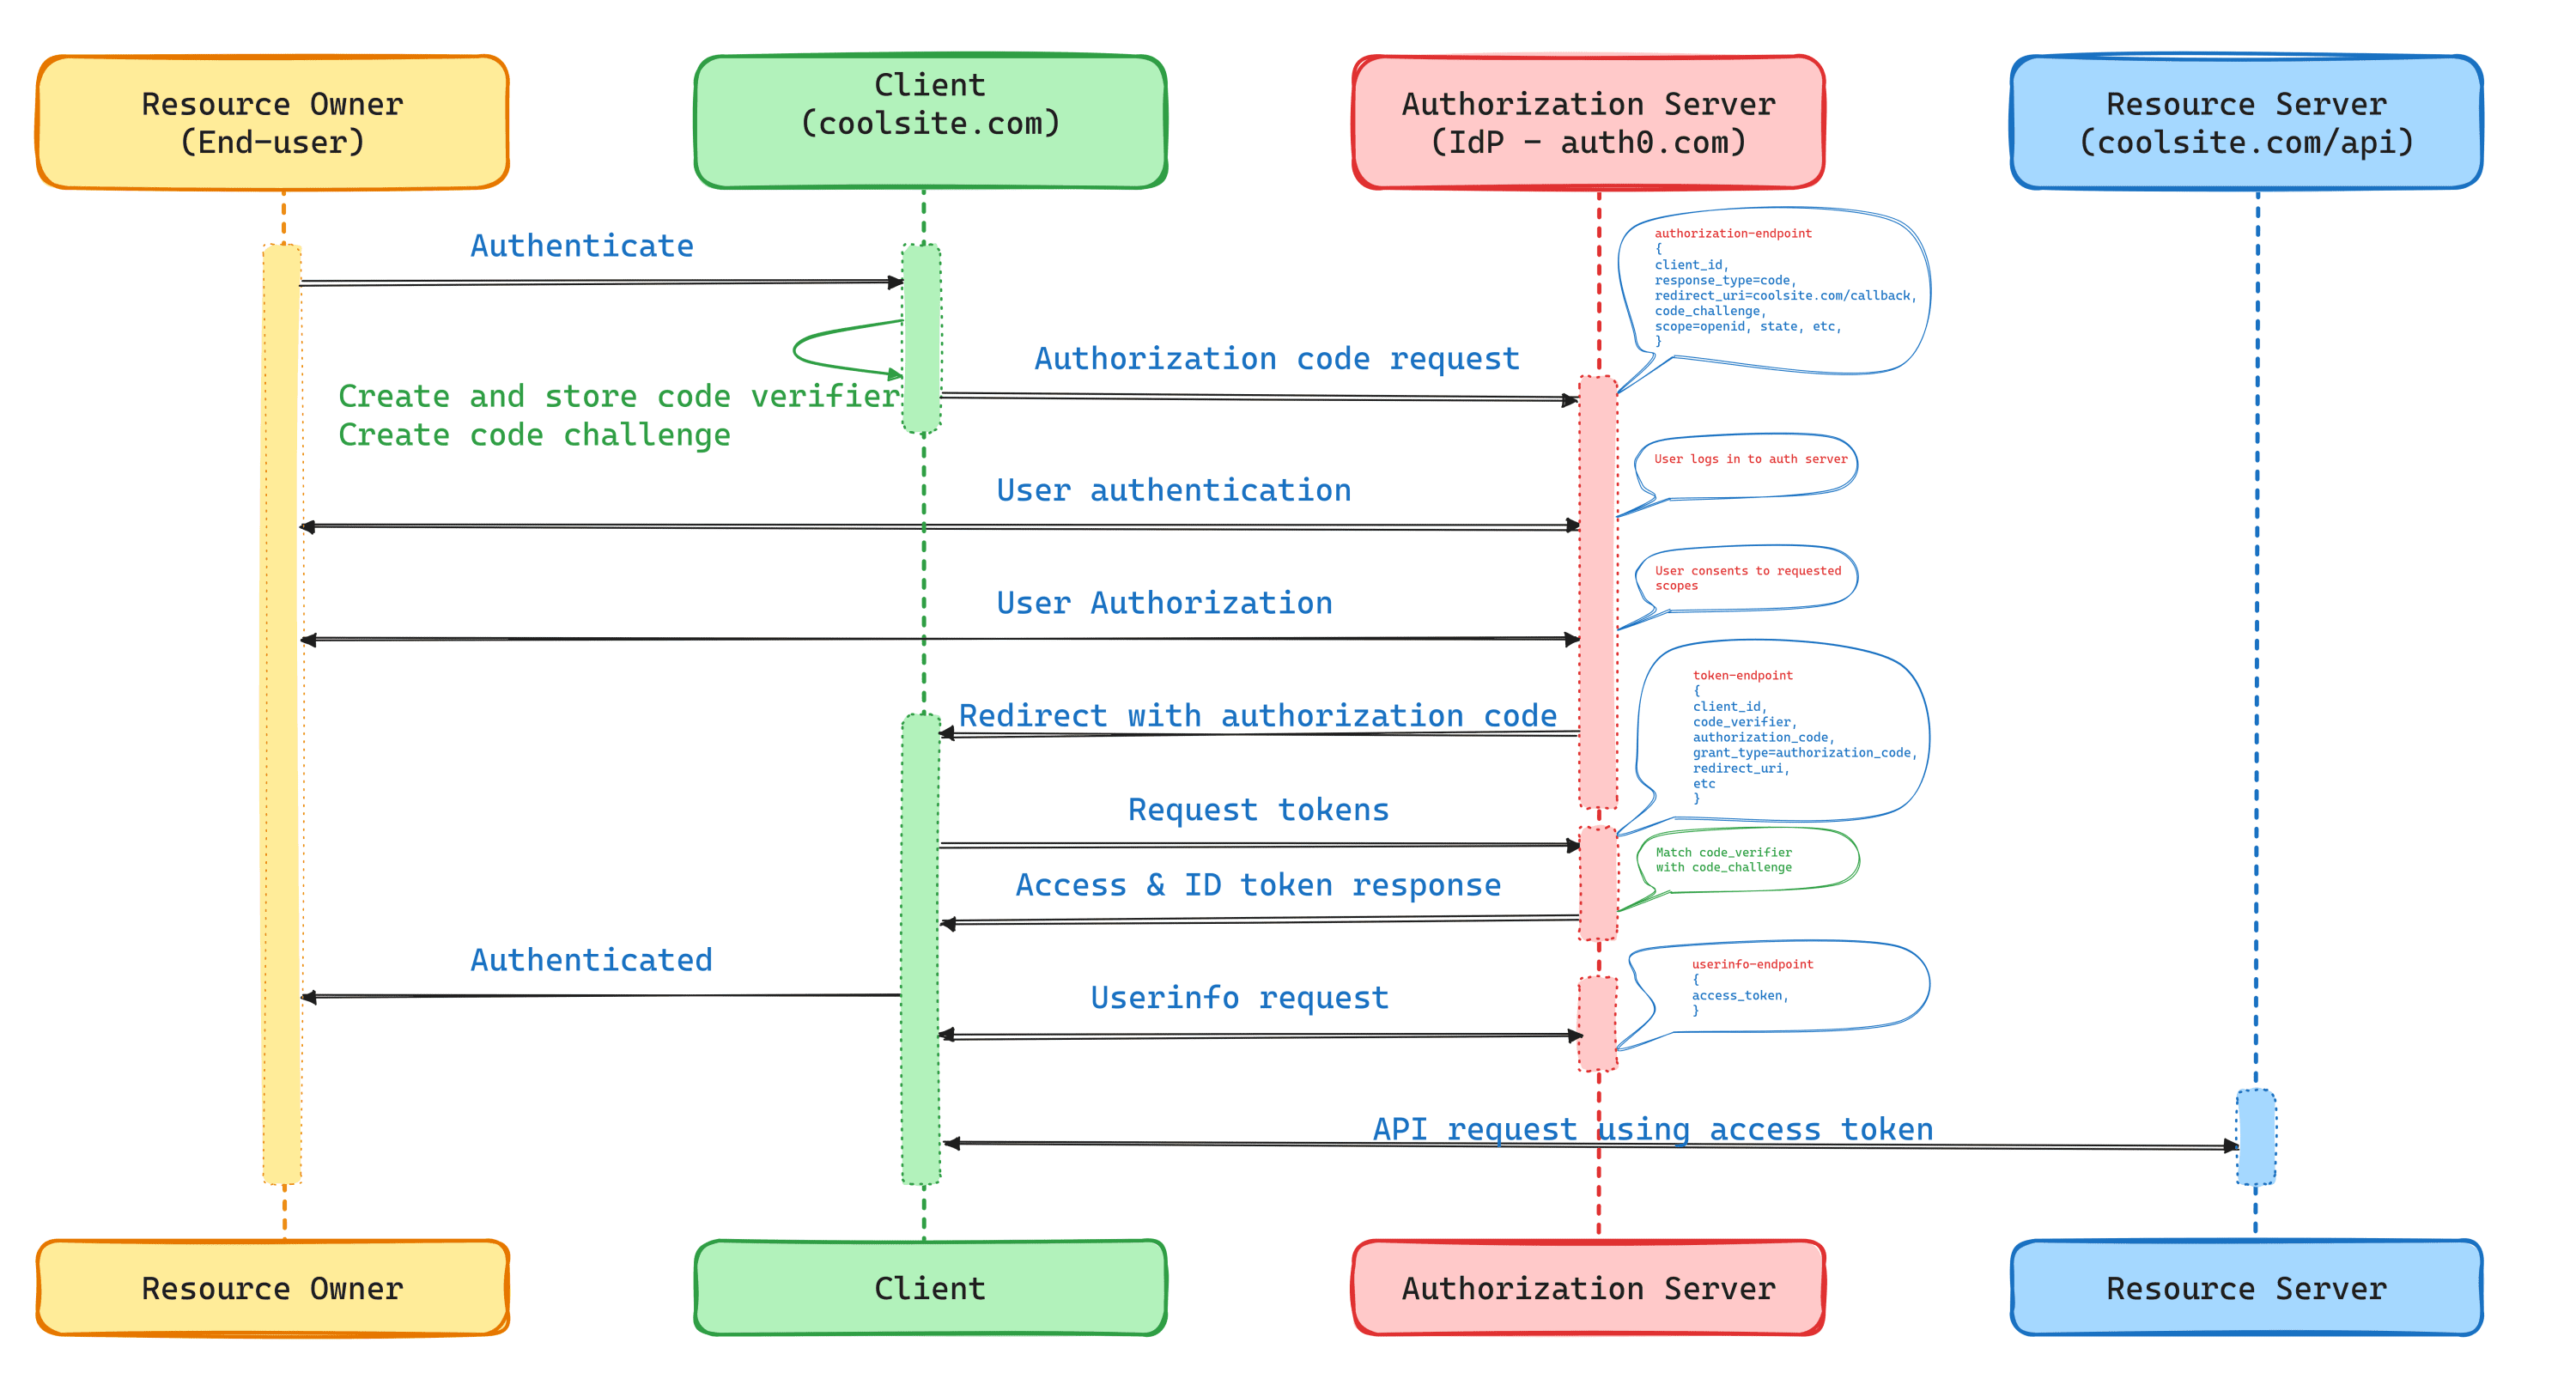
3. Seeing It in Action: The Authorization Code Flow
With your server configured, let's walk through the authorization_code flow step-by-step. The following video provides an excellent hands-on demonstration of this entire process.
Implementing an OAuth 2 authorization server with Spring Security - the new way! by Laurentiu Spilca
This video by Laurentiu Spilca demonstrates the entire authorization code flow using a locally running Spring Authorization Server, just like the one you've built. He shows how to construct the authorization URL, log in, and exchange the code for a token using Postman.
Watch the segment from 25:23 to 31:29. Follow along as he: Constructs the URL for the /authorize endpoint in the browser. Logs in with the user credentials defined in the server. Copies the code from the redirect URL. Uses Postman to make a POST request to the /token endpoint to exchange the code for an access token.
To try this yourself, follow these steps after starting your application:
-
Initiate the Flow: Open your browser and navigate to the authorization endpoint. The URL will look something like this (make sure the parameters match your
RegisteredClientconfiguration):http://localhost:9000/oauth2/authorize?response_type=code&client_id=oidc-client&scope=openid&redirect_uri=http://127.0.0.1:8080/login/oauth2/code/oidc-client -
Authenticate: You'll be redirected to the login page. Use the credentials you configured in
UserDetailsService(user/password). -
Consent: If required, you'll see a consent screen asking you to approve the requested scopes.
-
Get the Code: The server will redirect you to the
redirect_uriyou provided. The browser will likely show a 404 error becausehttp://127.0.0.1:8080isn't running, but that's expected. The important part is in the URL in your browser's address bar. It will contain the authorization code, for example:http://127.0.0.1:8080/login/oauth2/code/oidc-client?code=... -
Exchange the Code for a Token: Now, use a tool like Postman or
curlto make aPOSTrequest to the token endpoint (http://localhost:9000/oauth2/token).- Authorization: Use Basic Auth with the
clientIdas the username andclientSecretas the password. - Body (form-data or x-www-form-urlencoded):
grant_type:authorization_codecode: The code you copied from the URL.redirect_uri:http://127.0.0.1:8080/login/oauth2/code/oidc-client
- Authorization: Use Basic Auth with the
If successful, the authorization server will respond with a JSON payload containing your access_token and refresh_token.
Conclusion
Congratulations! You have successfully built and tested a standalone OAuth 2.0 Authorization Server using Spring. This is a significant, practical step in mastering microservice security.
Key Takeaways:
- Spring Authorization Server provides the components to build a standards-compliant authorization server.
- The configuration requires several key beans: two
SecurityFilterChains (one for protocol endpoints, one for user authentication), aUserDetailsService, aJWKSourcefor signing tokens, and aRegisteredClientRepository. - The
RegisteredClientRepositoryis where you define which applications can use your authorization server, which grant types they are allowed to use, and other security constraints likeredirect_uri. - The
authorization_codeflow involves two main steps: first, redirecting a user to the/authorizeendpoint to get a code, and second, exchanging that code for a token at the/tokenendpoint.
Next Up
You now have a server that can issue tokens. The next logical question is: how does a microservice use these tokens to protect its APIs?
In our next lesson, we will answer exactly that. We will build a simple Spring Boot microservice and configure it as an OAuth 2.0 Resource Server to validate JWT access tokens issued by the authorization server we built today. This will complete the core loop of issuing and validating tokens in a secure microservices architecture.
Can't find a good explanation? Sign up and we'll make it for you
Sign up