
Hello! Welcome to the next lesson in our journey through Laravel Queues.
In our last session, we configured our application to use different queue drivers, specifically the database driver and the high-performance Redis driver. You now know how to dispatch a job to a specific queue connection, which is a crucial skill for building scalable applications. However, a job dispatched to a queue is like a letter dropped in a mailbox—it waits there until someone comes to process it.
Today, we'll meet that "someone": the queue worker. This lesson is focused on the learning outcome: Run queue workers to process jobs from the queue. We will cover how to start workers, what options are available to control them, and how to ensure they run reliably in a production environment.
1. The Role of the Worker: Putting Jobs to Work
In the last lesson, when you dispatched a job, it was added as a record to your jobs database table or as an entry in Redis. But nothing actually happened. That's because we haven't started a worker process yet.
A worker is a long-running command-line process that continuously polls your queue backend (e.g., the jobs table or Redis), pulls off the next available job, and executes the code within its handle() method.
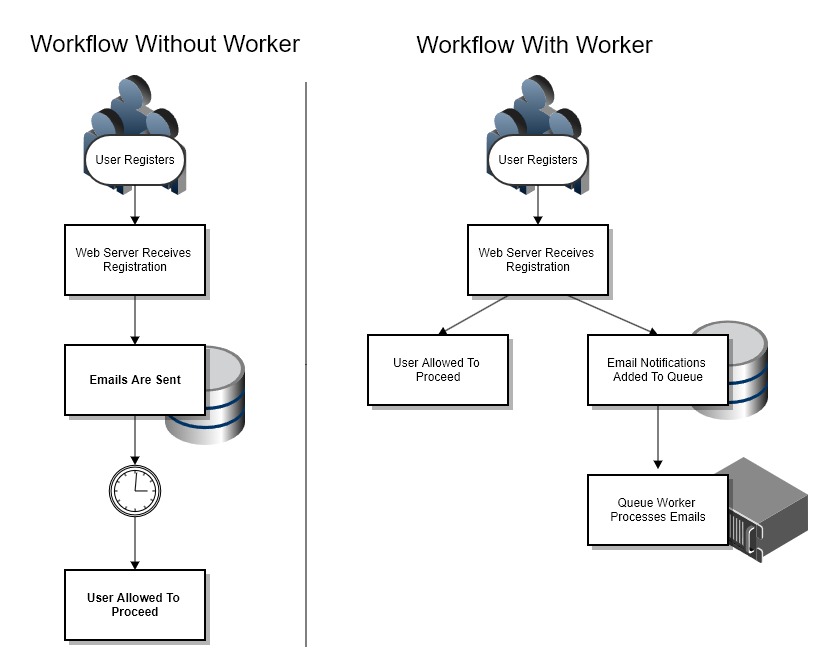
To understand this concept intuitively, let's watch a short segment that uses a great real-world analogy.
30 Days to Learn Laravel, Ep 25 - Queues Are Easier Than You Think
This clip from the Laracasts video you've seen before uses an excellent analogy of a copy shop to explain the relationship between jobs, queues, and workers.
Watch from 04:04 to 05:59. Listen carefully to how the concepts of a 'job' (the copy request), a 'queue' (the inbox tray), and a 'worker' (the person doing the copying) map to what we're doing in Laravel.
As the video explains, you already know what jobs, queues, and workers are from everyday life. Now, let's become the "worker" and start processing the jobs we've queued.
2. Starting Your First Worker
The primary tool for this is an Artisan command. Let's see it in action.
30 Days to Learn Laravel, Ep 25 - Queues Are Easier Than You Think
The same Laracasts video demonstrates exactly how to start a worker and what happens when you do.
Watch from 05:59 to 07:12. Pay attention to the command php artisan queue:work and how, once it's running, the previously queued email job is immediately processed.
The key command is:
php artisan queue:work
When you run this command in your terminal, it will start a worker process that connects to your default queue (as defined by QUEUE_CONNECTION in your .env file). The worker will then begin "listening" for jobs. As soon as it finds one, it will process it, and you'll see output in your terminal indicating the job's status (processed or failed).
Try it yourself:
- Ensure you have a job dispatched to your queue (from a previous exercise or by triggering an action in your app that dispatches one).
- Open your terminal and run
php artisan queue:work. - Observe the output as the worker picks up and processes the job.
3. The Worker Lifecycle and Code Changes
One of the most important things to understand as a developer is how queue:work manages your application code. To be efficient, a worker loads the entire Laravel framework into memory once when it starts and keeps it there to process multiple jobs without the overhead of bootstrapping the framework every time.
What does this mean for you? If you run a worker and then change the code in one of your job classes, the worker will not see those changes. It's still using the old code loaded in its memory.
Let's see a practical demonstration of this critical concept.
30 Days to Learn Laravel, Ep 25 - Queues Are Easier Than You Think
This final clip from the Laracasts video clearly demonstrates the problem of workers not seeing code changes until they are restarted.
Watch from 13:52 to 14:48. Notice how the job's log output remains the same after the code is changed. Only after stopping (Ctrl+C) and restarting the worker does the new logic execute.
The takeaway is simple but crucial: Whenever you deploy new code that affects your jobs, you must restart your queue workers. We'll see how to automate this in a production environment shortly.
4. Configuring the Worker
The queue:work command is highly configurable via various options. These allow you to control which queues a worker listens to, how it handles failures, and how it manages system resources.
How to Implement Queue Workers in Laravel
The article from OneUptime provides a fantastic, concise list of the most common options for the queue:work command.
In the article, find the section 'Running Queue Workers' and review the list under the 'Basic Worker Command' heading. You don't need to memorize them all, but understand what the most important ones do.
Here are some of the most important options you'll use:
--queue=high,default: Tells the worker to process jobs from thehighqueue first, and only when it's empty, move to thedefaultqueue. This is how you implement priority.--tries=3: If a job fails, the worker will attempt to run it again up to 3 times before moving it to thefailed_jobstable.--timeout=60: Sets a maximum execution time for a job. If a job runs longer than 60 seconds, the worker will be killed. This prevents a "stuck" job from blocking the worker indefinitely.--memory=128: If the worker's memory usage exceeds 128MB, it will finish its current job and then exit gracefully. This is a safeguard against memory leaks.--sleep=3: When no jobs are available, the worker will wait for 3 seconds before polling the queue again. This prevents the worker from consuming excessive CPU cycles when idle.
5. Running Workers in Production
Manually running php artisan queue:work in your terminal is fine for local development. In a production environment, this approach is not viable. If you close your SSH session or if the process crashes, your queues will stop being processed.
You need a process manager to monitor your worker processes, keep them running, and automatically restart them if they crash. The most common tool for this in the Laravel ecosystem is Supervisor.

Understanding Laravel queue internals: the job lifecycle
The Queuewatch article provides an excellent explanation of a 'production-hardened' Supervisor configuration and why certain settings are critical.
Read the section 'Supervisor Configuration Deep Dive'. Focus on understanding the purpose of the example configuration file and the explanation of key parameters like stopasgroup, stopwaitsecs, and --max-time.
A typical Supervisor configuration file for a Laravel worker looks like this:
[program:laravel-worker]
process_name=%(program_name)s_%(process_num)02d
command=php /path/to/your/app/artisan queue:work redis --sleep=3 --tries=3
autostart=true
autorestart=true
user=www-data
numprocs=8
redirect_stderr=true
stdout_logfile=/path/to/your/app/storage/logs/worker.log
stopwaitsecs=3600
Key directives:
command: The fullqueue:workcommand to run. Notice we can add our options here.numprocs=8: This tells Supervisor to run 8 worker processes in parallel, allowing you to process 8 jobs concurrently. You can adjust this number based on your server's capacity and application needs.autostart=true: Starts the workers when the server boots.autorestart=true: If a worker process crashes for any reason (e.g., it hits a memory limit or an unexpected error), Supervisor will automatically start a new one.
With Supervisor managing your workers, your deployment process becomes simple: after you push your new code, you just need to run sudo supervisorctl restart laravel-worker:* to have Supervisor gracefully restart all workers, ensuring they pick up the new code.
Conclusion
You have now mastered the final piece of the basic queueing puzzle. You know not only how to dispatch jobs but also how to run the workers that bring those jobs to life.
Key Takeaways:
- Jobs are processed by workers, which are started with the
php artisan queue:workcommand. - Workers are long-running processes that load the application once for efficiency.
- You must restart your workers after deploying code changes for them to take effect.
- The
queue:workcommand has many options (--queue,--tries,--timeout) to control its behavior. - In production, a process manager like Supervisor is essential for keeping worker processes running reliably and concurrently.
Up Next:
Our system is now running, but what happens when things go wrong? Jobs can fail due to bugs, external API outages, or bad data. In the next lesson, we will focus on handling and retrying failed jobs to build a truly robust and resilient background processing system.