
Hello! Welcome back to your course on Ethereum and Solidity development.
In our first lesson, we explored the core of Ethereum's execution environment: the EVM. We dissected its main data locations—the volatile stack and memory, and the persistent, costly storage. You learned that every state change on the blockchain is the result of the EVM executing code.
Today, we'll zoom out to see the full picture. If the EVM is the computer, a transaction is the command that tells it what to do. Our goal is to trace the complete journey of a transaction, from the moment a user initiates an action to its final, irreversible inclusion in the blockchain.
Learning Outcome: By the end of this lesson, you will be able to explain the transaction lifecycle, from creation and signing to inclusion in a block.
1. The Anatomy of a Transaction
A transaction is a cryptographically signed instruction initiated by an Externally-Owned Account (EOA)—that is, an account controlled by a private key, not by code. It's the only way to trigger a change in the Ethereum world state, whether that's transferring ETH or interacting with a smart contract.
To understand the lifecycle, we first need to understand the object itself. A transaction is essentially a data package with several key fields.
The official Ethereum documentation provides a clear and concise breakdown of a transaction's components. This will serve as our foundation.
Please read the section 'What's a transaction?'. As you read, focus on the purpose of each field listed, especially nonce, data, and the three gas-related fields.
To complement that reading, the following video provides a helpful narrated walkthrough of the same concepts.
The Most Misunderstood Concept in Ethereum | Ethereum transactions explained
This video from EatTheBlocks explains the core transaction fields in a conversational way.
Watch from 0:27 to 02:46. Pay attention to the explanation of the nonce field, as it's critical for preventing replay attacks and ensuring transactions from a single account are processed in order.
To summarize, every transaction contains:
from: The sender's address.to: The recipient's address. This can be another EOA or a smart contract.value: The amount of ETH to send, denominated in Wei (1 ETH = Wei).nonce: A transaction counter for thefromaccount. It must be sequential (0, 1, 2, ...). This prevents an old transaction from being re-broadcast and processed again.data: An optional field used for smart contract interactions. For a simple ETH transfer, it's empty. For a contract call, it contains the function signature and arguments, which we'll explore later.- Gas Fields (
gasLimit,maxFeePerGas,maxPriorityFeePerGas): These fields determine the fee paid for the transaction. We will dedicate our entire next lesson to this crucial topic. signature: The cryptographic proof that the holder of thefromaccount's private key authorized this transaction.
2. Creation and Cryptographic Signing
A transaction doesn't just appear on the network. It begins with a user's intent, which is translated into a transaction object by a wallet like MetaMask. Before this object can be broadcast, it must be signed.
Signing serves two vital purposes:
- Authentication: It proves that the transaction was initiated by the true owner of the
fromaddress. Only the holder of the corresponding private key can generate a valid signature. - Integrity: The signature is derived from a hash of all other transaction fields. If anyone tries to tamper with the transaction in transit—for example, by changing the
toaddress or thevalue—the signature will no longer be valid.
The signing process itself is a standard application of Elliptic Curve Digital Signature Algorithm (ECDSA). The wallet takes the transaction data, hashes it, and then signs that hash with the user's private key. The output is the signature, which consists of three values: v, r, and s.
The ethereum.org documentation shows what a signed transaction looks like from a developer's perspective, including the JSON-RPC call format. Given your background, this should look familiar.
Read the text following the first code block, starting from 'But a transaction object needs to be signed...'. Look at the account_signTransaction example and the resulting raw and tx objects. Notice how the final tx object includes the v, r, and s signature components.
3. Submission, Propagation, and the Transaction Pool
Once signed, the raw transaction is ready to be sent to the network. This is typically done by sending it to an Ethereum node via a JSON-RPC request (e.g., eth_sendRawTransaction). Your wallet handles this by communicating with an RPC provider like Infura or Alchemy, or your own node.
Here's what happens next:
- Initial Validation: The node that receives the transaction performs a series of initial checks. Is the signature valid? Is the
noncecorrect for the sender's account? Does the sender have enough ETH to cover thevalueplus the maximum potential gas fee? - The Mempool: If the transaction passes these checks, the node adds it to its local transaction pool (often called the "mempool"). This is a staging area for valid, pending transactions that have not yet been included in a block.
- Propagation: The node then broadcasts, or "gossips," this new transaction to its connected peers in the P2P network. Those peers validate it and, if it's valid, add it to their own mempools and propagate it further. Within seconds, the transaction spreads across the entire network.
This diagram provides a great high-level overview of the flow, from a dApp front-end to the blockchain network.
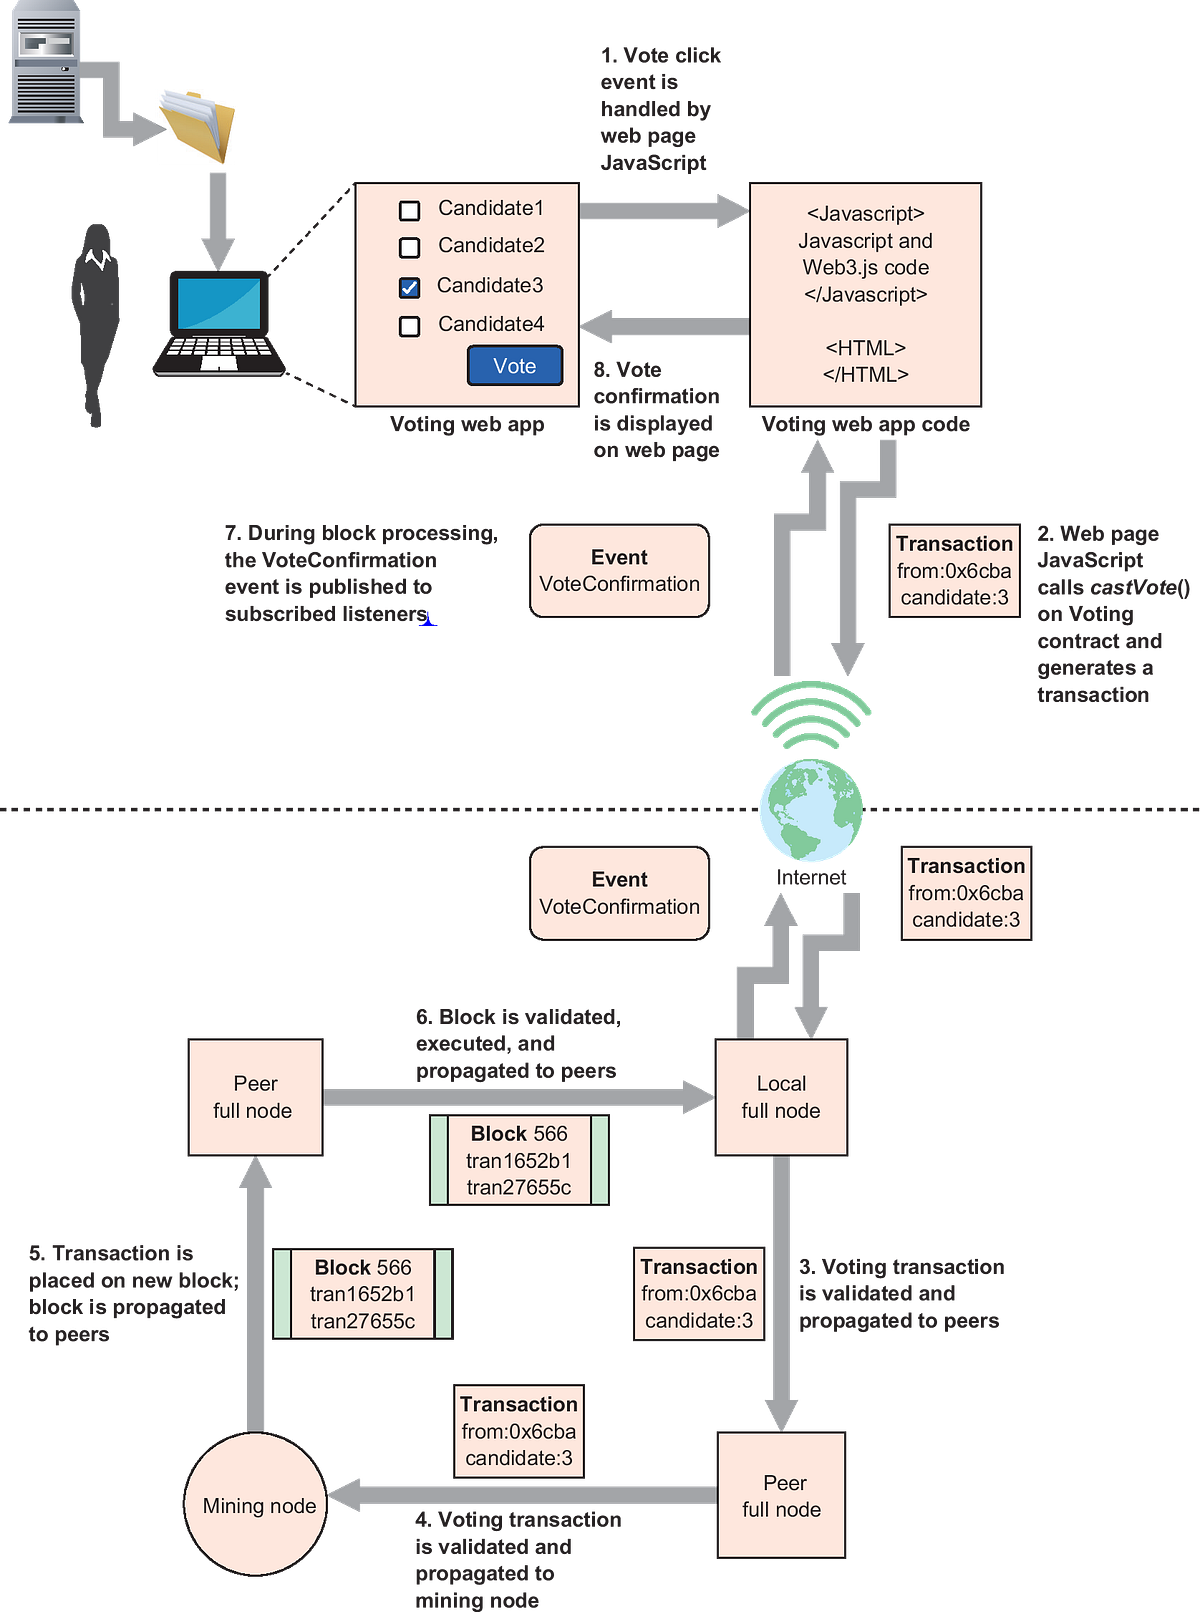
Now, let's take a more technical look at what happens inside an Ethereum client when it receives a transaction.
Talk | A Deep Dive into Go Ethereum
This talk from an ETHGlobal event features a core developer walking through the Go Ethereum (Geth) client's source code. It provides an authentic, under-the-hood view of how a transaction enters the system. Don't worry about understanding every line of Go; focus on the conceptual steps.
Watch the segment from 01:01 to 05:50. The speaker explains how a signed transaction is submitted via RPC, undergoes initial checks, and is added to the transaction pool, which sorts transactions based on their fees.
4. Block Inclusion and Execution
The transaction is now sitting in the mempools of thousands of nodes across the world. The next step is for a validator to select it for inclusion in a new block.
In Ethereum's Proof-of-Stake system, validators are responsible for proposing new blocks. They assemble a block by:
- Selecting Transactions: A validator looks at its local transaction pool and selects a set of transactions to include. This selection is primarily driven by economics: transactions offering a higher tip (
maxPriorityFeePerGas) are more profitable and are usually picked first. - Executing Transactions: The validator executes the selected transactions sequentially against the current state. This is where the EVM from our last lesson does its work. For each transaction, the EVM runs the code (if any), updates account balances, and modifies contract storage.
- Proposing the Block: After executing the transactions, the validator bundles them into a block, calculates the new state root (a hash representing the entire state of the blockchain), and proposes this new block to the network.
Talk | A Deep Dive into Go Ethereum
Let's return to the Geth deep dive to see how a block is built.
Watch the clip from 19:15 to 24:08. The speaker describes how a miner (the term used in the pre-Merge video, now a validator) prepares a block header and then fills it with transactions fetched from the transaction pool.
When the EVM executes a transaction that interacts with a smart contract, it uses the data field. The first 4 bytes of the data field, known as the "function selector," identify which function to call. The rest of the data contains the encoded function arguments. This is how a high-level call in your front-end code, like myContract.methods.myFunction(arg1, arg2).send(), is translated into an executable instruction for the EVM.
5. Confirmation and Finality
Once a validator proposes a block, other validators in the network "attest" to it, signaling that they agree it's valid. The journey isn't quite over yet.
- Inclusion: Your transaction is now "confirmed" and included in a block on the blockchain. You can view it on a block explorer like Etherscan.
- Justification: Under Proof-of-Stake, blocks are grouped into "epochs" (32 blocks). When a supermajority of validators agrees on an epoch, it becomes justified. This provides a stronger guarantee of inclusion.
- Finalization: When a subsequent epoch is justified, the previously justified epoch becomes finalized. A finalized block is considered a permanent and irreversible part of the chain. Reverting a finalized block would require an attack costing billions of dollars and a social consensus to accept the attack, making it practically impossible.
This progression from included to justified to finalized provides an increasing level of certainty that your transaction is permanent.
The ethereum.org article summarizes this final part of the lifecycle concisely.
Read the section 'Transaction lifecycle'. It outlines the steps from submission to the final upgrades to 'justified' and 'finalized' status.
Conclusion
Great job! We've traced the entire path of a transaction, from a simple signed message to an irreversible state change on a global computer.
Key Takeaways:
- A transaction is a signed data package from an EOA that represents an intent to change the state.
- The signature provides authentication and integrity, proving who sent the transaction and that it hasn't been altered.
- Transactions wait in a mempool before being selected by a validator.
- Validators execute transactions to compute the new state, then bundle them into a block.
- The lifecycle culminates in finality, where a transaction becomes a permanent and immutable part of the blockchain's history.
Throughout this lesson, we've mentioned the gas fields (gasLimit, maxFeePerGas, maxPriorityFeePerGas) that determine the transaction fee. This fee is the economic incentive that drives the entire process. In our next lesson, we will dive deep into this topic, analyzing how transaction costs are determined and how the EIP-1559 fee market works.
Can't find a good explanation? Sign up and we'll make it for you
Sign up