Hello! Welcome back to the course.
In our last lesson, we installed the essential tools for our development journey: Node.js, VS Code, and MetaMask. Now it's time to bring them all together and set up a professional development environment where we can build, test, and deploy our smart contracts.
Today, we'll focus on Hardhat, the engine of our development workflow. Hardhat is an Ethereum development environment that streamlines common tasks like compiling code, running tests against a local blockchain, and managing deployments. Your experience with data warehousing and ETL pipelines will be helpful here; you can think of Hardhat as a specialized task runner and integrated development environment, similar to how you might use tools to manage data transformations and deployments in a data warehouse.
By the end of this lesson, you will have a fully functional Hardhat project on your machine, understand its structure, and know how to use its most fundamental commands.
1. What is Hardhat?
Before we install it, let's clarify what Hardhat does for us. It provides three core functionalities that make a developer's life easier:
- Project Scaffolding & Task Running: It creates a standard project structure and gives you simple commands (
compile,test,deploy) to manage the smart contract lifecycle. - Plugin Ecosystem: Hardhat is highly extensible. We'll be using plugins for testing (
ethers.js), contract upgrades, and deployment throughout this course. - Hardhat Network: This is perhaps its most powerful feature. Hardhat comes with a built-in local Ethereum network designed for development. It's like having a private, high-speed blockchain running on your computer. This allows you to deploy contracts and run tests instantly, without the cost or delay of using a public testnet.
2. Creating Your First Hardhat Project
Let's get hands-on and create our first project. We will use the official Hardhat documentation as our guide.
Open your terminal or command prompt (the same one where you verified your Node.js installation).
Getting started with Hardhat 3
The official Hardhat documentation provides the most up-to-date instructions for creating a new project. We'll follow it to ensure our setup is current and correct.
Please read and follow the instructions under the 'Installation' heading. First, create a new directory for your project (e.g., mkdir my-token-project && cd my-token-project). Then, run the command npx hardhat --init. When prompted: Select Create a JavaScript project. Accept the default answers for the remaining questions by pressing Enter. \nThis will create a sample project and install all the necessary dependencies.
After the process completes, your project folder is ready. You have successfully initialized a complete Ethereum development environment.
3. Understanding the Project Structure
Now that you've created the project, let's open it in VS Code and explore the structure Hardhat has generated. In your terminal, from the project directory, you can type code . to open it in VS Code.
You'll see several files and folders. The following image shows a typical layout.
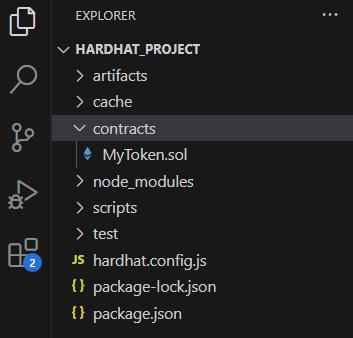
To get a better sense of what each part does, let's watch a quick walkthrough.
Build and Deploy Smart Contracts using Hardhat | [See Description]
Patrick Collins, a well-known educator in the web3 space, provides a clear walkthrough of the folders and files that Hardhat generates. This will help you get oriented within your new project.
Watch the video from 02:59 to 04:49. The first part (until 04:09) explains the purpose of the contracts, artifacts, scripts, and test folders. The second part (from 04:09) gives a quick look at the all-important hardhat.config.js file.
To summarize, here are the key components you need to know:
contracts/: This is where you will write your Solidity smart contract files (with a.solextension).scripts/: This folder is for JavaScript or TypeScript files that automate interactions with your contracts, such as deployment scripts.test/: This folder contains your test files. Writing automated tests is a critical part of smart contract development, and we have a whole module dedicated to it.hardhat.config.js: This is the main configuration file for your project. You use it to define which Solidity version to use, configure network connections (like to a testnet or Ethereum mainnet), and add plugins.artifacts/: This directory is automatically generated when you compile your contracts. It contains the compiled bytecode (the machine-readable version of your contract) and the ABI (Application Binary Interface), a JSON file that defines how to interact with your contract's functions. You should not edit files in this directory manually.
4. Interacting with Your Project: Core Hardhat Commands
Hardhat provides a set of simple tasks to manage your project. Let's try the three most fundamental ones. Run these commands from your project's root directory in the terminal.
1. Compile
The compile task reads the Solidity files in your contracts folder and generates the bytecode and ABI in the artifacts folder.
npx hardhat compile
You should see a message like "Compiled 1 Solidity file successfully."
2. Test
The test task executes the tests in your test folder. Hardhat automatically spins up a temporary Hardhat Network, runs your tests against it, and then tears it down.
npx hardhat test
You'll see the output from the sample test file, which should pass.
3. Node
The node task starts a persistent instance of the Hardhat Network, turning your machine into a local Ethereum node. This is incredibly useful for connecting wallets like MetaMask and interacting with your contracts in a development environment.
Let's see this in action and get a clearer explanation of the Hardhat Network.
Build and Deploy Smart Contracts using Hardhat | [See Description]
This clip demonstrates how Hardhat uses its built-in network for testing and shows you how to run a local node that you can interact with.
Watch from 04:49 to 05:32. The video demonstrates running tests and then shows how to start a persistent local node using npx hardhat node. Pay attention to the output—it lists 20 accounts, each pre-loaded with 10,000 test ETH.
Now, run the command yourself:
npx hardhat node
You'll see a message "Started HTTP and WebSocket JSON-RPC server" followed by a list of accounts and their private keys. This node is now running and listening for transactions. For now, you can stop the node by pressing Ctrl+C in your terminal. We will use these accounts extensively in upcoming lessons.
Conclusion
Excellent work! You have successfully set up a complete local Ethereum development environment using Hardhat.
In this lesson, you learned:
- What Hardhat is and why it's a cornerstone of modern Ethereum development.
- How to initialize a new Hardhat project from scratch.
- The purpose of the key files and folders in a Hardhat project, including
contracts,scripts,test, andhardhat.config.js. - How to use the core Hardhat commands:
compile,test, andnode.
You now have a solid foundation and a professional workflow in place. In our next lesson, we will bridge the gap between this local environment and the outside world. We'll learn how to create and manage Ethereum accounts, importing the local accounts from your Hardhat node into MetaMask. This will enable you to act as a user, send transactions, and truly start interacting with the blockchain.