
Hello, and welcome to the first lesson. This opening module builds the habit that will make later work with pandas, SQL results, models, and APIs much more manageable: being able to predict what code does rather than merely running code until something looks right.
Today you will run Python in two common settings—notebooks and scripts—and learn to trace execution: following the order of executed lines, recording what each variable currently refers to, and separating printed output from variable state. This is deliberately foundational. Before writing larger programs independently, you need a reliable way to inspect and explain small ones.
Code is executed; variables preserve state
A Python program is not a static document. When Python runs it, it executes statements in an order and maintains a current program state.
For this lesson, program state has two parts:
- Variable state: which names exist and what values they currently refer to.
- Output: text that has been printed so far.
Consider this short script:
project = "retention"
run_number = 1

print(project, run_number)

run_number = run_number + 1

print(project, run_number)
Python executes this from top to bottom. A useful manual trace records the state after each meaningful line:
| Executed line | project | run_number | Output so far |
|---|---|---|---|
project = "retention" | "retention" | — | |
run_number = 1 | "retention" | 1 | |
print(project, run_number) | "retention" | 1 | retention 1 |
run_number = run_number + 1 | "retention" | 2 | retention 1 |
print(project, run_number) | "retention" | 2 | retention 1retention 2 |
Two rules drive the whole trace:
- An assignment evaluates the expression on the right first, then binds the result to the name on the left.
print()displays a value but does not change a variable by itself.
The line
run_number = run_number + 1
does not state a mathematical equality. Python first looks up the current value of run_number, calculates , and then updates run_number to refer to 2.
A variable is therefore best treated as a name with a current value, not as a permanent fact. Later code can rebind that name:
status = "draft"
status = "validated"
print(status)
The only output is:
validated
The earlier value mattered while it was current, but it is no longer the value associated with status.
Notebooks: an interactive Python session
A notebook divides work into cells. A code cell can be executed independently, and its variables usually remain available to later cells through a running Python kernel.
For data work, notebooks are useful for exploratory analysis because you can inspect an intermediate calculation, view a table, make a plot, then refine a later cell. However, that convenience creates an important risk: a notebook’s visible top-to-bottom order is not necessarily its execution order.
Watch this setup demonstration before trying it yourself:
Getting Started with Jupyter Notebooks in VS Code
“Getting Started with Jupyter Notebooks in VS Code” from the Visual Studio Code channel shows the essential setup: extensions, a Python kernel, code cells, and markdown cells.
Watch notebook setup to see how the Jupyter and Python extensions connect a notebook to a Python environment. Then watch first cells for creating and running a code cell, plus using markdown cells to document work. If VS Code asks to install ipykernel when you first run a cell, that package enables the selected environment to act as a notebook kernel.
In a notebook, try these as two separate cells.
Cell 1
client_name = "Northwind"
Cell 2
print(client_name)
If you run Cell 1 and then Cell 2, the output is:
Northwind
But now imagine you restart the kernel—clearing the notebook’s Python session—and run only Cell 2. Python no longer knows client_name, because Cell 1 has not executed in this new session. You will eventually learn to read that resulting error precisely; for now, recognize its cause: the variable was never created in the current state.
The notebook reliability habit
While developing, it is normal to run cells individually. Before trusting a notebook’s results, use this routine:
- Save the notebook.
- Restart or clear the kernel.
- Run all cells from top to bottom.
- Check that it completes without errors and produces the expected output.
This prevents “hidden state”: a variable that exists only because you ran an old cell earlier, perhaps before changing the notebook. In data science, hidden state can make analysis appear reproducible when it is not.
The VS Code notebook interface also offers a Variables view and debugging tools. These are useful for inspecting the current state, but they are aids to your reasoning—not substitutes for understanding how that state was produced.
Scripts: a clean top-to-bottom run
A Python script is a plain text file with a .py extension, such as analysis.py. When you run it, Python normally starts a new process, executes the file from top to bottom, prints any output, and then exits.
Suppose analysis.py contains:
dataset_name = "customer_churn"
row_count = 250

print(dataset_name)
print(row_count)
Running the script executes all four lines in order and prints:
customer_churn
250
The next time you run the script, it starts fresh. It does not retain dataset_name or row_count from the previous run. This clean-start behavior is one reason scripts are well suited to reusable data pipelines and production code.
For now, distinguish the environments this way:
| Environment | Typical use | State behavior |
|---|---|---|
| Notebook | Exploration, analysis, explanations, charts | Kernel retains variables between executed cells until restarted |
| Script | Repeatable programs and automation | A normal run begins with a fresh program state and follows file order |
Later in the course, you will organize reusable code in scripts and use notebooks mainly to investigate data and communicate findings. Both execute Python; the difference is chiefly how you interact with the execution state.
Trace before you run
The core skill is a short, disciplined trace. Before running unfamiliar code:
- Start with an empty variable-state table and empty output.
- Identify the next line to execute.
- Evaluate its right-hand side using the current state.
- Update a variable only if the statement assigns to it.
- Add to output only if the code prints.
- Move to the next executed line.
This separates three things that are easy to blur together:
- Source code: the instructions you wrote.
- Current state: variable values after the instructions already executed.
- Output: what the program has displayed.
The following example is worth tracing slowly:
x = "Hello"
y = x
print(y, end=" ")
x = "World"
print(x, end=", ")
print(y)
Read the walkthrough below. It uses Python Tutor, a browser-based visualizer that lets you move one executed line at a time and inspect variables alongside output.
Code Tracing :: Introduction to Python
Read “Code Tracing” from the Introduction to Python text. It introduces Python Tutor and walks through this exact example one executed line at a time.
Begin with the opening explanation of why you should build a mental model before running code, then read the “Python Tutor Example” and “Stepping Through Code” material. Follow the mental model first. Next, locate the six-line example beginning with x = "Hello". In the step-by-step continuation, read each execution step. Focus on the difference between assigning to x, assigning y from its current value, and printing the current value of each name.
At the end, the output is:
Hello World, Hello
The key moment is this pair of lines:
y = x
x = "World"
When y = x executes, y receives the value that x has at that time: "Hello". Reassigning x later does not rewrite y. Therefore, the final print(y) still displays Hello.
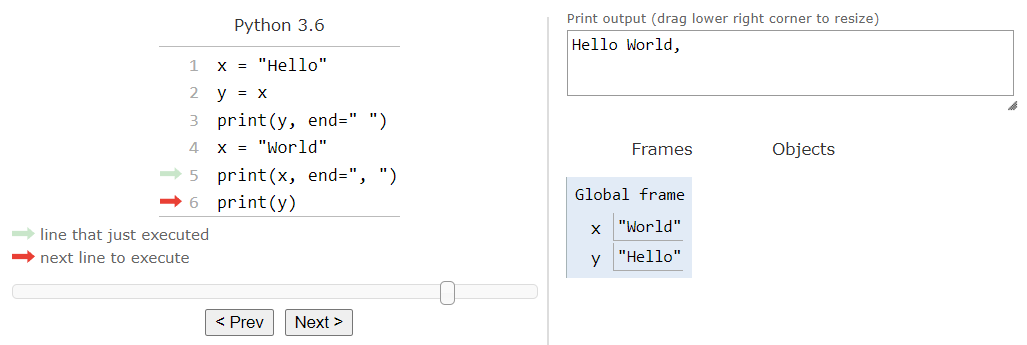
Python Tutor labels top-level variables as part of the Global frame. For this lesson, read that as: “these are the variables created outside any function.” When we begin functions later in this module, you will see separate local frames appear during a function call.
Use Python Tutor as a microscope, not an answer key
A visualizer is especially useful when your prediction and the actual behavior disagree. The best learning sequence is:
- Predict the output and variable state on paper or in a comment.
- Run the code normally in a notebook or script.
- Visualize it only if something surprises you.
- Explain the discrepancy in one sentence.
This keeps you in control of the reasoning. It also creates a productive habit for reviewing AI-generated code: do not trust code merely because it executes. Trace what it changes, check the output, and ensure the behavior matches the task.
Use Python Tutor’s basic interface with this small data-oriented example:
region = "west"
observations = 12

print(region, observations)

observations = 15
print(region, observations)
Visualizing your Python code with "Python Tutor"
“Visualizing your Python code with ‘Python Tutor’” from Python and Pandas with Reuven Lerner demonstrates the visualizer on a small loop and shows how the global frame, variables, objects, and output change during execution.
Watch a basic trace. The presenter’s loop is slightly ahead of today’s material, so do not worry about mastering for yet. Focus instead on the interface: the highlighted next line, the global frame containing current variables, and output accumulating only after print() executes. Then paste the region example into Python Tutor and step through it one line at a time.
When you step through your own code, do not rush through several steps at once. After every assignment, pause and state what changed:
- Did a new variable appear?
- Did an existing variable receive a new value?
- Did the output change?
- What is the next line Python will execute?
That narration may feel slow initially. It is how syntax becomes behavior you can predict.
A 10-minute independent practice routine
Create a new notebook named python_tracing_practice.ipynb and add a markdown heading such as “Tracing variable state.” Then place this code in one code cell:
metric = "revenue"
value = 100

print(metric, value)

value = value + 25
print(metric, value)
Before you run it, write a compact state table in a markdown cell. Run the code, compare your prediction to the output, and inspect the Variables view. Finally, change metric to "orders" and rerun the cell. Notice that execution recomputes the state from the cell’s statements; it does not preserve the old value once the assignment line runs again.
Key takeaways
Python executes statements in an order, and every point in execution has a current variable state plus any output printed so far. Assignments can create or update names; print() reveals current values without changing them.
Notebooks retain state in a kernel, which is excellent for exploration but requires the discipline of restarting and running all cells before trusting results. Scripts are generally clean, top-to-bottom runs and form the basis for repeatable programs.
Most importantly, begin using a predict, run, inspect, explain cycle. Python Tutor and notebook variable tools can reveal state, but your goal is to build the mental model that lets you reason about code before those tools are needed.
Next, we will make those traces more expressive by working with Python’s core values—numbers, strings, Booleans, and None—and the operators that combine and compare them.
Can't find a good explanation? Sign up and we'll make it for you
Sign up