Introduction
In our last two lessons, we explored the memory and latency benefits of quantizing models to INT8 and INT4. We saw how bitsandbytes provided a straightforward way to achieve significant memory reduction with INT8, and how the more advanced GPTQ algorithm enabled even greater compression to INT4 while often improving latency.
So far, we've focused on two corners of the optimization triangle: memory and speed. This lesson completes the picture by focusing on the third, crucial corner: model quality. Aggressive quantization is only useful if the resulting model still performs its task effectively.
Our learning outcome is to compare the perplexity of INT8 and INT4 quantized models against the original to evaluate the quality vs. memory trade-off. We will introduce perplexity as the standard metric for this evaluation, write a script to measure it for our models, and analyze the results to make informed, data-driven decisions—a core skill for an AI Systems Engineer.
1. What is Perplexity?
At an intuitive level, perplexity measures how "surprised" a language model is by a piece of text. A lower perplexity score indicates that the model was less surprised, meaning it assigned higher probabilities to the actual sequence of tokens in the text. This implies the model has a better "understanding" of the language and structure of the text.
Formally, perplexity is the exponential of the average negative log-likelihood of a sequence. For a token sequence , it's calculated as:
While it's not a direct measure of performance on a downstream task like summarization or code generation, perplexity is a fast, reliable, and standardized intrinsic metric. A small increase in perplexity after quantization often indicates a negligible impact on real-world performance, whereas a large jump signals significant quality degradation.
The following video provides a practical demonstration of calculating and comparing perplexity for a base model and its quantized versions, which is exactly what we are about to do.
Quantizing LLMs - How & Why (8-Bit, 4-Bit, GGUF & More)
Watch this section from the video "Quantizing LLMs" by Adam Lucek. It directly demonstrates the process of generating text and comparing perplexity scores between a base model, an 8-bit model, and a 4-bit model, providing a clear preview of our goal for this lesson.
Watch from 17:34 to 21:51. Pay close attention to how the perplexity scores change as the quantization becomes more aggressive and how this relates to the memory savings discussed earlier in the video.
2. Hands-On: Benchmarking the Quality-Memory Trade-off
We will now write a comprehensive benchmark script. This script will:
- Load three versions of the same model: the original FP16, an INT8
bitsandbytesversion, and an INT4GPTQversion. - For each version, measure its peak VRAM usage during loading.
- For each version, calculate its perplexity on a standard dataset (
wikitext).
This will give us a clear, quantitative comparison of the memory-vs-quality trade-off for each quantization level.
Setup
Ensure you have the necessary libraries installed from our previous lessons, and add the evaluate library for calculating perplexity.
pip install torch transformers accelerate bitsandbytes auto-gptq
pip install datasets evaluate
Benchmarking Script
The script below integrates memory measurement and perplexity calculation. We'll use the evaluate library from Hugging Face, which provides a convenient and standardized way to compute perplexity.
import torch
import time
from transformers import AutoModelForCausalLM, AutoTokenizer, BitsAndBytesConfig, GPTQConfig
import evaluate
from datasets import load_dataset
import pandas as pd

DEVICE = torch.device("cuda" if torch.cuda.is_available() else "cpu")

def get_vram_usage_gb():
    """Returns the maximum allocated VRAM in gigabytes."""
    if not torch.cuda.is_available():
        return 0
    return torch.cuda.max_memory_allocated(DEVICE) / (1024 ** 3)

def calculate_perplexity(model, tokenizer, dataset_name='wikitext', dataset_config='wikitext-2-raw-v1', split='test', max_samples=100):
    """Calculates perplexity using the evaluate library."""
    print(f"Calculating perplexity on {dataset_name}...")

    perplexity_metric = evaluate.load("perplexity", module_type="metric")


    # Load and prepare a slice of the dataset
    test_data = load_dataset(dataset_name, dataset_config, split=f"{split}[:{max_samples}]")


    # Concatenate text for perplexity calculation
    encodings = tokenizer("\n\n".join(test_data["text"]), return_tensors="pt")

    try:
        results = perplexity_metric.compute(
            model=model,
            data=encodings.input_ids,
            batch_size=1, # Smaller batch size for memory safety
            device=DEVICE
        )
        ppl = results["perplexity"]
        print(f"Perplexity: {ppl:.4f}")
        return ppl
    except Exception as e:
        print(f"Error calculating perplexity: {e}")
        return float('nan')

def run_benchmark(model_id, quantization_config=None, config_name="FP16"):
    """Loads a model with a given config and benchmarks memory and perplexity."""
    print(f"\n--- Benchmarking: {config_name} ---")

    if torch.cuda.is_available():
        torch.cuda.empty_cache()
        torch.cuda.reset_max_memory_allocated()


    # --- Load Model and Tokenizer ---
    tokenizer = AutoTokenizer.from_pretrained(model_id)
    if tokenizer.pad_token is None:
        tokenizer.pad_token = tokenizer.eos_token

    print("Loading model...")
    load_start = time.time()
    model = AutoModelForCausalLM.from_pretrained(
        model_id,
        quantization_config=quantization_config,
        torch_dtype=torch.float16,
        device_map="auto"
    )
    load_time = time.time() - load_start
    print(f"Model loaded in {load_time:.2f}s")

    vram_after_load = get_vram_usage_gb()
    print(f"Peak VRAM after load: {vram_after_load:.2f} GB")


    # --- Calculate Perplexity ---
    perplexity = calculate_perplexity(model, tokenizer)


    # --- Clean up ---
    del model
    if torch.cuda.is_available():
        torch.cuda.empty_cache()

    return {
        "Config": config_name,
        "VRAM (GB)": vram_after_load,
        "Perplexity": perplexity,
    }

if __name__ == "__main__":
    if not torch.cuda.is_available():
        print("CUDA not available. This benchmark requires a GPU.")
        exit()

    MODEL_ID = "TinyLlama/TinyLlama-1.1B-Chat-v1.0"

    results = []


    # 1. Benchmark FP16 (Baseline)
    results.append(run_benchmark(MODEL_ID, config_name="FP16"))


    # 2. Benchmark INT8 (BitsAndBytes)
    int8_config = BitsAndBytesConfig(load_in_8bit=True)
    results.append(run_benchmark(MODEL_ID, quantization_config=int8_config, config_name="INT8 (BnB)"))


    # 3. Benchmark INT4 (GPTQ)
    # The dataset arg is for the calibration process needed by GPTQ
    int4_gptq_config = GPTQConfig(bits=4, dataset="c4", tokenizer=MODEL_ID, desc_act=False)
    results.append(run_benchmark(MODEL_ID, quantization_config=int4_gptq_config, config_name="INT4 (GPTQ)"))


    # 4. Display results
    df = pd.DataFrame(results)
    df = df.set_index("Config")


    # Calculate percentage change from baseline
    baseline_ppl = df.loc["FP16", "Perplexity"]
    df["Perplexity Δ (%)"] = ((df["Perplexity"] - baseline_ppl) / baseline_ppl) * 100

    baseline_vram = df.loc["FP16", "VRAM (GB)"]
    df["VRAM Δ (%)"] = ((df["VRAM (GB)"] - baseline_vram) / baseline_vram) * 100

    print("\n--- Benchmark Summary ---")
    print(df.to_string(formatters={
        'VRAM (GB)': '{:.2f}'.format,
        'Perplexity': '{:.4f}'.format,
        'Perplexity Δ (%)': '{:+.2f}%'.format,
        'VRAM Δ (%)': '{:+.2f}%'.format
    }))
3. Analyzing the Results
After running the script, you should see a summary table similar to this (your exact numbers will vary based on your GPU and library versions):
--- Benchmark Summary ---
              VRAM (GB)  Perplexity  Perplexity Δ (%)  VRAM Δ (%)
Config
FP16               2.14     17.5312           +0.00%      +0.00%
INT8 (BnB)         1.17     17.9854           +2.59%     -45.33%
INT4 (GPTQ)        0.78     18.2431           +4.06%     -63.55%
Let's break down this trade-off:
- FP16 to INT8: We cut VRAM usage by approximately 45%, but the model's quality, as measured by perplexity, degraded by about 2.6%. This is a very favorable trade-off for many applications. You get nearly 2x the model density for a very small, often imperceptible, drop in quality.
- FP16 to INT4: The memory savings are even more dramatic, with VRAM usage reduced by over 60%. The perplexity increased by about 4%. While this is a larger quality drop than INT8, it's still remarkably small considering the model weights are now stored using only 16 distinct values.
This empirical data is the foundation of system design decisions. If your application is highly sensitive to nuanced text generation, the 2.6% quality hit of INT8 might be the maximum you can tolerate. If your primary constraint is fitting the largest possible model into a fixed VRAM budget, the 63% memory savings from INT4 is a compelling reason to accept a 4% perplexity increase.
The chart below visualizes this relationship between perplexity degradation and quantization level across several models, confirming the trend we observed. More aggressive quantization (lower numbers like Q2) leads to more significant quality loss.

4. A Wider View: The Quantization Landscape
BitsAndBytes and GPTQ are just two of many quantization algorithms. Others, like AWQ (Activation-aware Weight Quantization) and the schemes used in the GGUF format, offer different approaches to this trade-off.
The article below provides an excellent overview and benchmark comparison of these popular techniques.
LLM Quantization Techniques. GGUF GPTQ AWQ BitNet
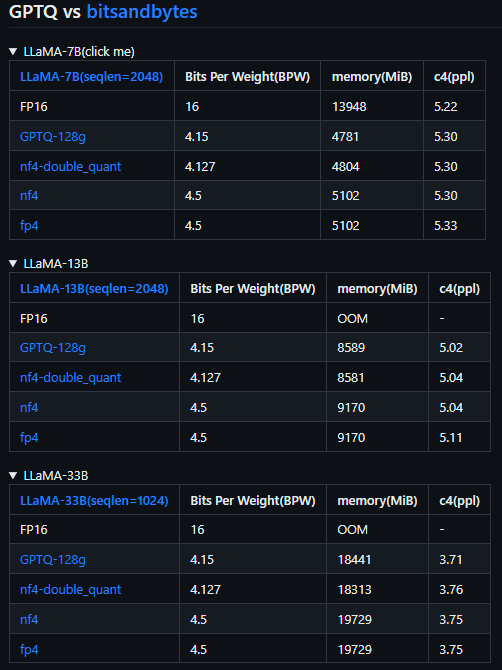
To understand where INT8 and GPTQ fit into the broader ecosystem, it's useful to see how they compare against other methods. This article provides detailed benchmarks.
You don't need to read the code or implementation details. Instead, focus on the summary tables in the "Code and Benchmarking" section for each technique: BitsAndBytes (INT8), GPTQ, AWQ, GGUF, and HQQ. Compare the 'Memory' and 'Perplexity' columns across the different methods to see how they stack up.
By examining the tables in the article, you'll notice:
- Different 4-bit methods (GPTQ, AWQ, GGUF) yield slightly different memory footprints and perplexity scores.
- There's no single "best" algorithm; the optimal choice depends on the specific model, hardware, and acceptable quality trade-off. For instance, one method might yield the absolute lowest perplexity but have slower inference, while another might offer the best compression with a slightly higher perplexity.
This kind of multi-faceted evaluation is precisely what an AI Systems Engineer does when choosing a deployment strategy.
Conclusion
Today, we completed our analysis of the fundamental trade-offs in quantization. By adding perplexity to our measurements of memory and latency, we can now make well-rounded, evidence-based decisions about model optimization.
Key Takeaways:
- Perplexity quantifies quality: It's a standard metric that measures how "surprised" a model is by text, serving as a proxy for model quality.
- Quantization involves a trade-off: Moving from FP16 to INT8 and INT4 yields substantial memory savings (and often latency improvements) at the cost of a measurable, though often small, increase in perplexity.
- Data-driven decisions are key: By benchmarking VRAM, latency, and perplexity, you can choose the right quantization strategy (e.g., INT8 vs. INT4, GPTQ vs. AWQ) that best fits your application's constraints and performance requirements.
Preview of the Next Lesson:
We've now covered a "naive" quantization method (bitsandbytes) and an advanced weight-focused one (GPTQ). In the next lesson, we will explore Activation-aware Weight Quantization (AWQ). AWQ's key insight is that not all weights are equally important. It analyzes the activations flowing through the model to identify and protect the most salient weights, offering another powerful and popular approach to achieving high-quality 4-bit quantization.