
Hello! Welcome back to your second lesson in the "Learn SQL for Product Designers" course.
In our first lesson, we established the conceptual foundation: how product ideas like 'users' and their 'actions' are organized into tables, columns, and rows within a database. You now have the "map" of where the data lives.
Lesson 2: Retrieving Data with SELECT
Today's Goal: By the end of this lesson, you will be able to write a SELECT statement to retrieve specific columns from a single table (e.g., user email, signup date). This is the most fundamental and common task in SQL.
We'll move from theory to practice and write our first queries. This is the first step toward answering your own questions about user behavior directly from the data.
Let's get started.
1. The Anatomy of a Query: SELECT and FROM
To ask the database for information, you need to write a query. The simplest and most essential query consists of two parts:
SELECT: Specifies the columns (the pieces of information) you want to see.FROM: Specifies the table where that information is located.
Think of it as telling someone: "Select these specific documents from that filing cabinet."
This diagram provides a high-level map of how SQL queries are structured. For today, we are focusing only on the first two components: SELECT and FROM.
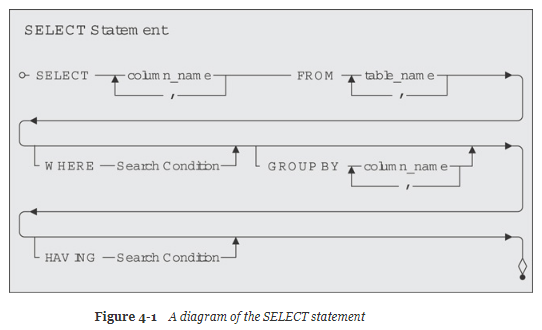
To see how this applies in a product context, let's look at a resource written for product managers.
SQL for product managers - the definitive guide
This article from Hello PM uses an Instagram-like database to explain the basic SELECT query. This example is great for connecting SQL syntax to a product you're familiar with.
Please read the section titled 'Retrieving data with SQL'. Focus on the syntax for selecting all columns (SELECT *) versus specific columns (SELECT {column name 1, column name 2}).
As the article shows, you have two main options:
- Get all columns using an asterisk (
*). - Get specific columns by listing their names.
2. How the Database "Thinks": A Visual Explanation
It's helpful to understand the logical order in which the database processes your query. While you write SELECT first, the database actually looks at the FROM clause first to identify the table, and then it executes the SELECT clause to pick out the columns you requested.
This video provides an excellent visual breakdown of this process.
SQL SELECT Queries (Visually Explained) for Beginners | All Essential Clauses | #SQL Course 4
This video from the 'Data with Baraa' channel visually explains how a SELECT query is executed. This step-by-step animation will help solidify your understanding of the process.
Please watch from 02:10 to 10:02. The first part (until 06:47) covers selecting all columns with *. The second part (from 06:47) covers selecting specific columns. Pay close attention to the animated explanation of how the database first fetches the table and then filters the columns.
Key points from the video:
SELECT * FROM users;first finds theuserstable, then returns all columns and rows.SELECT email, signup_date FROM users;first finds theuserstable, then filters the result to show only theemailandsignup_datecolumns.- The order of the columns in your output matches the order you list them in the
SELECTstatement.
3. Writing Your First Queries
Let's apply this. Imagine you're a product designer at a streaming service. Your database has a users table with the following structure:
| Column Name | Data Type | Description |
|---|---|---|
user_id | integer | Unique identifier for each user |
email | text | User's email address |
created_at | timestamp | Date and time of signup |
country | text | User's country |
plan_type | text | 'free', 'premium', or 'family' |
Scenario 1: A Quick Overview
You're starting a new project and want to get a general sense of the data available in the users table. You need to see all the information for a few users.
The query would be:
SELECT *
FROM users;
This query fetches every column for every user. It's great for initial exploration.
Scenario 2: Preparing for User Research
You're planning a user research session with newly signed-up users. You need a list of their email addresses and when they signed up.
How would you write this query? You need the email and created_at columns from the users table.
Click to reveal the query
SELECT
    email,
    created_at
FROM
    users;
A Note on Style and Readability
Just like in design, clarity and convention are important.
- Case: SQL keywords (
SELECT,FROM) are case-insensitive, but it's a common convention to write them in UPPERCASE to distinguish them from table and column names. - Line Breaks: For readability, especially as queries get more complex, it's good practice to put each major clause on a new line.
- Semicolons: The semicolon (
;) at the end of the query marks the end of the statement. While not always required in some tools (like Metabase), it's a standard part of SQL syntax and good to get in the habit of using.
Your well-formatted query from Scenario 2 is much easier to read than select email,created_at from users;, even though both produce the same result.
Conclusion
Excellent work! You've just learned the single most important command in SQL and written your first queries.
Key Takeaways:
- The
SELECT ... FROM ...statement is the foundation for retrieving data. SELECTspecifies the columns you want to see.FROMspecifies the table you're querying.- Use
*to select all columns, or list column names separated by commas for a specific selection. - Formatting your queries with uppercase keywords and line breaks makes them much easier to read and understand.
Next Lesson:
Now that you can select columns, we'll learn how to make the output even more useful. In the next lesson, we'll cover:
- Using
ASto rename columns for clearer reports (e.g., changingcreated_attoSignup Date). - Using
DISTINCTto find the unique values in a column (e.g., what are all the different countries our users are from?). - Using
LIMITto get a small sample of rows, which is crucial for quick exploration of large tables.
Can't find a good explanation? Sign up and we'll make it for you
Sign up