
Hello again. In the previous lesson, you wrote the mapping contract: a precise claim about an ecological response, predictors, prediction support, geographic extent, and target population. This lesson turns that claim into a project that can be rerun later—by you, a collaborator, or a future version of you—without relying on an undocumented local setup.
You will create two deliberately separate YAML files:
environment.ymlrecords the software environment: Python and installed packages.config/project.ymlrecords project choices that may change between mapping runs: paths, grid specification, temporal window, response definition, and output settings.
This separation matters. Updating a study boundary or changing a prediction resolution is a configuration change; it should not require editing Python source code. Adding a new geospatial library is an environment change; it should not be buried in a notebook cell.
Isolation is the starting point for reproducibility
A Conda environment is an isolated set of Python and package versions. It prevents a project from silently depending on whatever happens to be installed in your system Python or a different project’s environment.
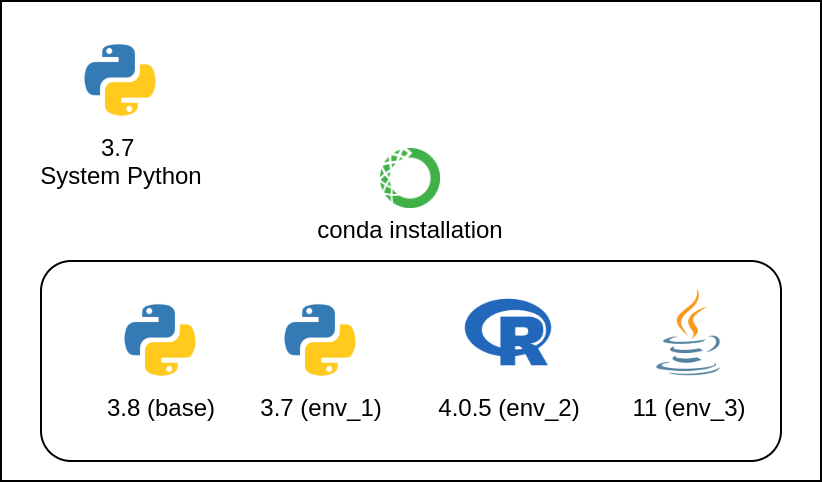
For spatial Python, isolation is particularly useful because packages such as GeoPandas, Rasterio, GDAL, PROJ, and Shapely rely on compiled geospatial libraries underneath Python. A clean environment reduces conflicts among those dependencies.
Use the base Conda environment to manage Conda itself, but do analytical work in a named project environment. Avoid installing project packages directly into base.
MetPy Mondays #3 - Conda Environments
Watch “MetPy Mondays #3 - Conda Environments” from NSF Unidata for a concise explanation of why environments are isolated and how an environment.yml recreates a shared setup.
First watch the environment idea, focusing on the distinction between separate project workspaces and a default installation. Then watch the YAML workflow, where the presenter explains how a named environment, channel, and dependency list can be rebuilt by another user.
The video uses some older activation syntax in its demonstration. In current Conda, use:
conda activate eco-spatial-ml
conda deactivate
A useful check at any time is:
conda env list
conda info --envs
The active environment is marked with an asterisk.
Create a small but complete project skeleton
Create one directory for a specific mapping project. Here the example is a project to map breeding-season amphibian habitat suitability, but its structure applies equally to biomass regression or image classification.
amphibian-suitability/
├── environment.yml
├── README.md
├── .gitignore
├── config/
│   └── project.yml
├── data/
│   ├── raw/
│   ├── interim/
│   └── processed/
├── notebooks/
├── outputs/
│   ├── figures/
│   ├── models/
│   └── predictions/
└── src/
    ├── __init__.py
    └── check_config.py
The directory names express a workflow rather than merely filing things away:
data/raw/holds received or downloaded inputs without manual alteration.data/interim/holds temporary or partly processed files.data/processed/holds analysis-ready datasets that can be regenerated.src/holds reusable Python functions and scripts.notebooks/holds exploration and reporting, not the sole copy of important processing logic.outputs/holds generated artifacts, including figures, fitted models, and maps.config/holds human-readable settings for a run.
Keep raw input data and generated output rasters out of Git unless they are deliberately small examples. Track the code, configuration, metadata, and instructions needed to recreate them.
A minimal .gitignore might be:
# Input and derived data
data/raw/
data/interim/
data/processed/

# Generated outputs
outputs/

# Python and notebook artifacts
__pycache__/
.ipynb_checkpoints/

# Local secrets and machine-specific overrides
.env
config/local.yml
Do not put passwords, cloud credentials, API keys, or private data paths in project.yml. Those belong in ignored local environment variables or a local configuration file that is never committed.
Define the software environment in environment.yml
The Conda documentation’s “Creating the project's files” section introduces the three central fields of an environment file: name, channels, and dependencies. Read it now, then use the spatially focused version below.
Creating projects — conda 26.7.2.dev68 documentation
Read the Conda documentation’s “Creating projects” tutorial to see the basic lifecycle: define an environment.yml, create an environment from it, and update it when declared dependencies change.
In “Creating the project's files,” read from the project-file setup. Focus on the meanings of name, channels, and dependencies. Then continue through “Creating our environment” and “Updating our project with new dependencies,” paying particular attention to the update workflow. The commands displayed by the page may have spacing artifacts; use the commands in this lesson exactly.
For this course, create environment.yml in the project root:
name: eco-spatial-ml

channels:
  - conda-forge

dependencies:
  - python=3.11

  # Core analysis
  - numpy
  - pandas
  - scipy
  - scikit-learn
  - matplotlib
  - seaborn

  # Vector and raster geospatial stack
  - geopandas
  - rasterio
  - rioxarray
  - xarray
  - pyproj
  - shapely

  # Interactive work and configuration
  - jupyterlab
  - ipykernel
  - pyyaml
Three design choices deserve attention.
One package channel, strict priority
This file uses only conda-forge. GeoPandas’ installation guidance warns that mixing defaults and conda-forge across a geospatial dependency stack can cause import problems. conda-forge provides current builds of common geospatial packages and the compiled libraries they need.
Installation — GeoPandas 1.1.3+0.gf5fe3ff.dirty documentation
Read GeoPandas’ installation guidance for the practical reason spatial projects commonly use Conda: it installs the compiled geospatial dependencies together rather than leaving Python to resolve them independently.
In “Installing with Anaconda / conda,” read the Conda advantage. Then read “Using the conda-forge channel” and “Creating a new environment,” especially the warning beginning the channel-consistency warning. Treat its geo_env commands as an illustration; your project environment will instead be created from environment.yml.
Before creating the environment, set strict channel priority once:
conda config --set channel_priority strict
This tells Conda to prefer a consistent package set from the highest-priority channel, rather than casually combining alternatives.
Pin the major Python version; avoid premature over-pinning
python=3.11 is a meaningful constraint: it reduces the risk that a later Python release changes compatibility. At this stage, leave most package versions unconstrained. Exact version pins are useful for a stable analysis or publication, but can make an early learning project difficult to solve and maintain.
The environment file is a declared specification: it states the packages your code directly needs. It is not necessarily a byte-for-byte record of every indirect dependency selected on one machine.
After you reach a stable milestone—such as the final version of a portfolio project—export a fuller snapshot:
conda env export --no-builds > environment-lock.yml
Keep both files:
environment.yml: readable, intentional, and suitable for development.environment-lock.yml: a more exact record of the solved environment at a dated milestone.
The lock file is not magic reproducibility across every operating system or future package repository, but it is strong evidence of the software state used for a result.
Include only what the project currently needs
Do not install every package you may someday use. The environment above is enough for early vector/raster inspection and conventional machine learning. Later modules may add packages for spatial statistics, cloud-optimized imagery, PyTorch, or segmentation. Each addition should be made intentionally and committed alongside the code that requires it.
Build, activate, and verify the environment
From the directory containing environment.yml, run:
conda env create --file environment.yml
conda activate eco-spatial-ml
If the environment already exists and you have edited the YAML file, synchronize it with:
conda env update --file environment.yml --prune
The --prune option removes packages that are no longer declared. Use it only after you have made the environment file your authoritative project specification; it can remove a package that you installed manually but forgot to add to the file.
Verify both the interpreter and key imports:
python --version

python -c "import geopandas, rasterio, sklearn, yaml; print('Environment check passed')"
Your Python version should be in the 3.11 series, and the second command should print the confirmation without an import error.
For a notebook workflow, register a clearly named kernel while the environment is active:
python -m ipykernel install --user --name eco-spatial-ml --display-name "Python (eco-spatial-ml)"
Then select Python (eco-spatial-ml) inside JupyterLab. A common reproducibility failure is opening a notebook in one environment while its kernel is actually executing in another.
Record mapping choices in config/project.yml
An environment specifies how the code can run. A project configuration specifies which analysis it should perform.
Hardcoding a value such as a data path, raster resolution, random seed, or study period inside a notebook makes the project fragile. You cannot easily see which settings governed a map, compare two runs, or rerun the same workflow for another watershed.
The short opening of ArjanCodes’ video makes the core argument well: configuration values scattered across code are difficult to find, inspect, and change consistently.
NEVER Worry About Data Science Projects Configs Again
Watch selected sections of ArjanCodes’ “NEVER Worry About Data Science Projects Configs Again” to understand why configuration should be external to source code and how YAML provides useful structure.
Watch the hardcoding problem, focusing on why file paths and experimental parameters embedded throughout code are hard to audit. Then watch configuration options for the contrast between environment variables and structured JSON/YAML files. Finish with the recap; the principle of one centralized, structured configuration is enough for this course. Hydra is useful later for large experiment suites, but you do not need it yet.
Create config/project.yml:
project:
  name: amphibian_suitability
  description: Breeding-season habitat-suitability mapping
  run_id: initial_setup
  random_seed: 2025

paths:
  observations: data/raw/amphibian_surveys.gpkg
  predictor_dir: data/raw/predictors
  boundary: data/raw/watershed_boundary.gpkg
  processed_dir: data/processed
  output_dir: outputs

response:
  name: breeding_detection
  type: binary
  positive_class: verified breeding-site detection
  survey_period: "April-June, 2022-2024"

prediction:
  crs: EPSG:32618
  resolution_m: 30
  extent_source: watershed_boundary
  target_population: non-urban terrestrial and wetland cells
  mask_path: data/processed/target_population_mask.tif

predictors:
  reference_period: "2022-2024 breeding seasons"
  candidate_groups:
    - terrain
    - hydrology
    - canopy_cover
    - spring_greenness

validation:
  strategy: spatial_blocks
  n_splits: 5
  group_column: spatial_block_id

outputs:
  probability_raster: outputs/predictions/breeding_suitability.tif
  metadata_file: outputs/run_metadata.yml
This configuration deliberately repeats the important parts of the mapping contract in a machine-readable form:
| Configuration section | What it records |
|---|---|
response | The target and its survey-time interpretation |
prediction | The mapping grid, extent basis, and population to which predictions apply |
predictors | Candidate information and its intended reference period |
validation | The intended geographic validation design |
paths and outputs | Inputs and products, relative to the project root |
project.random_seed | A recorded basis for reproducible stochastic operations |
The values are not yet claims that the data truly meet those definitions. They are declared expectations. In the next two lessons, you will inspect datasets and grids to verify or revise them.
Why relative paths?
data/raw/amphibian_surveys.gpkg is relative to the project root. It works whether the project lives in a home directory, a shared drive, or a collaborator’s computer, as long as the project structure is retained.
Avoid paths such as:
C:\Users\YourName\Desktop\final_final_data.gpkg
They encode one person’s computer rather than the project. A relative path is not inherently correct, however: it depends on the current working directory. Your scripts should make that assumption explicit.
Load and check the configuration with a small script
Create src/check_config.py:
from pathlib import Path
import yaml


PROJECT_ROOT = Path(__file__).resolve().parents[1]
CONFIG_PATH = PROJECT_ROOT / "config" / "project.yml"


def load_config(config_path: Path) -> dict:
    """Load the project YAML configuration."""
    with config_path.open("r", encoding="utf-8") as file:
        return yaml.safe_load(file)


def resolve_project_path(relative_path: str) -> Path:
    """Resolve a project-relative path and reject absolute paths."""
    path = Path(relative_path)

    if path.is_absolute():
        raise ValueError(
            f"Expected a project-relative path, received: {relative_path}"
        )

    return PROJECT_ROOT / path


def main() -> None:
    config = load_config(CONFIG_PATH)

    assert config["response"]["type"] in {"binary", "continuous", "categorical"}
    assert config["prediction"]["resolution_m"] > 0
    assert config["validation"]["n_splits"] >= 2

    observation_path = resolve_project_path(config["paths"]["observations"])
    output_path = resolve_project_path(config["outputs"]["probability_raster"])

    print(f"Project: {config['project']['name']}")
    print(f"Response: {config['response']['name']}")
    print(f"Prediction CRS: {config['prediction']['crs']}")
    print(f"Prediction resolution: {config['prediction']['resolution_m']} m")
    print(f"Observation file expected at: {observation_path}")
    print(f"Prediction raster will be written to: {output_path}")


if __name__ == "__main__":
    main()
Run it from the project root:
python src/check_config.py
At this point, the input files do not need to exist. The goal is to confirm that the YAML parses, required values are present, and paths resolve relative to the project root.
There are several intentional design choices here:
yaml.safe_load()reads plain YAML values without constructing arbitrary Python objects.Pathavoids fragile string-based path construction and works across Windows, macOS, and Linux.PROJECT_ROOTis derived from the script’s own location, not from an assumed notebook working directory.- The assertions catch simple invalid settings early. They do not prove ecological validity; for example, a valid-looking CRS could still be inappropriate for the study area.
For scripts that create outputs, make the destination directory explicitly:
output_path.parent.mkdir(parents=True, exist_ok=True)
Do this immediately before writing output, not while loading configuration. Configuration should describe what the workflow intends; the operational code creates the necessary directories.
A practical configuration boundary
Not every value belongs in project.yml. Use this rule:
Put values that define the data, mapping claim, experiment, or outputs in configuration. Keep algorithmic implementation details in Python functions.
For example:
| Put in configuration | Keep in Python code |
|---|---|
| Path to a field-observation file | How geopandas.read_file() reads it |
| Prediction CRS and resolution | Function that checks CRS consistency |
| Study period | Function that computes a seasonal composite |
| Random seed | Code that passes the seed to a model |
| Number of spatial folds | Code that constructs split indices |
| Output filename | Code that writes a GeoTIFF correctly |
A parameter may move into configuration later. For example, when you start comparing random forests or boosted trees, hyperparameters should be recorded in a named experiment configuration. For now, centralizing the mapping specification is the important habit.
A configuration file is also not a substitute for provenance. It names the expected inputs, but it does not record their acquisition date, license, source URL, resolution, or NoData semantics. The next lesson after data loading will add a dedicated provenance manifest for those details.
A minimum “rerun test”
Before considering setup complete, perform a short reproducibility test:
- Close the terminal and open a new one.
- Navigate to the project root.
- Activate the named environment with
conda activate eco-spatial-ml. - Run
python src/check_config.py. - Confirm that the printed CRS, resolution, response, and paths match
config/project.yml. - Make one harmless change—such as
run_id: initial_setup_v2—then rerun the script and confirm that the change appears without changing Python code.
That test checks the entire chain: directory structure, environment activation, dependency availability, YAML parsing, and configuration use. It is modest, but it is far more reliable than a project whose settings exist only in memory or scattered across notebook cells.
Key takeaways
A reproducible spatial ML project needs two distinct specifications:
environment.ymldefines an isolated Conda environment with a consistent channel and the Python packages your workflow uses.config/project.ymldefines the mapping run: response, prediction grid, paths, temporal assumptions, target population, validation intent, outputs, and random seed.
Use a named Conda environment rather than base, prefer one coherent package channel for the geospatial stack, and verify imports immediately after creation. Keep project choices external to Python code, use relative paths, and write a small script that loads and validates configuration before any expensive analysis begins.
Next, you will load vector and raster inputs in Python and check the properties that determine whether they can safely be combined: coordinate reference systems, extents, raster grids, and NoData definitions.
Can't find a good explanation? Sign up and we'll make it for you
Sign up