
Hello! Welcome to the fifth lesson in our module on building high-converting landing pages.
In our last lesson, you learned how to generate strategic, high-quality visuals for your landing page using AI tools like Canva and Midjourney. Your page now has a solid structure, persuasive copy, and compelling imagery. It's designed to attract and engage, but right now, it's like a beautiful storefront with a locked door.
Today, we're going to unlock that door. This lesson is focused on the single most critical function of a lead-generation landing page: integrating a lead capture form that connects to an email marketing service. This is where you convert a visitor's fleeting interest into a tangible asset—a lead in your database.
This is a tactical, hands-on lesson that bridges the gap between design and functionality. By the end, your landing page will be a working machine, ready to start building your audience.
The Core Components of Lead Capture
Before we dive into the tools, let's quickly map out the system we're building. It has three parts:
- The Form (Frontend): This is the set of input fields (e.g., for email and name) and the submit button that your visitor interacts with on your landing page. We'll be looking at forms within Carrd and Webflow.
- The Email Marketing Service (EMS): This is the "backend" database where your leads' information is stored. Popular choices include Mailchimp, ConvertKit, and MailerLite. This service will also be what you use to send emails to these leads later. We will focus on Mailchimp for our examples.
- The Connection: This is the digital "pipe" that sends the data from the form to your EMS. There are two common ways to build this pipe:
- API Integration: The landing page builder has a direct, built-in connection to the EMS. You authenticate using an API Key. This is the simpler method.
- Form Action URL: You use a standard HTML form and tell it where to send the data using a special URL provided by your EMS. This method is more flexible and universal.
Let's see how to implement both.
Method 1: The Rapid MVP Approach with Carrd
For launching multiple SaaS ideas quickly, Carrd is an excellent choice. Its integration with email marketing services is designed to be fast and simple, using the API key method.
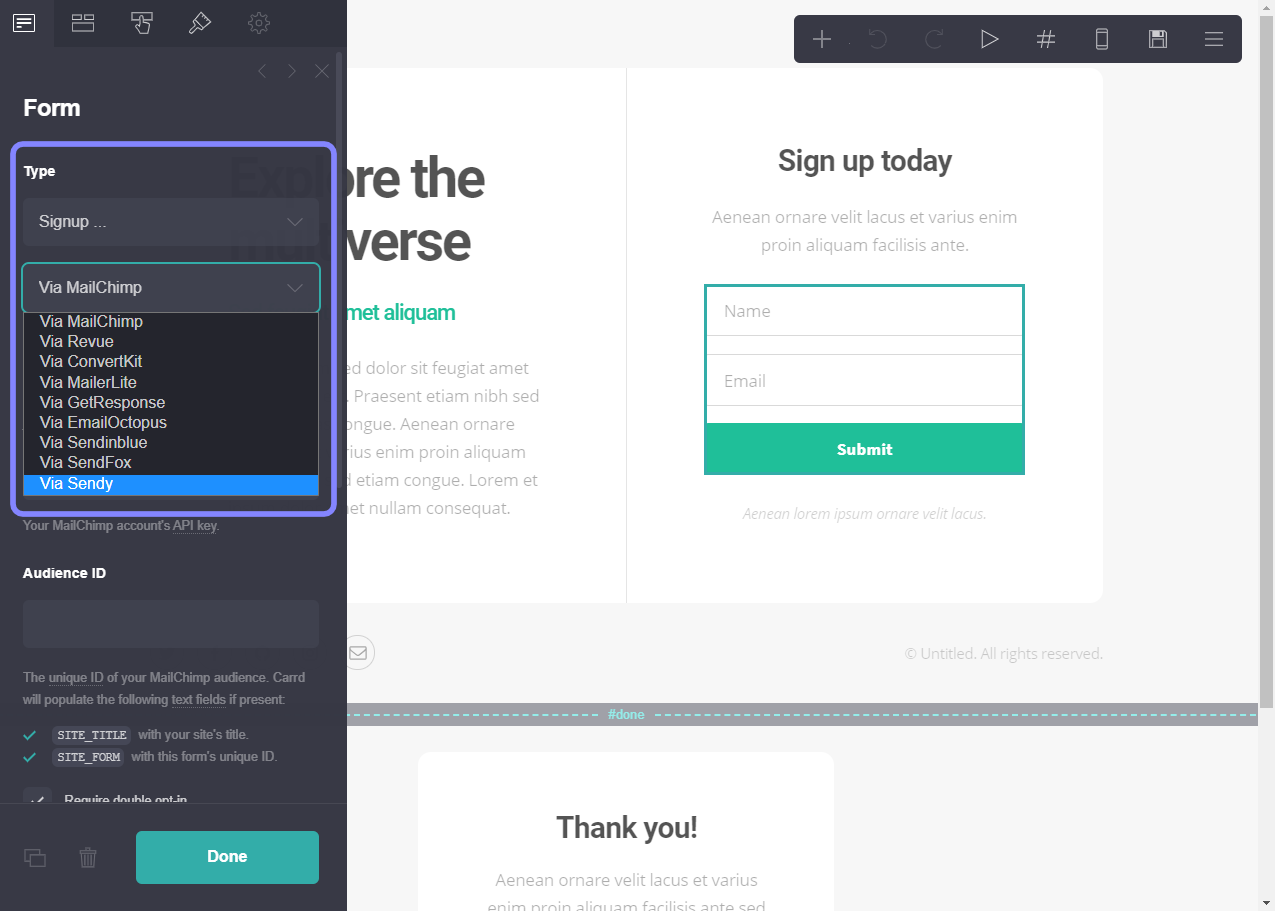
The following guide from Innovation Works provides a detailed, step-by-step walkthrough of connecting a Carrd landing page to Mailchimp.
Building a Landing Page With Carrd and Mailchimp
This article provides a complete, visual guide to connecting Carrd and Mailchimp. We will walk through the key steps together.
First, read the section 'Connecting the Carrd signup form to Mailchimp'. This will show you exactly where to find your API Key and Audience ID in Mailchimp. Then, read 'Testing your landing page and signup form' to understand the verification process.
Step-by-Step Carrd + Mailchimp Integration
Let's summarize the process you just read about:
-
In Mailchimp:
- First, ensure you have an Audience. This is the list your new subscribers will be added to.
- Navigate to
Account > Extras > API keysto create and copy a new API key. - Navigate to your Audience, then go to
Settings > Audience name and defaultsto find and copy the Audience ID.
-
In Carrd:
- Add a Form element to your page.
- Set the
Typeto Signup. - Set
Viato Mailchimp. - Paste the API Key and Audience ID you copied from Mailchimp into the corresponding fields.
- Configure Fields & Button: Use the other tabs in the form settings to add a
Namefield and customize your button text (e.g., "Get the Checklist"). - Set
On CompletionAction: This is critical.- To show a simple "Thank you," choose
Display a message. - To deliver a lead magnet (like a PDF), choose
Redirect to a URLand paste the URL of your uploaded file or a dedicated thank you page.
- To show a simple "Thank you," choose
- Add a Tag: Use the
Tagsfield to label subscribers coming from this specific form (e.g.,saas-idea-1-waitlist). This is vital for segmenting your audience later.
This video from No Code MBA provides a great visual summary of this process and highlights how you can connect to other services like ConvertKit or MailerLite.
Adding custom forms to Carrd (email, Typeform, and more)
Watch this short video to see the Carrd form settings in action. It reinforces the steps from the article and shows the flexibility of the platform.
Watch from 02:38 to 04:39. Pay attention to how the form is connected via API key and Audience ID, how tags are added, and the options available for the 'On Completion' action (redirect vs. display message).
Method 2: The Custom Approach with Webflow
For a flagship product where you want full control over the design and behavior of your form, Webflow is a more powerful choice. Instead of a pre-built integration, the standard method uses a native Webflow form connected to Mailchimp via a Form Action URL.
Since you have a Computer Science background, you'll recognize this process: you're essentially pointing an HTML <form> element's action attribute to an endpoint provided by Mailchimp and setting the method to POST.
This video provides an excellent, detailed walkthrough of this more advanced technique.
Complete Mailchimp Integration (including tags) with Webflow | Step-by-Step Tutorial
This tutorial is a fantastic deep-dive into the 'manual' but more powerful method of integrating a custom Webflow form with Mailchimp. It covers details that are often missed.
Please watch from 02:16 to 08:21. This is the core of the lesson for Webflow. Focus on these key steps: Extracting the Action URL from the Mailchimp embed code. Configuring the Webflow Form: Setting the Action and Method. Mapping Field Names: Matching the 'Name' attribute in Webflow (e.g., FNAME) to what Mailchimp expects. Adding Tags: Using a hidden field in an embed block to pass tag information. Styling Success/Error States for better user experience. Troubleshooting: Understanding the role of Mailchimp's 'double opt-in' feature.
Step-by-Step Webflow + Mailchimp Integration
Let's break down the powerful workflow you just saw in the video:
-
In Mailchimp:
- Go to
Audience > Signup forms > Embedded forms. - Select the form fields you want (e.g., First Name, Email) and add any tags you need.
- Click "Continue" to generate the HTML code. You do not need the whole block of code.
- Go to
-
Extract Key Information:
- Action URL: Find the
<form>tag in the code. Copy the URL inside theaction="..."attribute. It will look something likehttps://yourdomain.usX.list-manage.com/subscribe/post. - Field Names: Look at the
<input>tags. Thename="..."attribute tells you what Mailchimp calls each field (e.g.,EMAIL,FNAME). - Tag Input (if used): If you added a tag, copy the entire line that looks like
<input type="hidden" name="tags" value="...">.
- Action URL: Find the
-
In Webflow:
- Add a native Form Block element and style it to match your design.
- Select the Form element itself. In the settings, paste the Action URL and set the Method to
POST. - For each input field (Email, Name), select it and go to its settings. Set the Name attribute to exactly match what you found in the Mailchimp code (
EMAIL,FNAME). This is case-sensitive! - To pass tags, add an Embed element inside your form block and paste the hidden
<input>tag code you copied earlier.
Finally, always publish and test your form with a real email address to ensure the data appears correctly in your Mailchimp audience, including the custom fields and tags.
Test your understanding!
You are building a landing page in Carrd for a lead magnet (a free PDF guide). You need to capture a user's email and first name, tag them as guide-download, and immediately allow them to access the PDF after they submit the form.
Describe the three most important settings you would configure in the Carrd Form element to achieve this.
Show answer
- Fields & Connection: In the main tab, you would set the
TypetoSignupandViato your email provider (e.g., Mailchimp). You would then add your API Key and Audience ID. In theFieldstab, you would ensure bothEmailandNameare enabled. - Tagging: In the main tab, you would enter
guide-downloadinto theTagsfield to segment these new subscribers. - On Completion Action: In the main tab, under
On Completion, you would selectRedirect to a URL. In the URL field, you would paste the direct link to your hosted PDF file or a thank you page where the download link is available.
Conclusion
Congratulations! You have now mastered the crucial step of turning a static landing page into a functional lead generation tool. By connecting your form to an email marketing service, you have built the foundation of your entire marketing and sales funnel.
Key Takeaways:
- A lead capture form consists of a frontend form, a backend EMS, and the connection between them.
- For rapid launches, tools like Carrd offer simple API-based integrations that are quick to set up.
- For more control and custom design, tools like Webflow use a Form Action URL method, giving you full flexibility over the form's appearance and behavior.
- Always configure post-submission actions (like a redirect to deliver a lead magnet) and use tags to segment your audience from day one.
- Thoroughly test your form to ensure data flows correctly before you start driving traffic.
Preview of the Next Lesson:
Your landing page is now fully functional. But is it working? How many people are visiting? Where are they coming from? And most importantly, what percentage of them are filling out your form? To answer these questions, you need data.
In our next lesson, we will set up Google Analytics 4 on the landing page to track page views and form submissions. This will give you the visibility you need to measure performance and optimize your page for conversions.