
Hello! Welcome to the final lesson in our module on building high-converting landing pages.
In the previous lesson, we added the crucial element of social proof to your landing page using tools like Senja or Testimonial.to. Your page is now fully equipped with compelling copy, a functional lead capture form, and persuasive testimonials. It's ready for visitors. But how will you know if it's working?
This lesson addresses that fundamental question. Today, you will learn how to set up Google Analytics 4 (GA4) on your landing page to track page views and form submissions. "What gets measured gets managed" is a core principle in business, and for a digital product, analytics is your measurement tool. This setup is the non-negotiable foundation for understanding user behavior, optimizing your page, and, critically, measuring the return on investment of your future marketing efforts.
By the end of this lesson, you will have a live analytics dashboard tracking your page's traffic and, most importantly, its primary conversion goal: lead generation.
Part 1: Setting Up GA4 and Tracking Page Views
First, we need to get Google Analytics running on your landing page. This process involves creating a GA4 account, getting a unique tracking ID, and adding it to your site. Since you're using a landing page builder like Carrd, this is quite straightforward.
The following guide provides a clear, step-by-step walkthrough. We'll follow its process to get you set up.
How to set up Google Analytics GA4 for your Carrd website
This guide from Zite Design, 'How to set up Google Analytics GA4 for your Carrd website', will walk you through creating a GA4 property and connecting it to your Carrd site. The steps are conceptually the same for other builders like Webflow or Unbounce.
Read the section 'How to set up GA4 in Carrd with a new account?'. Follow steps 1 through 10. Your goal is to create a GA4 property, get your Measurement ID, add it to your landing page builder, and verify that your own visit is appearing in the GA4 Real-Time report.
To summarize the key steps you just followed:
- Create a GA4 Account and Property: This establishes the container for your website's data.
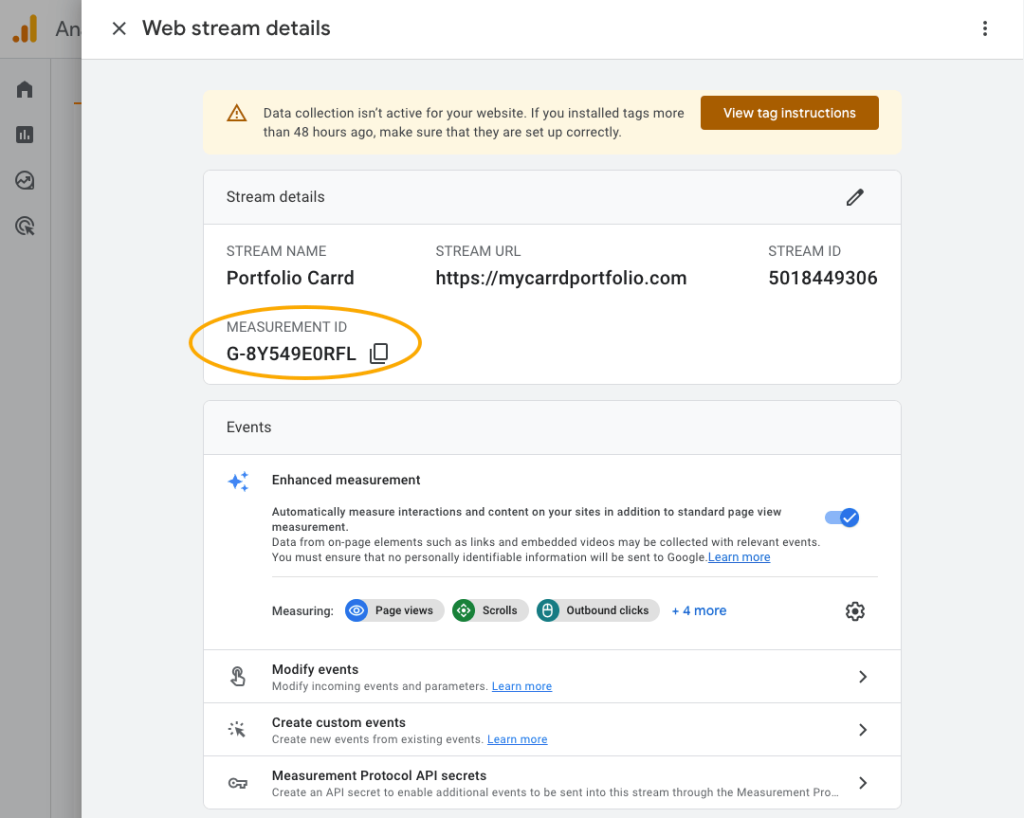
- Create a Data Stream: This generates a unique
MEASUREMENT IDfor your specific website. This ID is what links your site to your GA4 property.
- Integrate with Your Landing Page Builder:
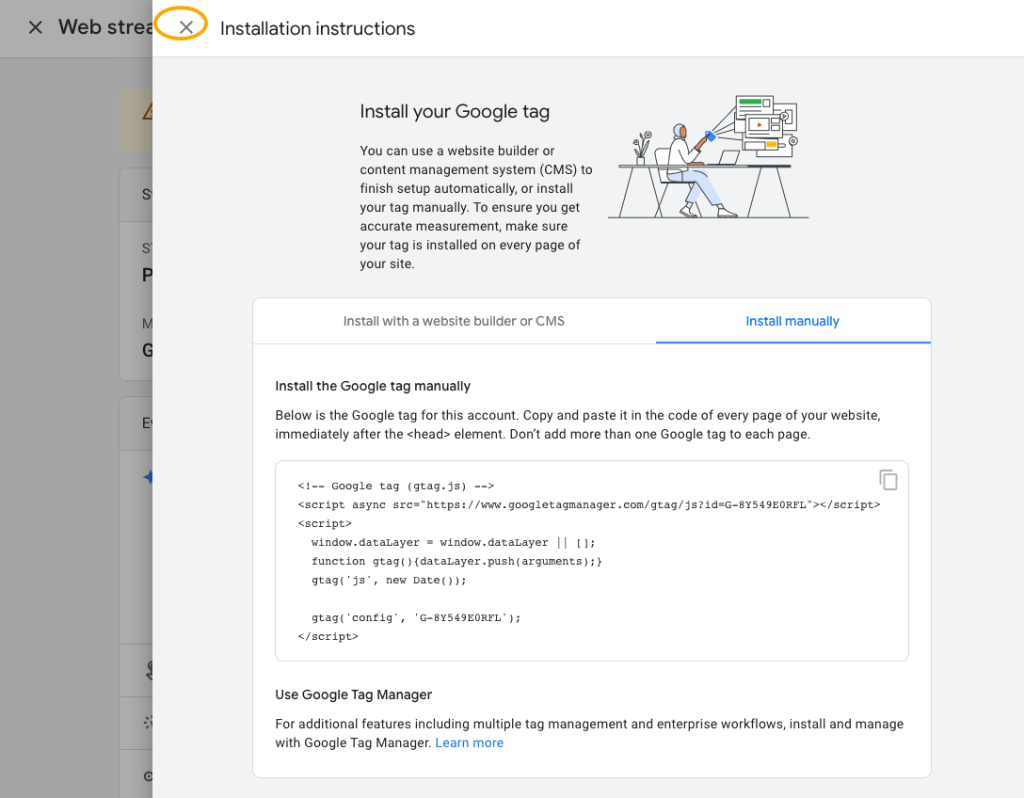
- For Carrd, you paste the Measurement ID into the
Google Analytics IDfield in the Publish settings. - For other builders like Webflow, Unbounce, or custom-coded pages, you might paste the ID into a similar integration field or paste the full
gtag.jsscript into the<head>section of your site's HTML.
- For Carrd, you paste the Measurement ID into the
- Verify Installation: By visiting your live site and checking the Real-Time report in GA4, you can confirm that data is being collected.
Once you see your own visit recorded, you have successfully set up page view tracking. You can now see how many people visit your page, where they come from, and more.
Part 2: Tracking Form Submissions
Now for the most important metric: conversions. For your landing page, a conversion is a form submission. Tracking this tells you how many visitors are turning into actual leads.
There are several ways to track form submissions. The best method depends on how your form behaves after a user clicks "submit." We'll explore the three main options, from simplest to most robust. The following video is an excellent, practical guide that covers all of them.
Google Analytics 4 Form Tracking (Plus 4 Mistakes To Avoid)
This video, 'Google Analytics 4 Form Tracking' from Loves Data, is the perfect tactical guide. We'll use it to explore the different methods for tracking form submissions.
We will reference specific sections of this video for each tracking method. Keep it handy as we proceed.
Method 1: GA4 Enhanced Measurement (The Automatic Way)
GA4 has a feature called "Enhanced Measurement" that tries to automatically detect form submissions. It's the easiest option but not always the most reliable.
First, check if it's enabled and test if it works for your form.
Google Analytics 4 Form Tracking (Plus 4 Mistakes To Avoid)
Let's see how to check your Enhanced Measurement settings and test them with Google Tag Assistant.
Watch from 00:34 to 03:30. Follow the steps to: Check if 'Form interactions' is enabled in your Data Stream's Enhanced Measurement settings. Use Tag Assistant (tagassistant.google.com) to see if a form_submit event is fired when you complete your form.
- If you see a
form_submitevent in Tag Assistant: Great! Automatic tracking is working for your form. - If you do not see the event: This is very common. The automatic tracking often fails with forms that don't cause a full page reload (known as AJAX forms), which are used by many modern tools. You will need to use one of the next methods.
A word of caution: As noted in the resource "How To Track Form Submissions in GA4," Enhanced Measurement can sometimes be "completely way off," reporting thousands of phantom submissions. If you use this method, keep a close eye on your data for anything that looks suspicious. If it seems inaccurate, disable it and move to Method 2 or 3.
Method 2: Thank You Page Tracking (The Reliable, Simple Way)
This is the most common and reliable method for forms that redirect the user to a dedicated "thank you" or "success" page after submission (e.g., yourwebsite.com/thank-you).
The logic is simple: a page view on this unique URL equals one successful form submission. You can configure GA4 to create a new conversion event whenever someone views this page.
Google Analytics 4 Form Tracking (Plus 4 Mistakes To Avoid)
This part of the video shows how to create a new event in the GA4 interface that triggers on a specific page view.
Watch from 04:12 to 06:27. Observe how to use the 'Create Event' feature in GA4's Admin panel. You'll set up a new event (e.g., form_submit) that is triggered when the event_name is page_view AND the page_location matches your thank you page URL.
This method is highly recommended if your form setup supports it. It's code-free, robust, and easy to verify.
Method 3: Google Tag Manager (The Powerful, Flexible Way)
What if your form doesn't redirect? Many modern forms simply display a success message like "Thanks for signing up!" on the same page. In this case, neither of the previous methods will work.
The solution is Google Tag Manager (GTM). GTM is a professional tool that gives you granular control over the tracking code (tags) on your site. Since you have a CS background, you'll appreciate the power and logic it provides. It allows you to fire tags based on specific user actions, like a form submission being validated or a specific "thank you" message becoming visible.
The video below explains two common GTM approaches.
Google Analytics 4 Form Tracking (Plus 4 Mistakes To Avoid)
Now, let's look at the two most common GTM techniques for tracking form submissions that don't redirect to a thank you page.
Watch from 06:27 to 16:22. This is a longer, more technical section, but it's crucial for advanced tracking. Form Submission Trigger (06:27 - 12:03): This shows how to create a trigger that fires only when a form is successfully validated. This is powerful but doesn't work with all website technologies. Element Visibility Trigger (13:12 - 16:22): This is often the most reliable method for modern forms. It triggers an event when a specific element, like your 'Thank You' message <div>, appears on the screen.
While a full GTM setup is beyond this lesson's scope, the key takeaway is to know that it is the ultimate solution for complex tracking scenarios. If your form doesn't have a thank-you page, GTM with an "Element Visibility" trigger is your best path forward.
Part 3: Marking Your Event as a Conversion
The final, critical step is to tell Google Analytics that your form_submit event is a business-critical action—a conversion (GA4 now calls these Key Events). This elevates the event in your reports and is essential for measuring campaign performance in tools like Google Ads.
Google Analytics 4 Form Tracking (Plus 4 Mistakes To Avoid)
Finally, let's flag our new event as a conversion. This video also includes a critical tip about avoiding duplicate data.
Watch from 16:22 to 18:22. Pay attention to these two key actions: Disabling Automatic Tracking (16:22 - 17:10): If you used GTM (Method 3), you must disable GA4's automatic 'Form interactions' to avoid double-counting every submission. Marking the Event as a Conversion (17:10 - 18:22): See how to find your form_submit event in the 'Events' list and simply toggle it on as a conversion.
Once you've marked your form submission event as a key event, you're done! Your GA4 property is now fully configured to measure both traffic (page views) and conversions (leads).
Test your understanding!
You've built a landing page where the lead capture form, upon successful submission, makes a "Thank you for subscribing!" message appear just below the form without redirecting to a new page. You tested GA4's Enhanced Measurement, and it didn't fire an event.
Which tracking method should you use, and what are the three high-level steps you would take in that tool to implement it?
Show answer
The correct method is Google Tag Manager (GTM) using an Element Visibility trigger.
The three high-level steps are:
- Create a Trigger: In GTM, create an "Element Visibility" trigger that is configured to fire when the specific CSS selector of the "Thank you..." message becomes visible on the page.
- Create a Tag: Create a "GA4 Event" tag. Name the event
form_submitand link it to your GA4 Measurement ID. - Connect Trigger to Tag: Apply the Element Visibility trigger you created in step 1 to the GA4 Event tag from step 2. This tells GTM to fire the
form_submitevent to GA4 only when the thank you message appears.
Conclusion
Congratulations! You have now implemented the brain of your landing page. You've moved beyond just building a page to instrumenting it for measurement and optimization. This is a fundamental skill for any data-driven founder.
Key Takeaways:
- Setting up GA4 involves creating a property and adding its Measurement ID or Google Tag to your site.
- Page view tracking is the default and is verified using the Real-Time report.
- Form submission tracking is critical for measuring conversions. The right method depends on your form's behavior:
- Enhanced Measurement: Easiest, but test its reliability.
- Thank You Page Tracking: Simple and very reliable if your form redirects to a unique URL.
- Google Tag Manager (GTM): The most powerful and flexible solution, essential for forms that don't redirect.
- You must mark your form submission event as a Key Event (Conversion) in GA4 to properly track its business value.
Preview of the Next Module:
Your landing page is now a complete conversion asset, and you have the analytics to prove it. But a great page with no traffic is useless. In our next module, "Paid Acquisition with Google & Meta Ads," we will shift our focus from building to distributing. You will learn how to set up and run your first ad campaigns to drive targeted traffic to the page you've just perfected, using the conversion tracking you set up today to measure your success.