
Hello again. You have just traced how a browser and server exchange HTTP messages. To build and inspect your own application, you now need a local workspace: an editor for writing files, a runtime for running server-side JavaScript, and version-control software for recording your work.
By the end of this lesson, Visual Studio Code, Node.js (including npm), and Git should be installed and verified on your Windows laptop. These are not three competing applications: each has a distinct responsibility.
- Visual Studio Code is the editor where you write and inspect project files.
- Node.js runs JavaScript outside the browser, which later lets us build a web server.
- npm comes with Node.js and installs project dependencies.
- Git records the history of your project files so changes can be understood and recovered.
A small amount of setup discipline
Install tools only from their official publishers’ sites. Search results can contain ads or unofficial download sites; confirm the site address before downloading. The resources in this lesson route you to the official installers.
Before beginning:
- Save any open work.
- Close existing PowerShell, Command Prompt, and VS Code windows. Installers can update Windows’ command lookup settings, but terminals that were already open may not see those updates.
- Keep the default installation locations unless you have a concrete reason to change them.
- If you discover that one of these tools is already installed and its verification command works, do not reinstall it just for this lesson. Record its version and continue.
A useful term here is PATH. Windows maintains a list of folders in which it looks for programs when you type a command such as node or git. The installers normally add their command folders to PATH. Restarting a terminal gives it the updated list.
Install Visual Studio Code
Visual Studio Code is a code editor, not the web server itself. Think of it as your project workbench: it shows the folder structure, lets you edit files, provides an integrated terminal, and later displays Git changes.
Read “Visual Studio Code on Windows” from Microsoft first. It explains why the User setup is the appropriate choice for most single-user Windows laptops and how its command-line launcher is configured.
In the “Choose User setup or System setup” subsection, focus on the User setup rationale. Then read the “Install with the Windows installer” subsection, especially the paragraph beginning “By default, the User setup installs VS Code under,” which explains that the installer adds VS Code to PATH and that you must restart your console before using code ..
Installation steps
- From the official VS Code page linked in the reading, download the User setup installer for Windows.
- Open the downloaded installer, usually named something like
VSCodeUserSetup-...exe. - Accept the license agreement.
- Keep the default destination and usual options.
- Complete the installation and launch VS Code once.
The User setup is usually preferable because it installs for your Windows account without administrator permissions and can update smoothly. A System setup is intended for a machine managed for several users.
Now verify the graphical application:
- Press the Windows key.
- Type Visual Studio Code.
- Open it.
- You should see the welcome screen or editor window.
Then close VS Code for the moment and open a new PowerShell window:
- Press the Windows key.
- Type PowerShell.
- Select Windows PowerShell or PowerShell.
Run:
code --version
A successful result displays one or more version lines. The exact number will differ over time. What matters is that PowerShell recognizes code as a command.
If it says that code is not recognized, close PowerShell completely, open a new one, and try once more. If it still fails but VS Code opens normally from the Start menu, continue with the rest of this lesson; we can troubleshoot the launcher after all three tools are installed.
Install Node.js and npm
Browser JavaScript runs within a browser and can use browser APIs such as the Document Object Model. Node.js is a runtime that executes JavaScript directly on your computer, outside the browser. Later, it will run the Express server for your application.
npm, short for Node Package Manager, is installed with Node.js. It will create projects, run project scripts, and download packages such as Express.
For this course, choose the LTS release when the Node.js download page offers a choice:
- LTS means Long-Term Support: a stable release line supported for a longer period.
- A Current release contains newer features but changes more quickly.
A version manager can be useful when an experienced developer must switch Node versions between several projects. For one beginner project, the standard LTS installer gives a simpler and more transparent starting point. We can introduce version-management tools only if a real project need arises.
How to Install Node.js on Windows 11 & Run Your First Program
Watch “How to Install Node.js on Windows 11 & Run Your First Program” by ProgrammingKnowledge for a visual walkthrough of the Windows installer and the two version checks you will use.
Watch the installer flow to see the MSI download and setup process. Then watch version verification for the node and npm checks. On the actual download page, choose the LTS Windows installer. During setup, keep Node.js, npm, and “Add to PATH” enabled; do not select optional tools for compiling native modules unless a later project specifically requires them.
Download the Windows MSI installer for the LTS release, open it, and proceed through the wizard. Keep the normal selected components.
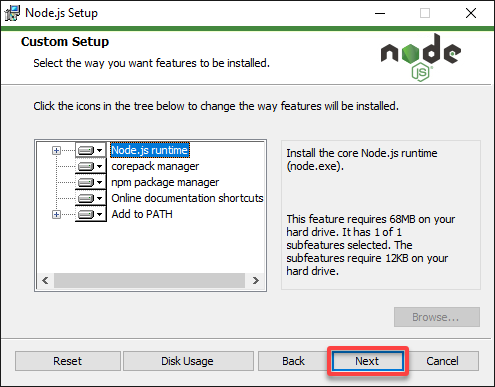
Some installer versions show Corepack as well. It is a tool associated with alternative package managers. Leave the default selection in place, but you do not need to use Corepack in this course.
After installation finishes, close PowerShell if it was open, then open a fresh PowerShell window and run:
node --version
npm --version
You should see two version numbers. For example, the Node command may begin with v, while npm usually prints only digits and periods. Do not try to match a particular version shown in the video; releases change regularly.
As an extra confirmation that Node can execute JavaScript, run:
node -e "console.log('Node is ready')"
Expected output:
Node is ready
This command asks Node to execute the small JavaScript instruction inside the quotation marks. You do not need to understand its syntax yet; its purpose is simply to verify that the runtime is functioning.
Install Git
Git is a version-control system. It records deliberate snapshots of changes in a project. This lets you answer questions such as:
- What changed between two working versions?
- When did an error first appear?
- Can I return to an earlier state safely?
- Which changes belong together as one feature?
Git works locally on your laptop. Later, you may connect it to a remote service such as GitHub, but an online account is not needed today.
Set up Node.js on native Windows
Read the “Install Git” subsection of Microsoft’s Windows Node.js setup guide. It explains why Git powers VS Code’s Source Control view and recommends the normal Git for Windows installation path.
Start at the paragraph beginning “If you plan to collaborate with others,” and read through the explanation that VS Code has Git commands in its Source Control view. In the numbered “Install Git” instructions immediately below, read the installer guidance: use Git for Windows and retain the default settings unless you know why a setting should differ.
Installation steps
- Use the official Git for Windows download linked in the reading.
- Run the installer.
- Keep the default selections unless a screen presents a clear preference you understand.
- If the installer offers Visual Studio Code as Git’s default editor, selecting it is reasonable because VS Code is now installed. Otherwise, leaving the existing default is also acceptable.
- Complete the installation.
Open a fresh PowerShell window and run:
git --version
A successful installation returns text similar to:
git version 2.x.x
Again, the exact version number is not important. The important result is that Windows finds and runs Git.
Verify the complete workspace
Use one newly opened PowerShell window and run this full check:
code --version
node --version
npm --version
git --version
You have a working foundation when each command produces version information rather than an error. You can also ask PowerShell where it found a command:
Get-Command node
Get-Command git
The output should identify each command as an application and show its location on your computer. This is useful when diagnosing PATH problems later.
A compact troubleshooting guide
| Symptom | Likely cause | Safe first response |
|---|---|---|
| A command is “not recognized” immediately after installation | The terminal was open before PATH changed | Close all terminal windows and open a new PowerShell window |
VS Code opens from Start but code --version fails | VS Code’s command-line launcher is not available to this terminal yet | Restart PowerShell; if needed, restart Windows and try again |
node --version works but npm --version fails in PowerShell | A PowerShell policy may be preferring or blocking npm’s PowerShell wrapper | Try npm.cmd --version; do not copy policy-changing commands from random websites |
| Git is installed but VS Code does not show Git features | VS Code was already open during the Git installation | Close and reopen VS Code, then verify git --version in PowerShell |
| An installer is blocked by a work or school device policy | The device is centrally managed | Do not bypass the policy; ask the device administrator for approved installation access |
Avoid making broad security changes, such as disabling Windows protections or permanently lowering PowerShell safeguards, merely to complete a setup step. First identify the specific tool and error. A clean, understandable workspace is more useful than a fast but fragile one.
For today, record the four version results somewhere convenient, such as a note on your desktop. That makes it easier to describe your environment accurately if you later need help.
Wrap-up
You now have the three core local development tools:
- VS Code for editing and exploring your project.
- Node.js for executing server-side JavaScript.
- npm for managing JavaScript project packages and scripts.
- Git for maintaining a reliable history of your project.
The verification commands are worth remembering:
code --version
node --version
npm --version
git --version
Next, you will use PowerShell more deliberately: navigating folders, creating directories, and running development commands in the correct project location.
Can't find a good explanation? Sign up and we'll make it for you
Sign up