
Hello again. Your Small Business Starter page now has a clear structure and a deliberate visual design. The next step is to give the project a reliable history: a record of meaningful states that you can inspect, compare, and return to later.
This lesson introduces Git, the version-control system used throughout modern software development. You will turn your existing project folder into a local Git repository, select the files that belong in its first saved snapshot, create that snapshot as a commit, and inspect what Git recorded. This repository stays on your laptop for now; publishing it to a service such as GitHub comes much later.
Git records a project’s history
Without version control, it is tempting to make copies such as:
small-business-starter-final
small-business-starter-final-2
small-business-starter-actually-final
That approach makes it difficult to know what changed, why it changed, or which folder is trustworthy. Git provides a more precise model: it stores a sequence of named project snapshots called commits.
A Git repository has three practical areas to distinguish:
- Working directory: the actual project folder you edit in VS Code, containing files such as
index.htmlandstyles/main.css. - Staging area: your deliberate proposal for the next commit. You place selected versions of files here.
- Repository: Git’s local history database, which stores commits after you create them.
A commit is not merely a backup copy. It is a labeled, inspectable record of a coherent change. Later, this becomes important for architecture work: a project’s Git history can explain when a feature, a boundary, or an important technical decision was introduced.
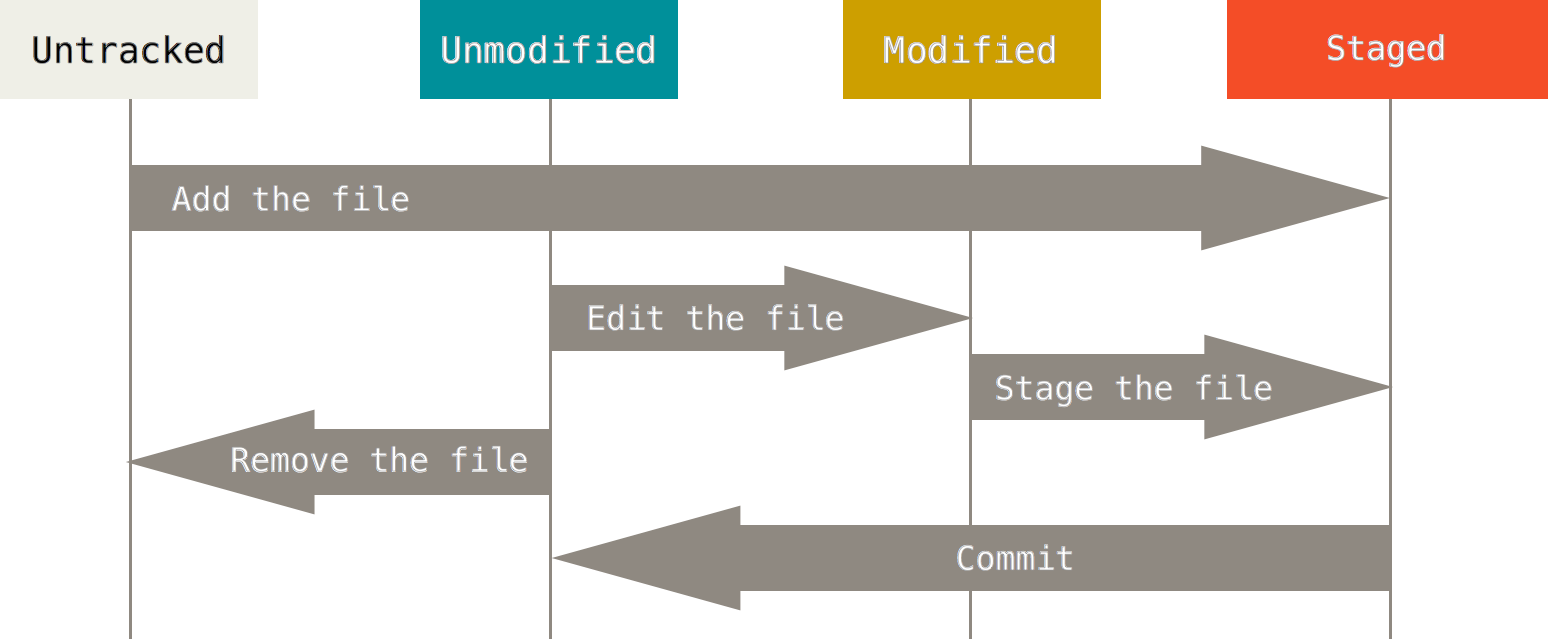
The lifecycle diagram introduces four useful states:
| State | Meaning | Typical status output |
|---|---|---|
| Untracked | A file exists in the folder, but Git has not been told to include it in history. | Untracked files |
| Unmodified | The file matches the most recent commit. | A clean status may show nothing |
| Modified | The file has changed since the most recent commit. | Changes not staged for commit |
| Staged | Git has selected the current version of that file for the next commit. | Changes to be committed |
The staging area is the extra step that makes Git useful rather than merely automatic. You might change several files while experimenting, but decide that only some of those changes form one complete, safe idea. Staging lets you choose exactly what the next commit contains.
A crucial detail: staging captures the file as it exists at that moment. If you stage index.html, then edit it again, the newer edit is not automatically staged. Git can show one version ready for a commit and another, more recent version still modified in your working directory.
2.1 Git Basics - Getting a Git Repository
Read “Getting a Git Repository” from the official Pro Git book. It explains what initialization does to an existing local project and places the first commit in context.
In “Getting a Git Repository,” read the subsection “Initializing a Repository in an Existing Directory” from its opening explanation through the initial git add and git commit example. Pay particular attention to what initialization creates: Git sets up its internal repository, but it does not automatically start tracking your project files.
Initialize your local repository
Open your Small Business Starter project folder in VS Code. You should be able to see index.html and the styles folder in the Explorer panel.
Next, open the integrated PowerShell terminal:
- Select Terminal in VS Code’s top menu.
- Select New Terminal.
- Check that the terminal prompt ends with your project folder name.
If it does not, navigate to the folder using cd. Replace the example path with the location you chose earlier:
cd "C:\Users\YourName\Documents\small-business-starter"
Confirm where you are and list the project files:
Get-Location
Get-ChildItem
You should see a location ending in your project folder and a list that includes index.html and styles.
Before committing for the first time, Git needs an author name and email address. These are stored in every commit so that a future collaborator—or future you—can identify who made it. First, check whether they have already been set:
git config --global user.name
git config --global user.email
If either command prints nothing, configure it. Use a name you are comfortable attaching to your local development history and an email address you control:
git config --global user.name "Your Name"
git config --global user.email "you@example.com"
The --global option means these settings apply to Git repositories you create as this Windows user. You can verify them again with the first two commands.
Now initialize Git in the folder:
git init
Git should report that it initialized an empty repository. It has created a hidden .git folder inside your project. That folder contains Git’s internal data: commit history, configuration, and other repository information.
Do not edit, rename, or delete .git. Deleting it removes the Git history from that project folder. You normally do not need to open it at all.
Run:
git status
Git will report that you are on an initial branch and that files such as index.html and styles/main.css are untracked. This does not mean the files are missing. They are present in your working directory, but Git is waiting for you to decide whether they belong in the project history.
Some Git installations call the first branch main; older configurations may use master. The branch name does not affect today’s workflow, and you will study branches later.
Review, stage, and commit the first version
Before staging, take a moment to decide what belongs in this first commit. For this project, the HTML page and stylesheet form one meaningful unit: they establish the first working version of the Small Business Starter page.
Stage precisely those files:
git add index.html styles/main.css
Then inspect the repository state again:
git status
Look for a section named “Changes to be committed.” Git should list your files as new files. They are now staged: the current versions are ready to become the first committed snapshot.
Using specific file paths is a good beginner habit. You may eventually use git add . to stage all eligible changes in a folder, but that is best done only after inspecting the status carefully. A project can contain files that should not enter version control, such as private configuration values, generated logs, or large temporary files.
Before creating the commit, inspect exactly what is staged:
git diff --staged
Because this is your first commit, Git displays the contents as additions. In the diff:
- Lines beginning with
+are lines being added to the commit. - The file headings identify which file is changing.
index.htmlandstyles/main.cssshould match the version you want to preserve.
If the output fills the terminal, Git may open it in a scrolling viewer. Press Q to return to the PowerShell prompt.
Now create the commit:
git commit -m "Add small business starter page"
The quoted text is the commit message. It should summarize the change in a way that will remain understandable when you see it weeks or months later.
Useful commit messages are:
Add small business starter pageStyle starter resource cardsFix navigation focus indicator
Unhelpful messages are:
changesupdatestufffinal version
A common convention is to use an action-oriented phrase, such as “Add,” “Fix,” “Remove,” or “Refine.” The key principle is clarity: a commit message should say what changed, not merely announce that something changed.
After Git reports that the commit was created, run:
git status
A successful first commit normally produces a message similar to:
nothing to commit, working tree clean
“Clean” means the working directory, staging area, and latest commit all currently agree. It does not mean your project is finished; it simply means Git has recorded every change you intentionally staged.
The same workflow in VS Code
You will use terminal commands regularly because they make Git’s underlying model visible. VS Code also provides a graphical interface for the same actions, which is useful for reviewing files and changes.
Using Git with Visual Studio Code (Official Beginner Tutorial)
Watch “Using Git with Visual Studio Code (Official Beginner Tutorial)” from the Visual Studio Code channel for a concise visual walk-through of the same initialization, staging, and commit workflow.
If you had not yet run git init, watch repository setup to see where Initialize Repository appears in the Source Control view. Then watch stage and commit to see how an untracked file moves into the staged list and receives a commit message.
In VS Code, select the Source Control icon in the left Activity Bar. Its symbol resembles branching lines. After initialization, it shows Git’s current state:
- Files marked U are untracked.
- Files marked M are modified since the latest commit.
- The + button stages a file.
- Staged files appear under Staged Changes.
- The message box at the top accepts a commit message.
- The checkmark creates the commit.
The command-line and VS Code approaches operate on the same repository. For example, after running git add in PowerShell, VS Code immediately shows the file under Staged Changes. You can freely use the interface that helps you understand and review your work best.
Inspect the commit you created
Creating a commit is only part of version control. You also need to be able to inspect history and confirm what a commit contains.
Start with a compact history list:
git log --oneline
You should see a line containing:
- A short identifier, such as
a1b2c3d. - Your commit message,
Add small business starter page.
The short identifier is an abbreviation of Git’s unique commit ID. Git calculates a much longer identifier internally; you do not need to memorize it. The identifier lets Git distinguish one saved snapshot from another.
To inspect the latest commit in detail, run:
git show HEAD
HEAD is Git’s convenient name for the commit currently at the top of your active branch. For now, read it simply as the latest commit.
The output from git show HEAD includes:
- The full commit ID.
- Your configured author name and email.
- The date and time of the commit.
- The commit message.
- A diff showing the files and lines introduced by that commit.
For an initial commit, all tracked page and CSS lines appear as additions because there was no prior committed version to compare against.
If you only want a short file-level summary rather than the complete diff, use:
git show --stat HEAD
This tells you which files the commit changed and how many lines were added or removed. It is a quick way to confirm a commit’s scope.
Your essential Git loop is now:
Edit files in the working directory
Inspect with git status
Stage intended files with git add
Review staged content with git diff --staged
Create a commit with git commit
Inspect history with git log and git show
Treat this as a careful record-keeping loop rather than a ritual. The ideal commit captures one coherent, working change. Do not commit after every character typed, but do not wait until days of unrelated work have accumulated either.
A final verification routine
Use this short routine now, while the project is still small:
git status
git log --oneline
git show --stat HEAD
You are looking for three conditions:
git statusreports a clean working tree.git log --onelinelists your starter-page commit.git show --stat HEADlistsindex.htmlandstyles/main.css.
If Git refuses to commit and says it cannot identify the author, configure user.name and user.email as shown earlier, then repeat the commit command. If git status shows a file you did not intend to include, do not commit yet; inspect why it exists and stage only the files that belong to the intended snapshot.
Wrap-up
You have given the Small Business Starter project its first durable history record.
The key ideas are:
- Git is a local version-control system; it is not the same thing as GitHub or another online hosting service.
git initcreates a repository inside a project folder through its hidden.gitdirectory.- Files move through untracked, modified, and staged states before becoming part of a commit.
git addselects the current version of a file for the next commit.git commit -m "message"saves the staged snapshot with an explanatory message.git statusshows the present state;git log --onelinelists saved history;git show HEADinspects the latest commit.
The next module begins programming with JavaScript. You will start by using values, variables, and operators to calculate and store information—skills that will turn your currently static page into an application with behavior.
Can't find a good explanation? Sign up and we'll make it for you
Sign up