
Creating a Virtual Environment and Installing Packages with pip
Hello, and welcome. This course approaches AI through small working Python projects rather than mathematics-first theory. In this first module, you will build the practical foundation for an AI assistant: a clean project setup, safe handling of credentials, controlled API spending, and eventually a short conversational program.
Today’s goal is deliberately modest but important: create a project-specific Python virtual environment and install a package with pip. By the end, you will have a folder ready for the AI assistant we will build in later lessons—without cluttering or breaking other Python projects on your machine.
Why each project needs its own environment
A Python package is reusable code written by someone else. For example, the openai package gives Python code a way to communicate with an AI model API. pip is Python’s standard tool for downloading and installing such packages, usually from the Python Package Index (PyPI).
The complication is versions. One project might need one version of a library; another project might need a different version. Installing everything into one global Python installation eventually creates conflicts that are hard to diagnose.
A virtual environment solves that problem. It is a folder, usually named .venv, that contains a project-specific Python setup and its installed packages. When that environment is active, Python and pip use the packages inside that project’s .venv folder.
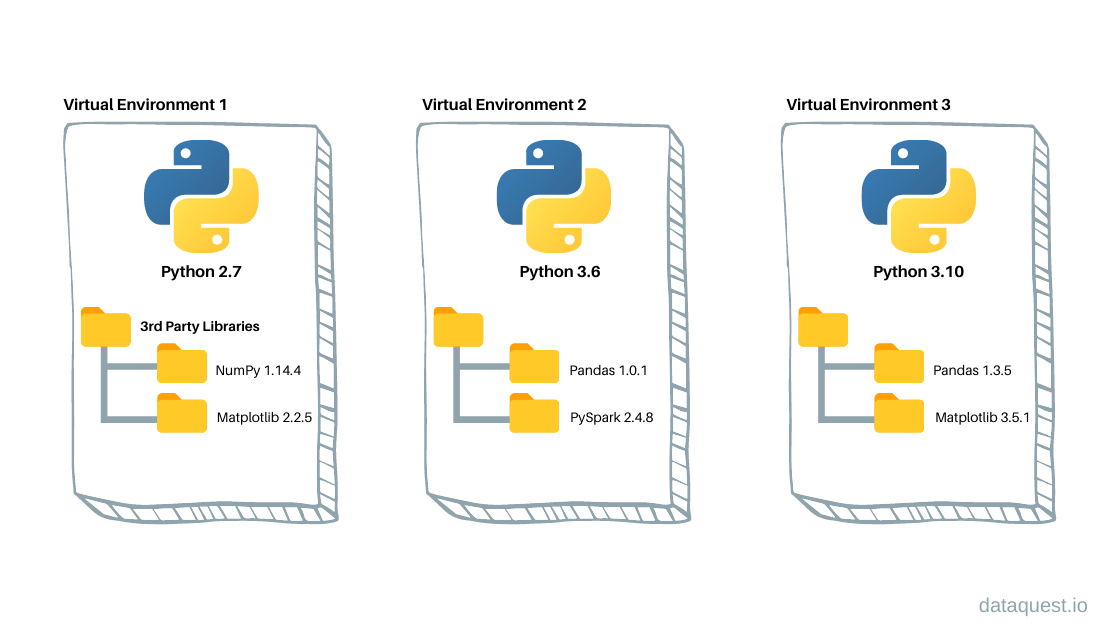
There is a useful rough parallel with Java development:
- A Java project declares libraries in
pom.xmlorbuild.gradle. - A Python project commonly records installed libraries in
requirements.txt. - A Python virtual environment is the local, isolated place where those declared libraries are actually installed.
It is not a container or a separate operating system. It is simply a controlled Python-and-packages workspace for one project.
For a quick visual explanation and a demonstration of the commands, watch the following.
Python Virtual Environments - Full Tutorial for Beginners
“Python Virtual Environments - Full Tutorial for Beginners” by Tech With Tim explains the exact workflow you will use: why environments exist, how to create and activate one, how pip installs packages, and how requirements files make a project reproducible.
Watch the isolation idea for the version-conflict problem virtual environments prevent. Then watch environment creation and activation; the commands differ slightly by operating system. Continue with package installation to see how an active environment changes pip’s package list. Finally, watch requirements files for the workflow used when another developer needs to reproduce the project setup.
The essential habit for this course is:
- Open the project folder.
- Activate that project’s environment.
- Install or run packages only while that environment is active.
- Record the dependency versions so the environment can be recreated later.
Create the project and its virtual environment
We will create a folder named first-ai-assistant. This is only a workspace for now; it will become the home of the first project in this course.
1. Create and open the project folder
In VS Code:
- Create a folder called
first-ai-assistantsomewhere easy to find, such as your Documents or development folder. - Select File > Open Folder and open
first-ai-assistant. - Open the integrated terminal with Terminal > New Terminal.
Make sure the terminal prompt is located inside first-ai-assistant. The command you run next creates .venv in the current folder.
2. Check that Python is available
Run one command, based on your operating system.
Windows
py --version
macOS or Linux
python3 --version
You should see a Python 3 version number. If you instead see an error such as “command not found,” pause here and verify Python’s installation before continuing. You already indicated that Python runs locally, so this should mainly confirm that VS Code’s terminal can find it.
3. Create .venv
Again, choose the command for your operating system.
Windows
py -m venv .venv
macOS or Linux
python3 -m venv .venv
Read this command in parts:
| Part | Meaning |
|---|---|
py or python3 | Start the Python interpreter installed on your computer. |
-m venv | Run Python’s built-in virtual-environment tool. |
.venv | Create the environment in a folder named .venv. |
After the command finishes, VS Code’s Explorer should show a .venv folder. Do not write your own Python files inside it. Treat it as generated project infrastructure, much like build output or a local dependency cache.
A typical project structure now looks like this:
first-ai-assistant/
├── .venv/
└── ...
4. Activate the environment
Creating an environment does not automatically make the current terminal use it. Activation does that.
Windows PowerShell (the usual VS Code terminal on Windows)
.\.venv\Scripts\Activate.ps1
Windows Command Prompt
.\.venv\Scripts\activate.bat
macOS or Linux
source .venv/bin/activate
When activation succeeds, your terminal prompt should begin with (.venv). For example:
(.venv) ... first-ai-assistant
That label is a helpful sign, but verify it with Python itself:
python -c "import sys; print(sys.executable)"
The printed path should include .venv. That is the reliable proof that this terminal is using the project environment rather than the global Python installation.
Windows PowerShell note: If activation is blocked by an execution-policy message, run the following command in that same terminal, then retry activation:
Set-ExecutionPolicy -Scope Process -ExecutionPolicy Bypass
-Scope Processapplies only to the current terminal session. It does not permanently change your computer-wide policy.
5. Tell VS Code to use the same interpreter
The terminal can be activated correctly while VS Code still uses a different Python interpreter for running files. Align them now:
- Press
Ctrl+Shift+Pon Windows/Linux, orCmd+Shift+Pon macOS. - Run Python: Select Interpreter.
- Choose the interpreter whose path includes
.venv.
VS Code often detects it automatically. Check the Python interpreter label in the bottom status bar if you are unsure.
Install a project package with pip
With (.venv) visible in the terminal, first check which pip belongs to this environment:
python -m pip --version
Its displayed path should include .venv.
Using python -m pip rather than just pip is a defensive habit. It means: “run the pip that belongs to this Python interpreter.” When you have several Python installations, that removes ambiguity.
Now update pip within the environment:
python -m pip install --upgrade pip
Next, install the OpenAI Python package:
python -m pip install openai
This command downloads openai and any supporting packages it requires, then installs them inside .venv. It does not send a request to an AI model, create an account, or spend money. It only prepares the Python library that later lessons will use.
Verify that pip installed it:
python -m pip show openai
You should see package information, including a Name, Version, and Location. The location should contain .venv.
For one final, visible confirmation, create a file named main.py in the top-level first-ai-assistant folder, alongside .venv. Add:
import openai

print("OpenAI package imported successfully.")
Run it from the activated terminal:
python main.py
Expected output:
OpenAI package imported successfully.
This is a small success criterion, but it matters: your code is running with the package installed in the intended environment.
Make the setup reproducible
An environment itself should normally stay on your computer. You do not commit its thousands of generated files to Git. Instead, commit a small text file that says what must be installed.
Create that file from your active environment:
python -m pip freeze > requirements.txt
Open requirements.txt in VS Code. You will see package names with exact versions, likely including openai and several packages it depends on. Exact versions help recreate the same working setup later.
Your project should now resemble:
first-ai-assistant/
├── .venv/
├── main.py
└── requirements.txt
Add a file named .gitignore and put this in it:
.venv/
__pycache__/
This tells Git not to track the virtual environment or Python’s temporary cache files. Keep requirements.txt under version control; it is part of the project’s reproducible definition.
When you later receive a Python project from GitHub, the common setup process is:
- Open the project folder.
- Create a new virtual environment.
- Activate it.
- Install the declared dependencies:
python -m pip install -r requirements.txt
The -r means “read package requirements from this file.” You do not need to run that command now, because your current environment already has the packages installed. Its importance is that someone else—or future you on a new machine—can rebuild the project without guessing.
A short operating checklist
Before running any Python project in this course, use this checklist:
- Is VS Code opened at the project’s root folder?
- Does the terminal prompt show
(.venv)? - Does
python -m pip --versionshow a path inside.venv? - Is VS Code’s selected interpreter the
.venvinterpreter? - If you installed a new package, did you update
requirements.txt?
Two small points prevent a lot of frustration:
- Closing a terminal deactivates the environment. In a new terminal, activate
.venvagain. You create the environment once, but activate it whenever you start working. - A virtual environment can be rebuilt. If it becomes corrupted, delete the
.venvfolder through VS Code or your file explorer, create it again, activate it, then runpython -m pip install -r requirements.txt. Your source files remain untouched because they live outside.venv.
Wrap-up
You have established a professional Python project boundary:
- A virtual environment isolates one project’s Python packages from every other project.
.venvis the conventional local folder for that environment.- Activating it makes the terminal use its Python and pip.
python -m pip install openaiinstalls the OpenAI package without making an API call.requirements.txtrecords dependencies so the environment can be recreated..venv/belongs in.gitignore, whilerequirements.txtbelongs in the repository.
Next, we will add the first security boundary: storing a model API key in an environment variable rather than placing it in main.py.
Can't find a good explanation? Sign up and we'll make it for you
Sign up