
Hello! Welcome to the final lesson in our module on Solana Blockchain Fundamentals.
In our previous lessons, we learned that the Solana world is composed of accounts: executable accounts holding program logic and data accounts holding state. We also covered rent, the economic mechanism that pays for the storage these accounts occupy.
Today, we will connect these concepts by learning how to interact with accounts. The mechanism for this is the transaction. A transaction is the fundamental unit of work on Solana; it's the message you send to the network to get anything done, from transferring SOL to interacting with a complex DeFi protocol.
Your learning outcome for this lesson is to describe the structure of a Solana transaction, including instructions, accounts, and signatures. By the end, you'll have a clear mental model of how actions are bundled and sent to the Solana network for processing.
The Anatomy of a Transaction
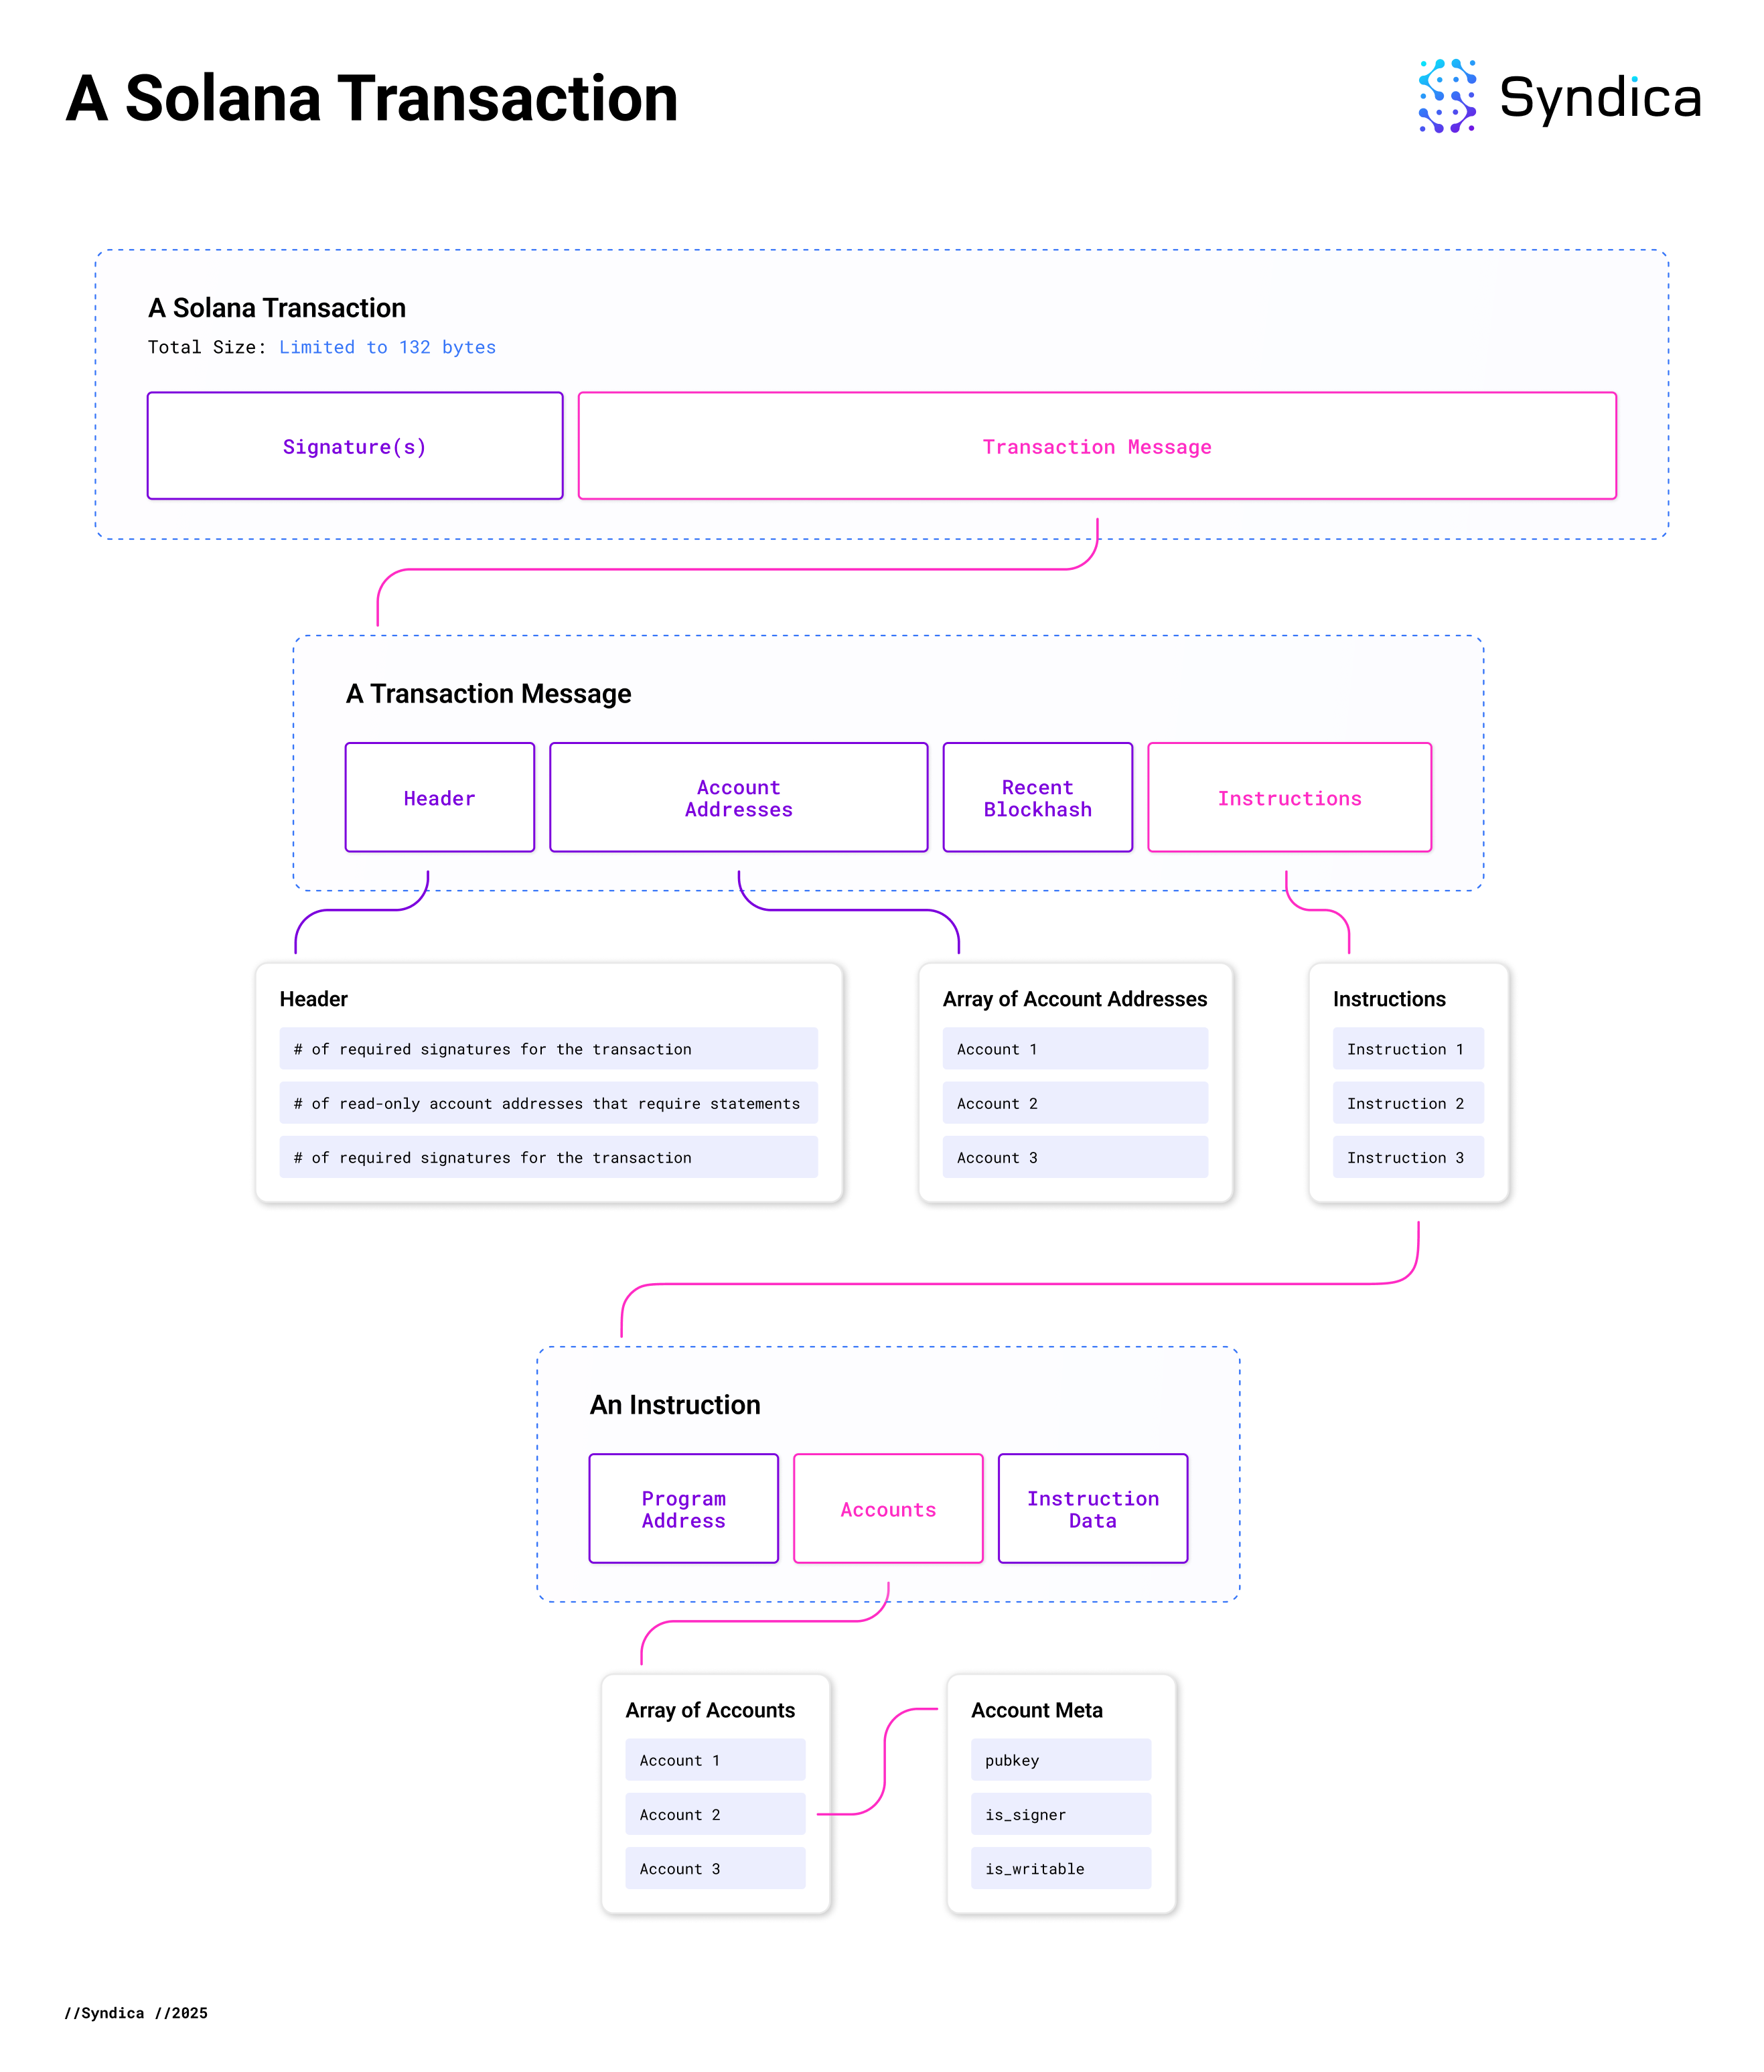
At the highest level, a Solana transaction is like an envelope containing a set of forms. The forms are called instructions, and they tell the network what specific actions to perform. The entire envelope is processed atomically: either every single instruction succeeds, or the entire transaction fails and no state is changed. This atomicity is a cornerstone of Solana's programming model, ensuring that complex, multi-step operations are reliable.
A transaction consists of two main parts:
- An array of
signatures. - A
messagethat contains the actual contents of the transaction.
Let's start by reading the official documentation which introduces this structure.
The official Solana documentation provides the most accurate, high-level overview of a transaction. This will give us a solid foundation for the rest of the lesson.
Read the introductory section, up to (but not including) the 'Signatures' section. Focus on the definition of a transaction and its two primary components: signatures and message.
This diagram provides a great visual roadmap for the components we'll be dissecting.
The Message: The Heart of the Transaction
The message is where the "what" and "how" of the transaction are defined. It's a carefully packed structure designed for efficiency. Given your background, you can think of it as the highly optimized payload of an API request.
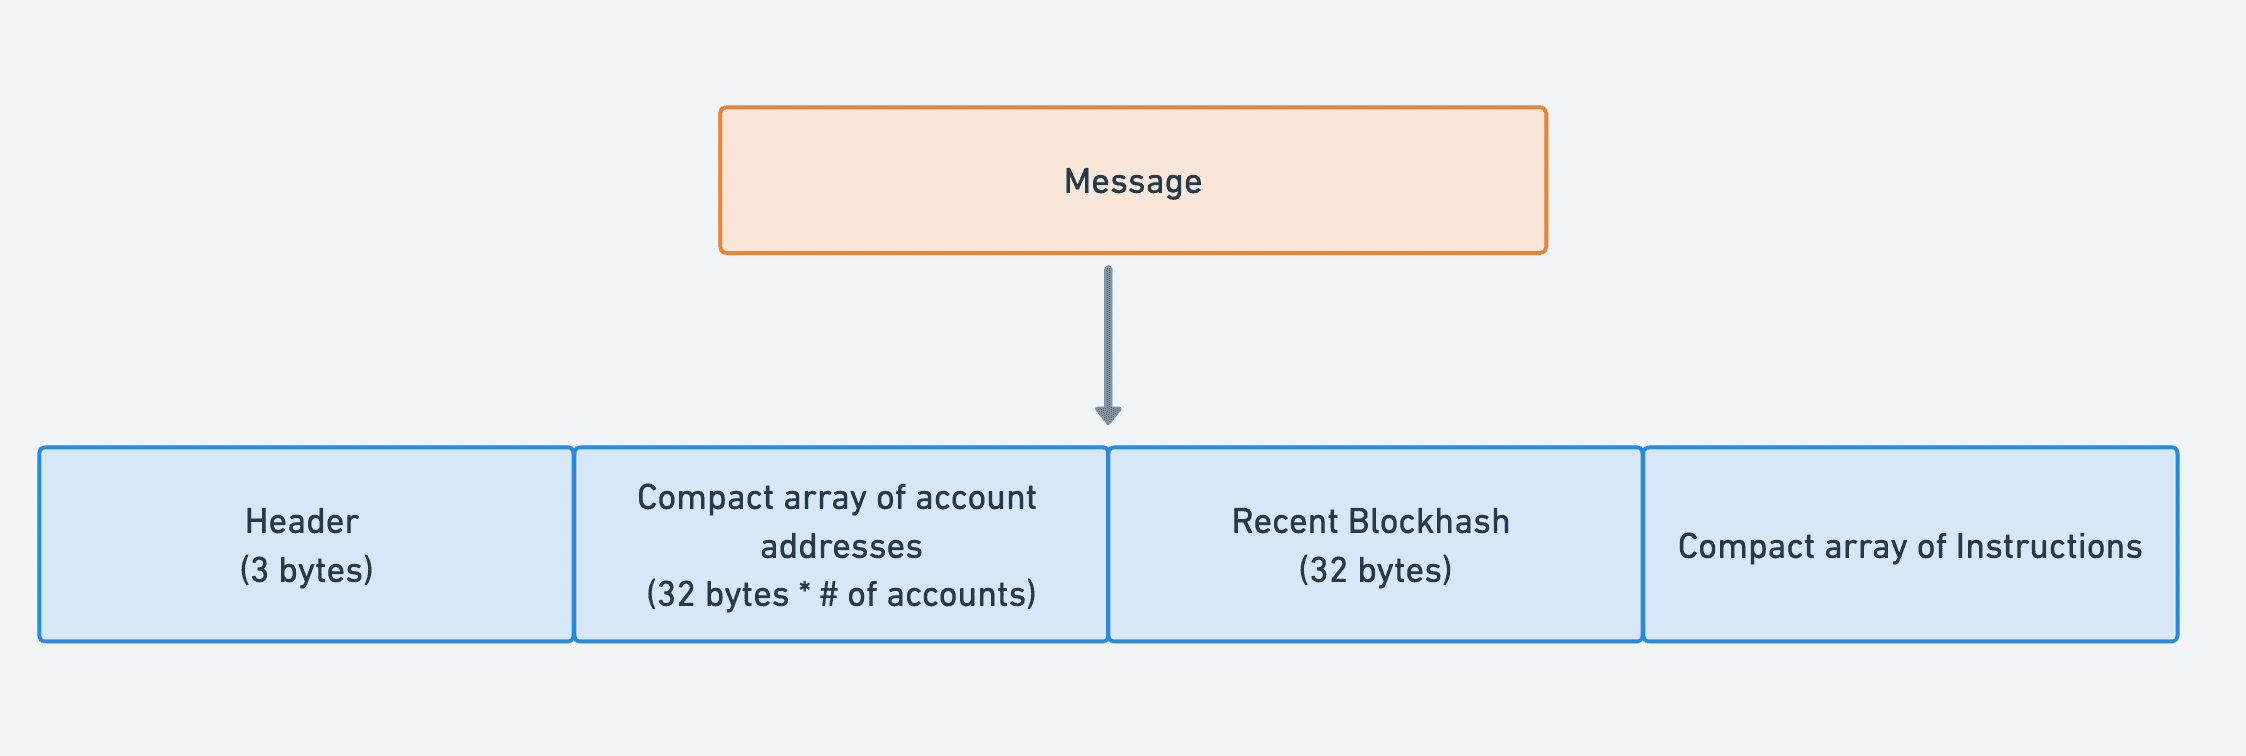
The message itself contains four key pieces of information:
account_keys: A flat list of all account public keys that will be used by any instruction within the transaction. This is a crucial design choice for efficiency. Instead of listing accounts inside each instruction, they are all listed once here and referenced by an index.instructions: An array of the actual instructions to be executed in sequence.recent_blockhash: A unique hash from a very recent block. This serves two purposes: it acts as a network timestamp, causing the transaction to expire if it's not processed quickly (usually within about a minute), and it prevents the same transaction from being processed twice.header: A small piece of metadata that specifies how many of the accounts in theaccount_keyslist are signers, and how many are read-only versus writable.
Let's dive deeper into these components using the documentation.
We will now explore each part of the transaction message. The official docs provide the technical details for each field.
Read the sections titled 'Message', 'Header', 'Account addresses', and 'Recent blockhash'. Pay close attention to the strict ordering of the account_keys array—this is a key concept for understanding how permissions are assigned without being explicitly listed for every account.
To summarize this efficient design: the header provides counts (num_required_signatures, etc.), and the strictly ordered account_keys array provides the accounts. By combining the header's counts with the array order, the Solana runtime can quickly determine which accounts are signers, which are writable, and which are read-only, without needing bulky permission flags on every account.
Instructions: The To-Do List
Now we come to the most important part of the message: the array of instructions. Each instruction is a directive to call a specific program with a specific set of accounts and data.
A compiled instruction within a transaction message is compact and contains three parts:
program_id_index: An index (au8integer) that points to an address in the transaction's top-levelaccount_keysarray. This address is the program that will execute the instruction.accounts: An array of indices, where each index points to an account in theaccount_keysarray. These are the accounts that will be passed to the program for this specific instruction.data: A byte array (Vec<u8>) that is passed directly to the program. This data typically specifies which function within the program to call and includes any arguments for that function.
Let's read about this structure and then see a practical example.
First, let's read the official definition of an instruction's structure within a transaction message.
Read the 'Instructions' section. Notice how program_id_index and the accounts array use indices to reference the main account_keys list. This is the core of Solana's transaction data compression.
To make this concrete, let's look at a deconstruction of a real transaction. The following article provides a fantastic, developer-oriented walkthrough of a transaction that mints a new token.
This article offers a step-by-step breakdown of a multi-instruction transaction. It perfectly illustrates how the concepts we've discussed are applied in practice.
Please read the section 'Instructions' and the detailed breakdown of 'Instruction #1/5'. The author does an excellent job of showing how the raw data buffer is interpreted and how the keys (accounts) and programId map to a real action—in this case, calling the System Program to create a new account.
As you saw in the article, a single logical action, like "minting a token," is actually composed of several low-level instructions: create an account for the mint, initialize the mint, create an account to hold the tokens, etc. The atomicity of transactions ensures this entire sequence either completes successfully or not at all.
Signatures: Authorizing the Transaction
Finally, we return to the first component of the transaction: the signatures.
A transaction must be signed by any account that is either debiting SOL (like the fee payer) or authorizing a change to data it owns.
The signatures array is a list of ed25519 signatures. Each signature corresponds to one of the signer accounts listed at the beginning of the account_keys array.
- The first signer in the
account_keyslist is always the fee payer. Its signature is the first one in thesignaturesarray and is also used as the transaction's unique ID, which you see on block explorers like Solscan or Solana Explorer. - The Solana runtime verifies that the number of signatures provided matches the
num_required_signaturesvalue in the message header and that each signature is valid for the corresponding public key.
Test your understanding!
Imagine you are building a transaction to do two things:
- Transfer 0.1 SOL from your wallet (
Wallet_A) to a friend's wallet (Wallet_B). This requires calling theSystem Program. - Update your profile bio on a social media program (
Social_Program). This requires modifying a data account (Profile_Account) that you own.
Based on what you've learned, answer the following:
- What accounts would need to be listed in the transaction's
account_keysarray? - Which of these accounts must sign the transaction?
- How many instructions would this transaction contain?
Show answer
- The
account_keysarray would need to contain:Wallet_A,Wallet_B,System_Program,Social_Program, andProfile_Account. Wallet_Amust sign the transaction. It is the fee payer, it is the source of the SOL transfer (a debit), and it is the owner of theProfile_Accountbeing modified, so it must authorize all these actions.- The transaction would contain two instructions: one for the SOL transfer (calling the
System_Program) and one for updating the bio (calling theSocial_Program).
Conclusion
You have now dissected the structure of a Solana transaction. It's an efficient, atomic container for one or more instructions designed to be processed quickly by the network.
Here are the key takeaways:
- A transaction is an atomic bundle of
signaturesand amessage. - The
messagecontains a list of instructions, a recent blockhash for liveness, and a single, unified list of allaccount_keysinvolved. - A
headerand a strict ordering of accounts allow the runtime to efficiently determine permissions (signer, writable). - Each
instructionis a compact object that points to a program and the specific accounts it needs by using indices into the mainaccount_keyslist, and includes a rawdatapayload for the program's logic. - Signatures are provided by the fee payer and any other account authorizing a debit or state change.
In this module, we've covered the what (accounts), the cost (rent), and the how (transactions). You now have the foundational knowledge of Solana's core on-chain concepts.
In our next module, "Native Solana Program Development," we will put this knowledge to use. The next lesson will focus specifically on the components of a Solana instruction (program_id, accounts, and instruction data), preparing you to write your very first program entrypoint that can process one of these instructions.
Can't find a good explanation? Sign up and we'll make it for you
Sign up