
Hello again! In our last lesson, we established a core principle of the hypermedia approach: keeping read-only global state, like user identity, on the server and using out-of-band (OOB) swaps to ensure the UI stays in sync.
Today, we take that concept a step further to tackle one of the most common challenges in SPA development: managing state that changes across different components. Your learning outcome is to translate a cross-component state update from Redux/Context into an HTMX action that uses out-of-band swaps to refresh a separate region (e.g., a cart counter). This is a pivotal lesson for your goal of migrating your CRUD applications from React to HTMX.
The Scenario: From React Context to Server Truth
In a typical React e-commerce application, you would handle adding an item to a cart using a global state manager. An "Add to Cart" button in a Product component would dispatch an action. A CartContext or Redux store would process this action, update its internal state, and trigger a re-render of a separate Header component to display the new cart count.
The state change is managed and propagated entirely on the client.
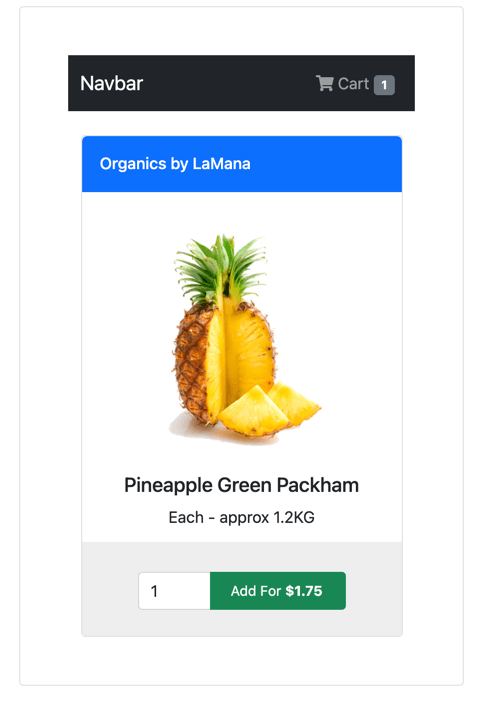
With HTMX, we invert this model. The "Add to Cart" button will make a request directly to the server, telling it, "The user wants to add this item." The server will update the "source of truth"—the user's session or database record—and then send back precise instructions on which parts of the UI need to change. The mechanism for this, as you've already seen, is the out-of-band swap.
Revisiting Out-of-Band Swaps
You were introduced to OOB swaps in our previous lesson. They are the key to solving this cross-component update problem. As a quick refresher, OOB swaps allow a single server response to contain multiple HTML fragments, each designated to update a different element in the DOM by its ID.
The segment on updating multiple places in Jack Herrington's "HTMX For React Developers" video perfectly illustrates this. It's worth a quick re-watch to solidify the pattern in your mind.
HTMX For React Developers in 10 Minutes
This video segment provides a concise demonstration of using hx-swap-oob to update two separate counters on a page with a single button click, explicitly mentioning the e-commerce cart use case.
Please re-watch the section from on updating multiple places. The key is how the server returns a primary fragment for the main target and a secondary fragment marked with hx-swap-oob="true" and an id that matches an element elsewhere on the page.
Implementing the Cross-Component Update
Let's translate the shopping cart scenario into code. Your Product component in React becomes a simple HTML structure, perhaps a form or a button with HTMX attributes.
<!-- The 'Add to Cart' button on the product page -->
<button
    hx-post="/cart/add/prod_123"
    hx-target="#add-to-cart-status"
    hx-swap="innerHTML">
    Add to Cart
</button>
<div id="add-to-cart-status"></div>

<!-- The cart counter, likely in your main layout or header partial -->
<span id="cart-count">Cart: 1</span>
When the user clicks the button, HTMX sends a POST request to /cart/add/prod_123. The hx-target points to a local div where we might display a confirmation message. The magic happens in the server's response.
Your Express route handler would do the following:
- Authenticate the user and access their cart from the session.
- Add the new product (
prod_123) to the cart. - Calculate the new total number of items.
- Construct and send a multi-part HTML response.
The article "Build a Full-stack App with Node.js and htmx" provides an excellent, practical example of how to construct such a response in Express. While the article uses it for flash messages, the technique is identical for our cart counter.
Build a Full-stack App with Node.js and htmx - SitePoint
This article from SitePoint demonstrates how to manually construct an HTML response in an Express handler that includes an out-of-band fragment.
Focus on the section Adding flash messages. Pay close attention to the Node.js code block where res.render is used with a callback. The code first renders the primary HTML for the sidebar, then manually combines it with a string containing the main element marked with hx-swap-oob. This is the exact pattern you'll use.
Applying this pattern to our cart scenario, the Express handler would look something like this:
app.post('/cart/add/:productId', (req, res) => {
  // 1. Access the user's cart from the session
  const cart = req.session.cart || { items: [], count: 0 };

  // 2. Add the item (logic omitted for brevity)
  // ...
  cart.count += 1;
  req.session.cart = cart;

  // 3. Render the updated cart counter partial
  res.render('partials/_cart-count', { count: cart.count }, (err, cartCountHtml) => {
    // 4. Construct the full response with the OOB fragment
    const html = `
      <!-- This is the OOB fragment that updates the header -->
      ${cartCountHtml}

      <!-- This is the primary response for the hx-target -->
      <p>Item added successfully!</p>
    `;
    res.send(html);
  });
});
And your partials/_cart-count.ejs would be:
<span id="cart-count" hx-swap-oob="true">Cart: <%= count %></span>
When HTMX receives this response:
- It takes the
<p>Item added successfully!</p>and places it inside<div id="add-to-cart-status">as directed byhx-target. - It sees the
<span>withhx-swap-oob="true". It looks for an element with theid="cart-count"in the current DOM and swaps it with this new fragment.
The user sees both the confirmation message appear and the cart counter update, all from one simple server interaction, completely eliminating the need for client-side state management libraries for this interaction.
A Deeper Look at a Complete Example
For a more comprehensive view of this pattern, the "Working with hx-target and hx-swap" resource provides another excellent conceptual breakdown, including a specific shopping cart example.
Working with hx-target and hx-swap
This resource offers a clear, structured explanation of out-of-band updates and a practical shopping cart example that updates multiple elements at once.
First, read the section on OOB updates to reinforce the core concept. Then, review the code in the final example, Shopping Cart. Although it uses ASP.NET Razor syntax, focus on the HTML response structure. Notice how a single form submission to update an item's quantity results in a response that updates the line item's total, the cart's subtotal, and the item count in the header—three distinct UI elements updated from one request.
This ability to update multiple, unrelated parts of the page is what makes OOB swaps so powerful. It's the hypermedia answer to the cross-component state synchronization problem that libraries like Redux and React Context were designed to solve on the client.
Conclusion
You have now learned the canonical HTMX pattern for managing state changes that affect multiple components. By offloading the state logic to the server, you replace a complex web of client-side event listeners, state containers, and selectors with a simple, robust request/response cycle.
Key Takeaways:
- Translate Actions to Requests: A user action that would dispatch an event in React (like
addToCart) becomes a direct HTTP request (hx-post) in HTMX. - Server as the Source of Truth: The server updates the application state (e.g., the cart in the session) and becomes solely responsible for describing the resulting UI changes.
- OOB Swaps for Cross-Component Updates: The server response includes one or more fragments marked with
hx-swap-oob="true". HTMX uses these fragments to swap out DOM elements with matching IDs, wherever they may be on the page. - Simplicity and Power: This pattern dramatically simplifies the client-side architecture for CRUD-style applications, letting you manage complex UI updates with standard HTML and server-side logic.
In our next lesson, we will get into the practicalities of a gradual migration. You'll learn how to run React and HTMX side by side, allowing you to incrementally introduce these hypermedia patterns into your existing projects without needing to commit to a full, "big bang" rewrite.
Can't find a good explanation? Sign up and we'll make it for you
Sign up