
Hello! Welcome back to your course on DJing DnB.
In our last lesson, you integrated tempo and phase adjustments to perform a complete manual beatmatch by ear. This is the most fundamental skill in DJing, and you learned to use a "listen, diagnose, correct" feedback loop to keep two different tracks in sync.
Today, we're going to enhance that skill with a powerful visual tool. The learning outcome for this lesson is to use the 'Stacked Waveform' view on linked CDJ-3000s to visually confirm beat and phrase alignment. Think of this as moving from debugging with print statements (listening alone) to using a proper visual debugger. It won't replace your primary skill—listening—but it will make you faster, more precise, and more confident in your mixes.
1. Introducing the Stacked Waveform
When your CDJ-3000s are connected via a Pro DJ Link network (which you learned to set up in Module 1), they can share information. One of the most significant features this enables is the Stacked Waveform display. Instead of only seeing the waveform of the track playing on the current deck, you can see its waveform displayed parallel to the waveform of the master deck.
Pioneer DJ's official product page for the CDJ-3000 provides a concise overview of this feature.
CDJ-3000 - Professional DJ multi player
This reading from the official Pioneer DJ product page introduces the concept of the Stacked Waveform.
Read the short section titled 'Stacked Waveform'. The key takeaway is its purpose: to visually check if the beatgrids of the master and cued tracks are perfectly lined up.
As the description states, this feature allows you to "visually check the beatgrids are perfectly lined up at a glance." This is your visual confirmation step.
2. How to Read the Stacked Waveform
Seeing the two waveforms is one thing; interpreting them is the crucial skill. Let's break down what you're looking at.
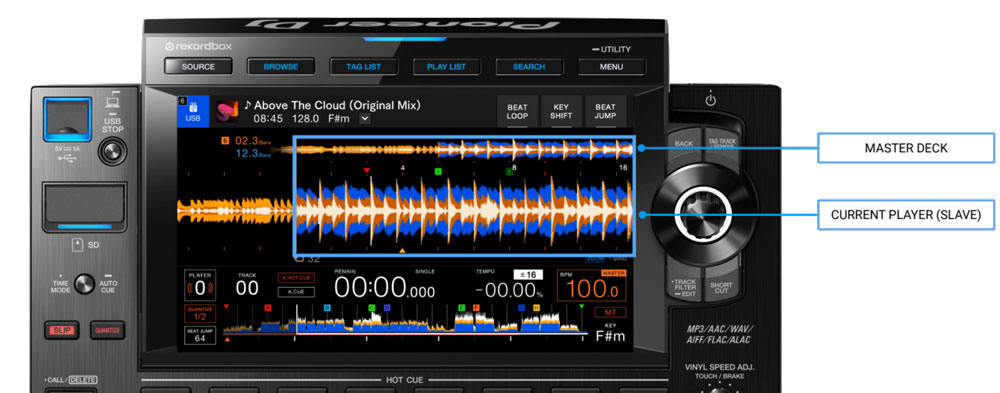
When you look at this display, you are checking for two types of alignment:
-
Beat Alignment: Look at the transient peaks, which are the sharpest spikes in the waveform. In DnB, these are typically the kick and snare drums. For a perfect beatmatch, the transients of both tracks should align vertically, just like the beat grid markers in the image. If the bottom waveform's peaks are slightly to the left of the top one's, it's ahead (rushing). If they are to the right, it's behind (dragging).
-
Phrase Alignment: Zooming out gives you a higher-level view. You can see the overall structure of the music—the dense, energetic sections of a drop versus the sparser sections of a breakdown. By aligning these larger blocks visually, you can confirm that your phrases are matched up, ensuring you're mixing an intro with an intro, or a drop with a drop. You learned to identify these 32-beat phrases by ear; this view gives you a visual map of that same structure.
3. Integrating Visuals into Your Workflow
The goal is not to stare at the screen. The best DJs use their ears first and their eyes for quick confirmation and fine-tuning. Here's how to activate the view and incorporate it into your practice.
This tutorial from The DJ Shop explains the practical steps for using the Stacked Waveform feature.
Read the section '3-Band Waveform and Stacked Waveform Tutorial'. Focus on how to switch to the stacked waveform view (by pressing the phase meter) and how to zoom in and out (using the rotary knob).
Based on this, here is your refined beatmatching workflow:
- Ear First: Perform your manual beatmatch exactly as you did in the last lesson. Use your headphones to align the tempo and phase of the incoming track (Track B) with the master track (Track A).
- Eyes for Confirmation: Once you believe the tracks are synced, glance at the screen of Deck B and tap the phase meter to switch to the Stacked Waveform view.
- Visual Diagnosis: Instantly, you'll see the reality of your mix.
- Are the beat grids perfectly aligned?
- Is the bottom waveform slowly creeping forward or backward?
- Refine with Precision: Use the visual feedback to make a highly accurate correction. If you see Track B is slightly ahead, you know you need to give the jog wheel a tiny drag—no guesswork required. Use the rotary knob to zoom in for even more precise micro-adjustments.
This process transforms the stacked waveform from a simple display into an interactive tool that sharpens the feedback loop you've already developed.
4. Practical Exercise: Visually Confirmed Beatmatching (30 minutes)
Now, let's apply this refined workflow.
Setup:
- Ensure your two CDJ-3000s are connected to the DJM-900NXS2 with both audio and LAN cables for Pro DJ Link.
- Select two different DnB tracks.
- Deck A is your master track, playing. Deck B is your incoming track, cued in your headphones.
The Drill:
- Beatmatch by Ear: Following the process from our last lesson, get Track B in sync with Track A using only your ears. Aim to hold it for 8 bars.
- Switch to Visuals: After your initial match, switch Deck B to the Stacked Waveform view.
- Analyze and Correct:
- Observe the alignment of the beat grids. How accurate was your ear-only match?
- Watch the waveforms for a few bars. Can you see the drift you were previously only able to hear?
- Use the jog wheel to make precise corrections, aiming for perfect vertical alignment of the beat markers.
- Maintain the Lock: Your new goal is to keep the beat grids perfectly locked for 32 bars (128 beats). Use the stacked waveform as your guide. The moment you see even the slightest drift, make a tiny correction with the jog wheel.
- Experiment with Zoom: Use the rotary knob to zoom in and out. See how zooming in allows you to make incredibly fine adjustments, while zooming out helps you confirm your overall phrase alignment.
Repeat this exercise with different pairs of tracks. The goal is to make the transition from ear to eye and back again feel seamless and natural.
Conclusion
Today you've added a powerful visual tool to your beatmatching arsenal. You've learned how to use the CDJ-3000's Stacked Waveform display not as a crutch, but as a professional tool for confirmation and precision.
Key Takeaways:
- The Stacked Waveform view displays the master and slave deck waveforms in parallel, enabled by Pro DJ Link.
- It allows for visual confirmation of both beat alignment (transients and grid markers) and phrase alignment (overall waveform structure).
- The ideal workflow is ears first, eyes second. You should beatmatch by listening and then use the screen to confirm your accuracy and make precise micro-adjustments.
- This tool helps you diagnose drift more quickly and correct it more accurately.
Preview of the Next Lesson:
With your beatmatching now solid both audibly and visually, you are ready to perform your first real mix. In the next lesson, you will learn to perform a basic transition between two beatmatched tracks using the channel faders and the crossfader. This is where all your practice comes together to create a seamless flow of music.
Can't find a good explanation? Sign up and we'll make it for you
Sign up