
Hello. In the previous lesson, you identified the folder that matters: the project’s backend directory, containing package.json. This lesson turns that saved path into an actual working location in PowerShell—the place from which you will later run npm install and npm run dev.
By the end, you will be able to enter the backend folder reliably, read PowerShell’s location prompt, and independently confirm that PowerShell is in the exact directory you intended. Do not run npm commands yet; first make the terminal location correct.
A terminal always has a current location
PowerShell operates in one folder at a time. It calls that folder your current location (also called the working directory). The prompt usually displays it:
PS C:\Users\YourName>
In this example, PowerShell is currently in:
C:\Users\YourName
The text before the > is useful evidence, but use Get-Location when you need an unambiguous answer. It prints the full current path.
Get-Location
Expected style of output:
Path
----
C:\Users\YourName
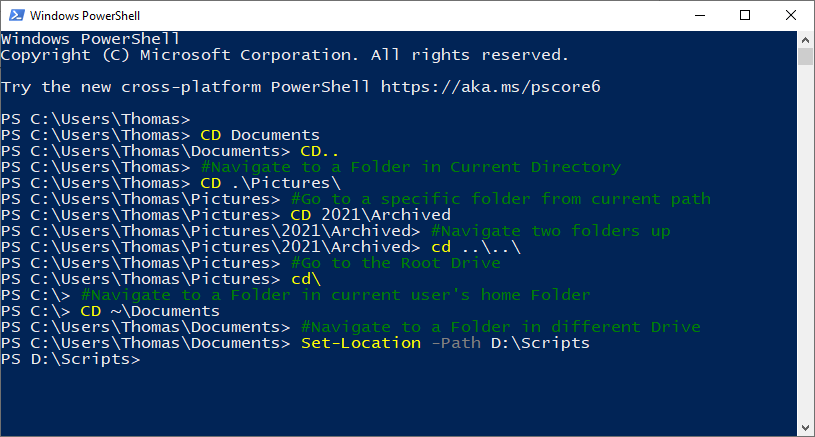
The official PowerShell command behind the familiar cd shortcut is Set-Location. Learning both names helps because you will see both in documentation:
cdmeans “change directory” and is the quick form you will usually type.Set-Locationis the full PowerShell command.Get-Locationdisplays your current folder.
Managing current location - PowerShell
Microsoft’s “Managing current location - PowerShell” explains the official PowerShell names for changing and checking folders. Read it now to understand why a location-change command may appear to do nothing until you verify the result.
Read the subsections “Getting your current location (Get-Location)” and “Setting your current location (Set-Location)”. In the second subsection, begin at “After you enter the command” and read why a check matters. Then continue through the explanation and examples of relative paths, including . and ..; these are useful orientation tools, though your first move into the backend will use its full path.
A directory change normally produces no success message. That silence is normal—not a failure and not proof that you reached the right place. Confirm it with Get-Location.
Enter the backend directory using its full path
From the previous lesson, you should have a path resembling this:
C:\Users\YourName\Downloads\my-project-main\backend
Your names will differ. Replace the example path with the exact backend path you found, stopping at backend, not at package.json.
In PowerShell, enter:
Set-Location -Path "C:\Users\YourName\Downloads\my-project-main\backend"
Then immediately verify it:
Get-Location
The output should end in \backend:
Path
----
C:\Users\YourName\Downloads\my-project-main\backend
You can also combine the location change and visible confirmation in one command:
Set-Location -Path "C:\Users\YourName\Downloads\my-project-main\backend" -PassThru
-PassThru asks PowerShell to display the resulting location after changing it.
Why the quotation marks matter
Keep the double quotation marks around a full path. They are essential if any folder name contains spaces, such as:
C:\Users\YourName\OneDrive - School\my project\backend
Without quotation marks, PowerShell may interpret the space as the end of the path.
You may use the shorter cd form instead:
cd "C:\Users\YourName\Downloads\my-project-main\backend"
For this course, either command is correct. Set-Location -Path is more explicit; cd is quicker.
Important: Do not type the
PS C:\...>prompt itself. Type only the command after the>and press Enter.
When cd backend works—and when it does not
Your initial goal was:
cd backend
npm install
npm run dev
That first command works only if PowerShell is already in the folder immediately above backend.
For example, suppose the project structure is:
C:\Users\YourName\Downloads\my-project-main
│
└── backend
    └── package.json
If Get-Location shows:
C:\Users\YourName\Downloads\my-project-main
then this is correct:
cd backend
Afterward, confirm:
Get-Location
But if PowerShell starts in your home folder, such as:
C:\Users\YourName
then cd backend usually fails because there is no backend folder directly inside your user folder. Use the full path instead.
Likewise, once you are already in backend, do not enter cd backend again. PowerShell would look for a folder named backend inside the existing backend folder.
A practical, low-error method
If copying paths is easier than typing them:
-
Open the correct
backendfolder in File Explorer. -
Click the File Explorer address bar, or press
Ctrl + L. -
Copy the displayed folder path with
Ctrl + C. -
Return to PowerShell and type:
cd " -
Paste the path with
Ctrl + V, type the closing quotation mark, and press Enter. -
Run
Get-Location.
The completed command should look like:
cd "C:\Users\YourName\Downloads\my-project-main\backend"
Confirm that this is the right backend folder
Reaching a folder named backend is not quite enough if you have multiple downloaded projects. Check that the expected project file is there:
Get-ChildItem
Look through the list for:
package.json
A shorter, less cluttered version lists only names:
Get-ChildItem -Name
A typical successful sequence is:
Set-Location -Path "C:\Users\YourName\Downloads\my-project-main\backend"
Get-Location
Get-ChildItem -Name
You want these three pieces of evidence:
| Check | What you should see |
|---|---|
| Location | A path ending in \backend |
| Folder contents | package.json appears in the list |
| Prompt | It usually also ends in \backend> |
If all three agree, leave that PowerShell window open. It is now prepared for the installation command in the next lesson.
For a quick visual demonstration of cd, folder listing, and Tab completion, watch this short segment:
Windows PowerShell/Command Line for Beginners (Tutorial)
“Windows PowerShell/Command Line for Beginners (Tutorial)” by CyberForge demonstrates changing folders and listing their contents in a live PowerShell session. It is useful for seeing the distinction between a current folder and a folder you want to enter.
Watch basic navigation. Focus on the pattern: inspect the current folder with ls, enter a named folder with cd, and use Tab to complete a partially typed folder name. Your project path will differ from the video’s example, but the navigation pattern is the same.
Tab completion is optional but helpful. Start typing enough of a folder name to make it distinctive, then press Tab; PowerShell may complete the rest. This reduces spelling mistakes in long project paths.
If the directory change does not work
If PowerShell says it cannot find the path, do not guess and do not run npm from the current folder. Instead:
- Run
Get-Locationto see where you actually are. - Recheck the backend path in File Explorer or from the earlier
package.jsonsearch result. - Make sure the project ZIP was extracted; a
.zipfile is not a usable backend directory. - Put quotation marks around the full path, especially if it contains spaces.
- Confirm the path ends with the real folder name
backend.
A safe reset is simply to run the full-path command again after correcting it:
cd "C:\your\actual\project\backend"
Get-Location
Avoid changing directories using broad guesses such as cd .. repeatedly unless you know exactly where you are. A full copied path is more reliable while you are setting up a project for the first time.
Key takeaways
PowerShell’s current location determines which project npm will use. Navigate to the exact folder that contains the backend’s package.json, preferably with a quoted full path:
cd "C:\your\actual\project\backend"
Then confirm your location rather than trusting a silent command:
Get-Location
Get-ChildItem -Name
You are ready to proceed only when the location ends in \backend and the folder listing contains package.json. Next, you will run npm install there and learn how to tell ordinary installation warnings apart from genuine failures.
Can't find a good explanation? Sign up and we'll make it for you
Sign up