
Namaste! Pichhli lesson mein aapne reusable JavaScript functions likhe: inputs parameters ke through dena aur result return karna. Ab function ko ek aur important capability denge: input ke basis par different decision lena.
Manual GIS mein aap reclassification rules set karte hain—jaise NDVI high ho to “dense vegetation,” medium ho to “moderate vegetation,” otherwise “sparse/bare.” JavaScript mein wahi decision-making if, else if, aur else se likhi jaati hai. Aaj aap normal JavaScript values ke liye clear, ordered conditional logic likhenge; later ye understanding GEE processing rules ko design karne mein kaam aayegi.
Condition ka basic idea: “agar yeh sach hai, to kya karna hai?”
Ek condition aisa expression hota hai jiska result true ya false hota hai.
const ndvi = 0.72;

if (ndvi >= 0.60) {
  print('High vegetation');
}
Yahan condition hai:
ndvi >= 0.60
Kyuki 0.72 is greater than 0.60, condition true hai, so braces {} ke andar wala code run hoga.
if ka general structure:
if (condition) {
  // Condition true ho to yeh code chalega.
}
Agar aapko false case mein bhi action lena hai, else use kijiye:
const cloudPercent = 18;

if (cloudPercent <= 10) {
  print('Low-cloud scene');
} else {
  print('Cloud review needed');
}
Is code mein sirf ek branch chalegi:
cloudPercent <= 10true ho to first block- otherwise
elseblock
Curly braces hamesha use kijiye, even agar block mein ek hi line ho. GEE scripts often long hote hain; braces future edits aur debugging ko safer banate hain.
Comparison operators: condition ko precisely likhna
Pichhli lessons ke operators ab decision-making mein use honge. In operators ka result boolean hota hai:
| Operator | Meaning | Example |
|---|---|---|
> | greater than | ndvi > 0.5 |
>= | greater than or equal to | cloudPercent >= 20 |
< | less than | temperature < 0 |
<= | less than or equal to | cloudPercent <= 10 |
=== | value and type same hain | bandName === 'B8' |
!== | value/type same nahin hain | status !== 'clear' |
= | value assign karna | const threshold = 0.3 |
Sabse common beginner mistake = aur === ko confuse karna hai.
const selectedIndex = 'NDVI';

if (selectedIndex === 'NDVI') {
  print('NDVI workflow selected');
}
Yahan === question puch raha hai: “kya selectedIndex exactly 'NDVI' hai?”
Lekin:
selectedIndex = 'NDWI';
ka meaning hai: selectedIndex mein new value assign karo. Condition mein accidental = logic ko incorrect bana sakta hai. Isliye equality check ke liye default habit === rakhiye.
Aapko existing older JavaScript/GEE scripts mein == bhi milega. Yeh loose equality hai: JavaScript kuch cases mein types convert karke values compare karta hai. New scripts mein === aur !== use karna more predictable hai.
else if: jab do se zyada outcomes hon
NDVI ko sirf high aur non-high mein classify karna often enough nahin hota. Suppose aapko three labels chahiye:
- High vegetation: NDVI
- Moderate vegetation: NDVI , but below
- Low vegetation or bare surface: NDVI below
Is case mein conditional ladder likhenge:
const ndvi = 0.44;

if (ndvi >= 0.60) {
  print('High vegetation');
} else if (ndvi >= 0.30) {
  print('Moderate vegetation');
} else {
  print('Low vegetation or bare surface');
}
JavaScript is ladder ko top se bottom tak check karta hai:
- Pehle
ndvi >= 0.60test hota hai. - Agar false ho, tab
ndvi >= 0.30test hota hai. - Agar woh bhi false ho, final
elserun hota hai. - First true condition ke baad poori ladder stop ho jaati hai. Sirf ek block execute hota hai.
Given ndvi = 0.44:
0.44 >= 0.60is false.0.44 >= 0.30is true.- Output hoga:
Moderate vegetation.
Yahan second condition mein upper limit explicitly likhne ki zarurat nahin hai, because first condition already fail ho chuki hai. Isliye else if (ndvi >= 0.30) ka actual meaning is ladder ke context mein “from 0.30 up to, but not including, 0.60” hai.
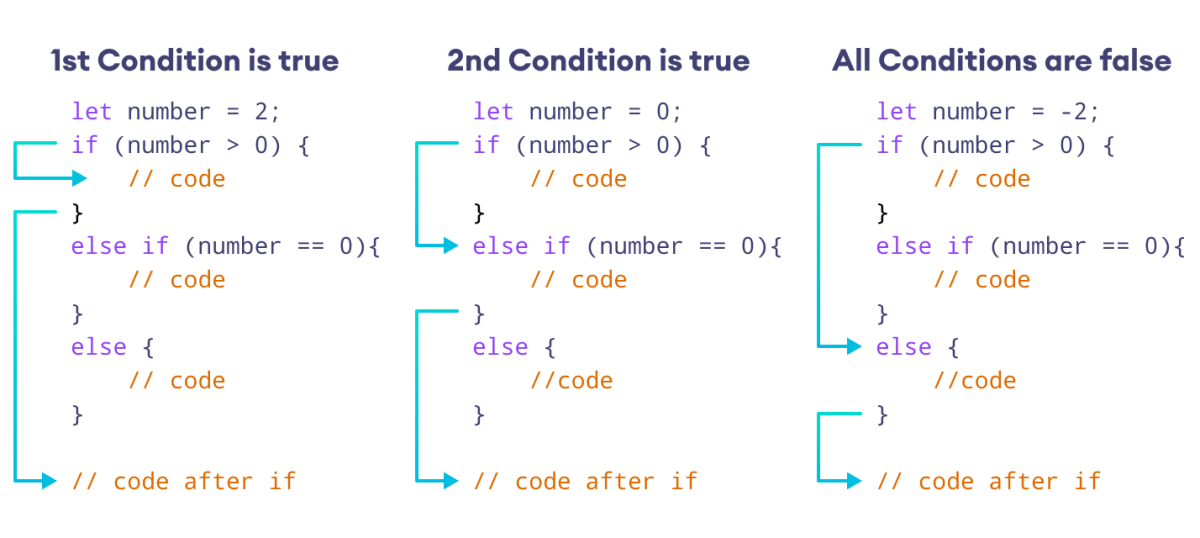
Image mein middle example exactly yahi principle dikhata hai: first condition false hone par hi JavaScript second condition ko evaluate karta hai. Diagram mein equality ke liye == shown hai; apne new code mein strict comparison === prefer kijiye.
Condition order matters
Threshold ladder mein generally most restrictive/highest threshold pehle likhiye.
Correct order:
const ndvi = 0.72;

if (ndvi >= 0.60) {
  print('High vegetation');
} else if (ndvi >= 0.30) {
  print('Moderate vegetation');
} else {
  print('Low vegetation');
}
Incorrect order:
const ndvi = 0.72;

if (ndvi >= 0.30) {
  print('Moderate vegetation');
} else if (ndvi >= 0.60) {
  print('High vegetation');
}
Second version mein 0.72 >= 0.30 pehle hi true hai. JavaScript Moderate vegetation print karke ladder finish kar dega; high-condition tak kabhi pahunchega hi nahin.
Short video: equality checks aur multi-condition ladder
JavaScript Conditionals: if, else if, else ladder | Sigma Web Development Course - Tutorial #56
CodeWithHarry ke “JavaScript Conditionals: if, else if, else ladder” video ke do concise portions dekhiye. Yeh = versus equality comparison aur first-matching branch rule ko visual examples ke through consolidate karta hai.
Pehle comparison rules dekhiye. = assignment, == value comparison, aur === value-plus-type comparison ka distinction note kijiye; apne GEE-oriented scripts mein === ko default banaiye. Phir the ladder dekhiye aur observe kijiye ki first true branch ke baad later else if branches execute nahin hoti hain.
if ladder aur separate if statements ek jaise nahin hote
Agar aap chahte hain ki exactly one class choose ho, use one connected if ... else if ... else ladder.
const ndvi = 0.72;

if (ndvi >= 0.60) {
  print('High vegetation');
} else if (ndvi >= 0.30) {
  print('Moderate vegetation');
} else {
  print('Low vegetation');
}
Lekin yeh two independent conditions hain:
const ndvi = 0.72;

if (ndvi >= 0.30) {
  print('Vegetation is present');
}

if (ndvi >= 0.60) {
  print('Vegetation is high');
}
Is second example mein dono messages print honge, because each if independently evaluate hota hai. Yeh wrong nahin hai; bas intent different hai.
- Mutually exclusive classes ke liye:
if ... else if ... else - Multiple simultaneous checks ke liye: separate
ifstatements
For example, ek scene “usable” bhi ho sakta hai aur “low cloud” bhi; dono messages meaningful ho sakte hain. But ek NDVI value ko same time “high,” “moderate,” aur “low” class nahin milni chahiye.
Truthy/falsy: convenient, but early GEE scripts mein explicit rahiye
JavaScript if ke parentheses ke andar value ko boolean mein convert kar sakta hai. 0, empty string '', null, aur undefined falsy hote hain; many other values truthy hote hain.
if (0) {
  print('This will not run');
}

if ('0') {
  print('This will run because this is a non-empty string');
}
Yeh behavior language ka valid feature hai, but analysis logic mein implicit truthiness confusing ho sakti hai. For example:
const cloudPercent = 0;

if (cloudPercent) {
  print('This scene has cloud');
}
Yeh block run nahin hoga because 0 falsy hai—not because JavaScript ne aapka cloud rule understand kiya. Analysis code mein intent clearly state kijiye:
if (cloudPercent > 0) {
  print('This scene has some cloud');
} else {
  print('No cloud reported');
}
Rule of thumb: conditions mein direct number, string, ya object place karne ke bajay explicit comparisons use kijiye.
Function ke andar conditional logic: reusable classifier
Pichhli lesson ka function pattern ab useful ho raha hai. Same NDVI classification rule ko ek reusable function mein write karte hain:
function classifyNdvi(ndvi) {
  if (ndvi >= 0.60) {
    return 'High vegetation';
  } else if (ndvi >= 0.30) {
    return 'Moderate vegetation';
  } else {
    return 'Low vegetation or bare surface';
  }
}
Function ko different observations ke saath call kijiye:
print('Field A:', classifyNdvi(0.71));
print('Field B:', classifyNdvi(0.43));
print('Field C:', classifyNdvi(0.12));
Expected Console output:
Field A: High vegetation
Field B: Moderate vegetation
Field C: Low vegetation or bare surface
Notice kijiye: har possible path mein return hai. Isliye function har valid numeric NDVI input ke liye ek label return karega. Final else remaining cases handle karta hai.
Aap cloud percentage ke liye bhi same pattern apply kar sakte hain:
function assessCloudLevel(cloudPercent) {
  if (cloudPercent <= 10) {
    return 'Use directly';
  } else if (cloudPercent <= 30) {
    return 'Review before compositing';
  } else {
    return 'Exclude from clean optical workflow';
  }
}
Is logic mein boundary values carefully defined hain:
| Cloud percentage | Returned decision |
|---|---|
10 | Use directly |
11 | Review before compositing |
30 | Review before compositing |
31 | Exclude from clean optical workflow |
Threshold choice itself project, sensor, season, and objective par depend karega. Aaj ka focus threshold design nahin, balki threshold rules ko correctly implement karna hai.
Guided GEE Code Editor practice
Apne current script ki copy save kijiye:
07_conditional_logic
Phir GEE Code Editor mein yeh code paste karke Run kijiye:
// Reusable classification for ordinary JavaScript NDVI numbers.
function classifyNdvi(ndvi) {
  if (ndvi >= 0.60) {
    return 'High vegetation';
  } else if (ndvi >= 0.30) {
    return 'Moderate vegetation';
  } else {
    return 'Low vegetation or bare surface';
  }
}

// Reusable decision rule for scene-level cloud percentage.
function assessCloudLevel(cloudPercent) {
  if (cloudPercent <= 10) {
    return 'Use directly';
  } else if (cloudPercent <= 30) {
    return 'Review before compositing';
  } else {
    return 'Exclude from clean optical workflow';
  }
}

// Test three NDVI conditions.
const fieldANdvi = 0.71;
const fieldBNdvi = 0.43;
const fieldCNdvi = 0.12;

print('Field A NDVI class:', classifyNdvi(fieldANdvi));
print('Field B NDVI class:', classifyNdvi(fieldBNdvi));
print('Field C NDVI class:', classifyNdvi(fieldCNdvi));

// Test three cloud conditions.
const sceneACloud = 8;
const sceneBCloud = 22;
const sceneCCloud = 48;

print('Scene A decision:', assessCloudLevel(sceneACloud));
print('Scene B decision:', assessCloudLevel(sceneBCloud));
print('Scene C decision:', assessCloudLevel(sceneCCloud));

// Strict equality check for a named analysis choice.
const selectedIndex = 'NDVI';

if (selectedIndex === 'NDVI') {
  print('Selected index is NDVI');
} else {
  print('A different index is selected');
}
Console mein verify kijiye ki:
- NDVI values ke liye three different class labels aayein.
8percent cloud scene directly usable ho.22percent cloud scene review category mein ho.48percent cloud scene exclude category mein ho.'NDVI' === 'NDVI'true evaluate ho.
Ab boundary testing kijiye. Sirf values change karke Run karein:
const fieldANdvi = 0.60;
const fieldBNdvi = 0.30;
const fieldCNdvi = 0.29;

const sceneACloud = 10;
const sceneBCloud = 11;
const sceneCCloud = 31;
Boundary cases test karna professional workflow ka important habit hai. Isse aap confirm karte hain ki aapke >= aur <= signs intended categories create kar rahe hain.
Ek important GEE preview
Aaj ke examples mein 0.71, 22, aur 'NDVI' ordinary JavaScript values hain. Inki value Code Editor ko immediately pata hoti hai, so normal if statement work karta hai.
Aage Module 2 mein aap ee.Number, ee.Image, aur other Earth Engine objects use karenge. Unki calculation Earth Engine server par deferred hoti hai. Isliye future mein kisi server-side comparison ko directly normal JavaScript if mein place nahin karenge. Us context mein Earth Engine-specific approaches use honge.
Abhi ke liye distinction yaad rakhiye:
- Plain JavaScript number/string/boolean par normal
ifuse kar sakte hain. - Earth Engine server-side object handling ko Module 2 mein systematically seekhenge.
Key takeaways
Aaj aapne conditional logic ka core pattern seekha:
if (condition1) {
  // First matching action.
} else if (condition2) {
  // Second possible action.
} else {
  // Remaining cases.
}
iftrue condition ka block run karta hai.else ifadditional conditions test karta hai, but only if earlier conditions false hon.elseremaining case handle karta hai aur optional hai.- Connected ladder mein first true branch only execute hoti hai.
- Threshold classes ke liye conditions ko highest/most restrictive threshold se start karna important hai.
=assignment hai; strict equality check ke liye===use kijiye.- Separate
ifstatements multiple outputs de sakte hain; a connected ladder mutually exclusive classification ke liye hoti hai. - Functions ke andar
iflogic rakhkar aap reusable NDVI classes aur scene-screening decisions bana sakte hain.
Next lesson mein aap Console messages aur error locations ko use karke basic syntax aur runtime errors diagnose karenge—yeh skill GEE Code Editor mein confidently script edit karne ke liye essential hai.
Can't find a good explanation? Sign up and we'll make it for you
Sign up