
Welcome to the next module of our course. Having successfully navigated the iOS build and troubleshooting landscape, we now pivot to the Android ecosystem. This lesson marks our first step into preparing your development environment for building, running, and debugging the Android version of your Capacitor application.
Our goal today is to install the core components of the Android toolchain and configure your system to ensure all the necessary command-line tools can operate correctly. Specifically, we will install Android Studio, use it to manage the Android SDK, and then set up the crucial JAVA_HOME and ANDROID_HOME environment variables on your macOS machine. This foundational setup is the equivalent of the Xcode and CocoaPods installation we performed for iOS and is essential for everything that follows.
Part 1: Installing Android Studio
Just as Xcode is the nexus for all iOS development, Android Studio is the official Integrated Development Environment (IDE) from Google for building native Android apps. It bundles the IDE itself, a powerful emulator, and tools for debugging and performance profiling.
Conveniently, Android Studio also includes a compatible version of the Java Development Kit (JDK), which is required to compile and build Android projects using its build system, Gradle. This saves you the trouble of managing a separate Java installation.
Let's begin by downloading and installing Android Studio. The Capacitor documentation provides the official link.
Environment Setup | Capacitor Documentation
This document outlines the dependencies for Android development. We will use it to get the link for Android Studio and understand the basic requirements.
Start by reading the Android Requirements section to understand the core components. Then, follow the link in the Android Studio subsection to download the installer from Google's official site.
Once the download is complete, open the .dmg file and drag the Android Studio icon into your Applications folder, as you would with any other macOS application.
After installing, launch Android Studio. You will be greeted by a setup wizard. This wizard will download and install additional components, including the Android SDK. While the following video demonstrates the process on Windows, the steps in the setup wizard are nearly identical on macOS. It's a useful visual guide for the first-time setup process.
How To Create Your First Android App in Android Studio (Getting Started) on Windows (2026)
This video walks through the initial installation and setup of Android Studio. Pay attention to the setup wizard that runs after the first launch.
Watch the section covering the setup wizard. You'll be asked to choose a setup type (select "Standard"), and accept license agreements. This is where Android Studio downloads the initial SDK components.
Part 2: Installing the Android SDK via the SDK Manager
The Android SDK (Software Development Kit) is a collection of tools and libraries required to develop for the Android platform. While the initial setup installs a default version, you will often need to install other versions or specific components. Android Studio provides a graphical tool called the SDK Manager for this purpose.
- From the Android Studio welcome screen, find the "More Actions" dropdown (or a "Configure" button in older versions) and select SDK Manager. If you have a project open, you can find it under Tools > SDK Manager.
- The SDK Manager has several tabs. The first one, "SDK Platforms", lists the different versions of the Android OS. You can target your app to run on any of these versions. Capacitor requires a minimum API level, but it's good practice to install the latest stable SDK Platform.
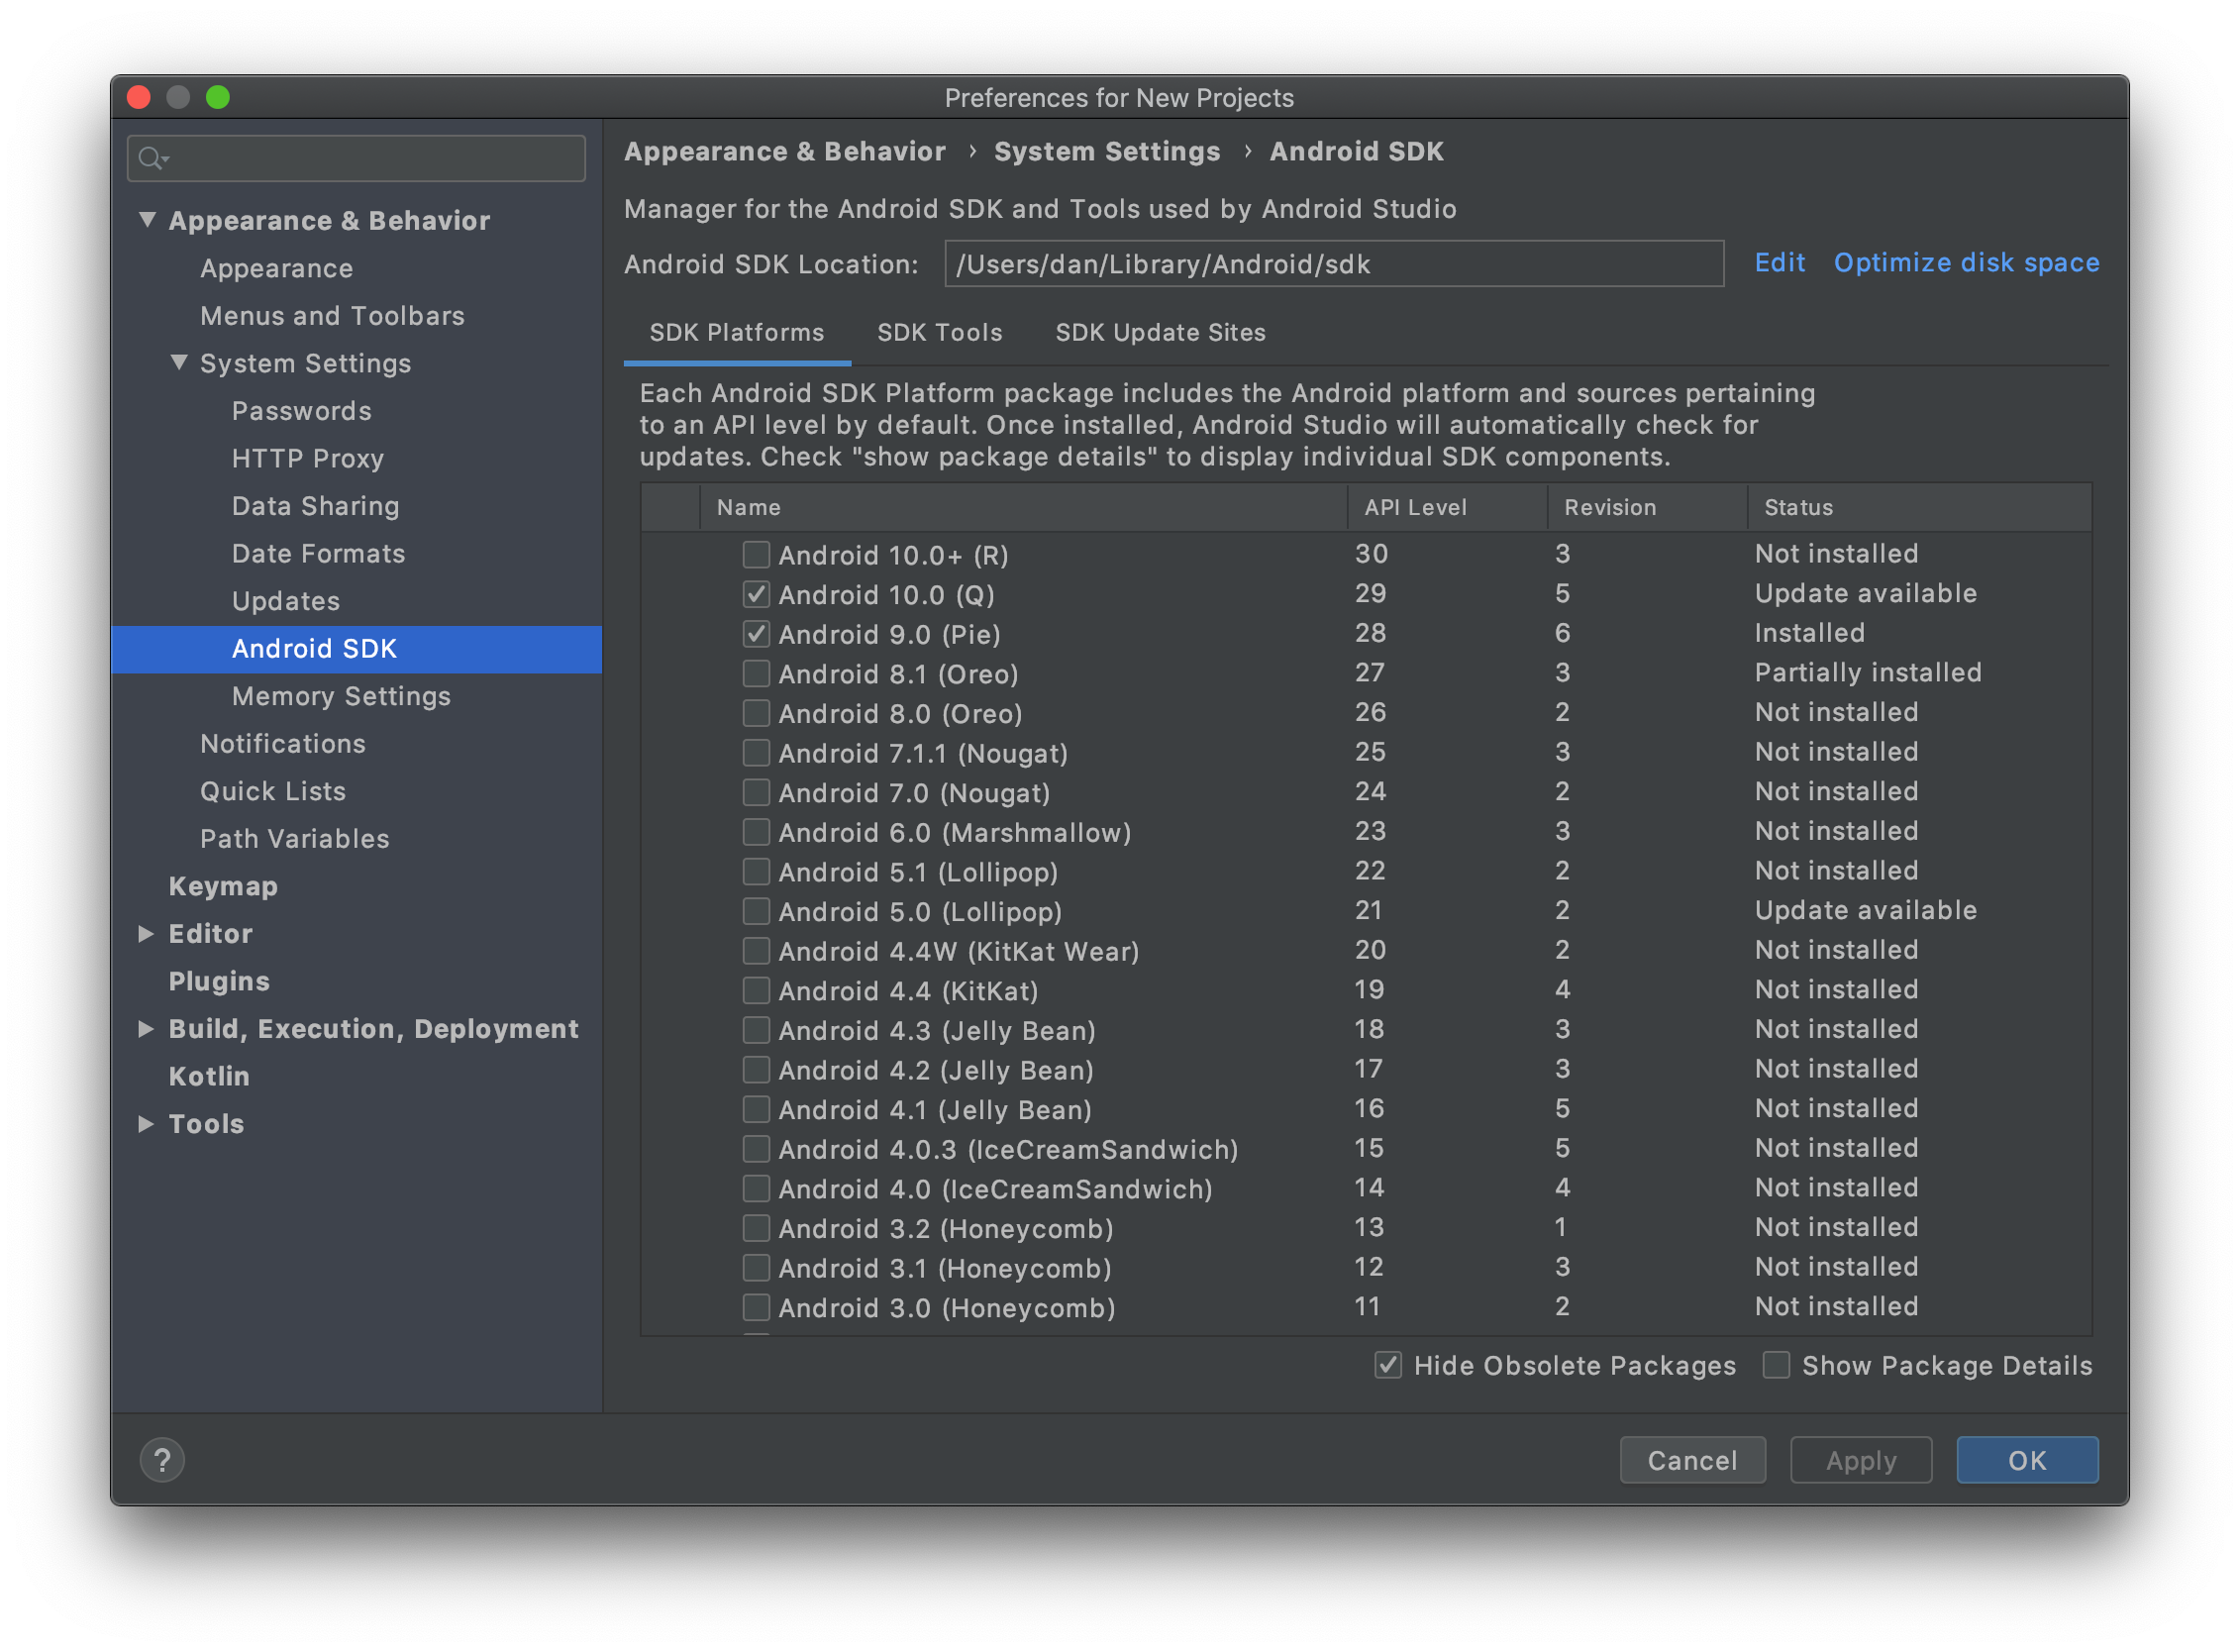
For now, ensure that at least one recent SDK is installed (e.g., Android 13.0 "Tiramisu" - API Level 33, or higher). You only need one to get started.
- Next, click the "SDK Tools" tab. This is where you manage the build tools, emulator, and other command-line utilities.
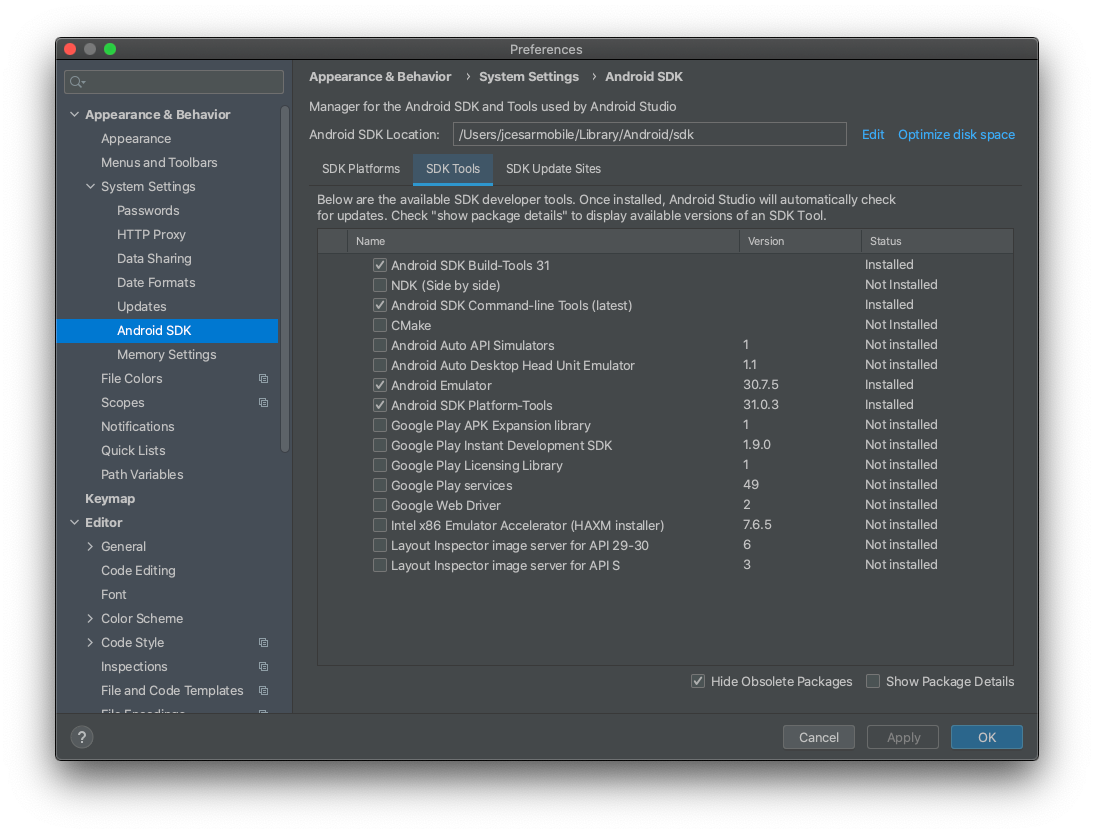
The initial setup wizard should have already installed the essentials:
- Android SDK Build-Tools: Compiles your app's code.
- Android SDK Platform-Tools: Includes essential tools like
adb(Android Debug Bridge), which is used to communicate with emulators and devices. - Android SDK Command-line Tools (latest): Allows you to interact with the SDK from your terminal.
- Android Emulator: For running virtual devices.
Verify that these are checked and installed. If not, check the boxes and click "Apply" to install them. Note the "Android SDK Location" path displayed at the top of the window. On macOS, this is typically ~/Library/Android/sdk. This path is what we'll need in the next step.
Part 3: Configuring Environment Variables
With the tools installed, we must now tell your command-line environment where to find them. This is done by setting environment variables in your shell's configuration file. For modern macOS, this is usually the Z shell, which uses the .zshrc or .zshenv file in your home directory.
We need to configure two primary variables:
ANDROID_HOME: This variable tells tools like Capacitor and Gradle where to find your Android SDK installation.JAVA_HOME: This variable points to the JDK that Gradle should use to build your project. We will point this to the JDK that is bundled inside the Android Studio application itself.
Configuring JAVA_HOME can be tricky because the path has changed across different versions of Android Studio. The community on Stack Overflow has done an excellent job of documenting the correct paths.
macos - Using JDK that is bundled inside Android Studio as JAVA_HOME on Mac - Stack Overflow
This Stack Overflow thread is an invaluable resource for correctly setting the JAVA_HOME variable on macOS to point to Android Studio's bundled JDK. We will use the most up-to-date answers to configure your shell.
First, quickly skim the answers to understand the context. Notice how the path changes from jre to jbr in newer versions. The answer from 2023 clearly shows the path change for "Android Studio Electric Eel" and newer. The most recent answer confirms the path for "Android Studio Hedgehog" on macOS Sonoma. The answer from July 2024 provides a great summary of which files to edit for zsh vs. bash. Finally, the most comprehensive solution is in the answer that provides a full .zshrc configuration. This combines ANDROID_HOME, JAVA_HOME, and updates your PATH variable correctly. We will use this as our template.
Now, let's apply this configuration.
-
Identify your shell: Open your terminal and run
echo $SHELL. The output will likely be/bin/zsh. This means you'll be editing a file in your home directory (~). -
Edit your shell configuration: We'll edit the
.zshrcfile. This file is executed every time you open a new terminal window.# Open the .zshrc file in a simple text editor open -e ~/.zshrcIf this command reports that the file doesn't exist, create it first with
touch ~/.zshrcand then run theopencommand again. -
Add the configuration: Copy the following block of code and paste it at the end of the
.zshrcfile. This configuration is based on the final, comprehensive answer from the Stack Overflow resource you just reviewed. It correctly sets up bothANDROID_HOMEandJAVA_HOMEfor a modern Android Studio installation and adds the necessary tool directories to your system'sPATH.# Android SDK export ANDROID_HOME=$HOME/Library/Android/sdk export PATH=$PATH:$ANDROID_HOME/emulator export PATH=$PATH:$ANDROID_HOME/platform-tools # Java (from Android Studio) export JAVA_HOME="/Applications/Android Studio.app/Contents/jbr/Contents/Home" export PATH=$PATH:$JAVA_HOME/bin -
Apply and verify: Save the
.zshrcfile and close the text editor. For the changes to take effect in your current terminal session, run thesourcecommand:source ~/.zshrcNow, verify that the variables are set correctly. Run these commands one by one:
echo $ANDROID_HOME
# Expected output: /Users/your-username/Library/Android/sdk

echo $JAVA_HOME
# Expected output: /Applications/Android Studio.app/Contents/jbr/Contents/Home

java -version
# Expected output: Should show OpenJDK version information, e.g., "openjdk version 17.0.x..."

adb --version
# Expected output: Should show Android Debug Bridge version information.
If each command produces the expected output without errors, your Android development environment is successfully configured.
Conclusion
In this lesson, we have successfully laid the groundwork for Android development with Capacitor. You have installed Android Studio, used the SDK Manager to ensure you have the necessary SDK platform and tools, and, most importantly, configured your command-line environment so that the Capacitor CLI and other tools can find and use them.
Let's recap the key takeaways:
- Android Studio is the all-in-one IDE for Android development, which conveniently bundles a compatible JDK.
- The SDK Manager within Android Studio is your portal for downloading and managing different Android API levels and build tools.
- The
ANDROID_HOMEandJAVA_HOMEenvironment variables are critical for enabling command-line tools to function. On macOS, these are set in your shell's configuration file (e.g.,.zshrc).
With this setup complete, you are now ready for the exciting part. In our next lesson, we will use this toolchain to build your Capacitor app and launch it for the first time on both an Android emulator and a physical Android device.
Can't find a good explanation? Sign up and we'll make it for you
Sign up