
Hello! Welcome to your first lesson on playing Factorio efficiently.
The goal of this course is to move beyond simply launching a rocket and towards mastering the principles of efficient, scalable factory design. Your background in statistics and economics, particularly with optimization and systems thinking, will be a great asset here. We'll be approaching the factory not as a chaotic collection of machines, but as a large-scale logistical system that can be described and optimized mathematically.
This first module lays the groundwork by establishing the core metrics we'll use. In this lesson, we will focus on defining 'items per second' as the universal unit for all factory planning. Understanding this single concept is the most important step toward building factories that are balanced, predictable, and easy to scale.
Why a Universal Unit?
A Factorio factory is a complex system of production and transportation. You have miners digging ore, furnaces smelting plates, and assemblers crafting components. All of these processes happen at different speeds. To prevent bottlenecks (where production halts due to a lack of ingredients) or wasteful overproduction, you need a common language to describe the flow of resources through the entire system.
This is where the concept of a "rate" comes in. While you could measure in "items per minute," the de-facto standard in the Factorio community is items per second (items/s). This is because the game itself defines all crafting recipes in terms of seconds. By standardizing on this unit, we can create a clear and consistent framework for our calculations.
The core idea of efficient factory planning is to start with a target and work backwards.
Factorio Tutorial — Simple Production Ratios
This short article from the blog 'The Tao of Gaming' perfectly captures the high-level mindset we're adopting. It explains why setting a target rate is the first step in avoiding the common beginner's trap of building randomly.
Please read the first few paragraphs, starting from 'I see a fair number of questions...' and ending just before 'Rule of thumb...'. Focus on the central idea: 'The easiest way is decide how many outputs per second you want.'
This top-down approach—setting a goal like "one science pack per second"—transforms factory design from guesswork into a solvable set of equations. The game's own interface reinforces the centrality of this metric.

As you can see, the game provides real-time feedback using this exact unit. Our goal is to learn how to plan our factory so that these numbers match our design goals.
The Core Equation: Production Rate
Every machine in Factorio that creates items can be described by its production rate in items/s. This rate is determined by three factors:
- Crafting Time: The base time in seconds it takes to craft one set of items. This is defined by the recipe.
- Crafting Speed: A multiplier based on the machine itself. For example, a basic Assembling machine 1 has a speed of 0.5, while a faster Assembling machine 2 has a speed of 0.75.
- Recipe Output: The number of items produced in one crafting cycle. Most recipes produce 1 item, but some produce more (e.g., iron gear wheels from iron plates used to produce 2). Note: The Iron Gear Wheel recipe was changed in Factorio version 1.1.8 to produce 1 item.
The general formula for the number of machines required to hit a target production rate is:
Or, rearranged to solve for the number of machines you need to build:
Let's watch a video that puts this formula into practice.
FACTORIO | Calculations & Ratios Tutorial
The YouTuber Soelless Gaming provides a clear, step-by-step guide to manually calculating the number of assemblers needed for a specific goal. We will focus on the setup and the first example.
Watch from the beginning until timestamp 03:55. The first section introduces the key variables (crafting time, machine speed). The second section applies the formula to calculate how many assemblers are needed to produce exactly 1 red science pack per second. Pay close attention to how the equation is constructed from the recipe's values.
As the video demonstrates, by setting a simple goal of 1 item/s, you can precisely calculate the required number of assemblers (10) for red science packs using basic machines. This same logic applies to every single item in your factory.
Test your understanding!
An electronic circuit (a green circuit) has a crafting time of 0.5 seconds and the recipe produces 1 circuit. You are using Assembling machine 1s, which have a crafting speed of 0.5.
How many Assembling machine 1s are required to produce a total of 5 electronic circuits per second?
Show answer
Let's use the formula:
Plugging in the values:
You would need 5 Assembling machine 1s to produce 5 electronic circuits per second.
The Link: Consumption and Logistics
Calculating production is only half of the story. For every machine producing items, other machines are consuming them as ingredients. And in between, a transport belt is carrying them. The items/s unit unifies all three parts of this chain.
- Consumption Rate: If your goal is to produce 1 green circuit per second, and a green circuit requires 3 copper cables, you must supply copper cables at a rate of
1 * 3 = 3 items/s. - Logistics (Belt) Throughput: The belt carrying those copper cables must have the capacity to transport at least
3 items/s.
This brings us to the concept of throughput: the maximum number of items a transport belt can move per second.
Transport belts - Official Factorio Wiki
The official Factorio Wiki provides a technical definition of belt physics. This will give you the 'first principles' understanding of where the throughput numbers come from.
Please read the two short sections titled 'Speed' and 'Throughput'. Then, glance at the section 'Calculations' at the bottom of the page. You don't need to memorize the exact numbers, but focus on how throughput is defined as a function of item density and belt speed, and ultimately measured in items per second. The breakdown into game 'ticks' and 'positions' may be of interest given your programming background.
As the wiki explains, a belt's throughput is its fundamental capacity, measured in items/s. Different tiers of belts have different throughputs.
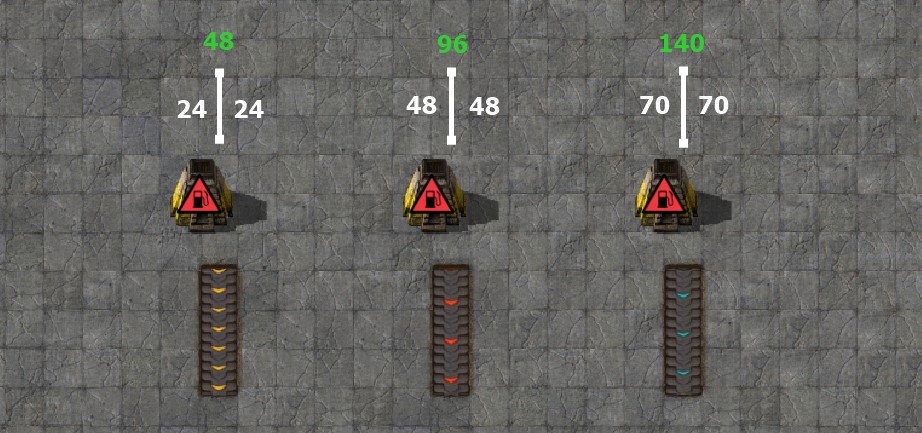
This is the crucial link. If you calculate that you need to supply 20 iron plates per second to a production line, you know immediately that a single yellow belt (capacity: 15 items/s) is insufficient. You will need a red belt (capacity: 30 items/s) or multiple yellow belts.
By using items/s everywhere, the entire factory becomes a system of interconnected flow rates. Planning is no longer about "a bunch of assemblers" but about ensuring that for every stage of production: input rate ≥ consumption rate and belt throughput ≥ required transport rate.
Conclusion
In this lesson, we've established the single most important concept for efficient Factorio design. Let's summarize the key takeaways:
- 'Items per second' (items/s) is the universal unit for measuring the flow of resources. It connects machine production, machine consumption, and belt capacity.
- Adopting a target-based approach (e.g., "I want to produce 2 science packs per second") turns factory design into a series of solvable math problems.
- The production rate of a set of machines can be precisely calculated using the recipe's crafting time, the machine's crafting speed, and the number of items produced per craft.
- The throughput of a transport belt is its maximum carrying capacity, also measured in
items/s, which dictates the limits of your logistical network.
In our next lesson, we will build directly on this foundation. We will memorize the specific items/s throughput for yellow, red, and blue belts, and begin to explore what those numbers mean for designing your first production lines.
Can't find a good explanation? Sign up and we'll make it for you
Sign up