
Hello! Welcome to the second module of our n8n course.
In our last module, we built a solid foundation. You learned what n8n is, navigated its interface, built a first workflow, and most importantly, learned how to inspect the flow of data and debug using the Execution View. This skill is your lens for understanding everything that follows.
Today, we begin our deep dive into Core Concepts, starting with the different ways a workflow can be initiated. So far, you've been running workflows manually. For true automation, we need workflows that start themselves. This lesson focuses on the first and most common type of automated trigger: the Schedule Trigger.
By the end of this lesson, you will be able to set up a Schedule Trigger to run your workflows at any specific interval you need—from every few seconds to a specific time on a particular day of the month.
1. From Manual Testing to Automated Execution
When developing and debugging, you use the "Execute Workflow" button to run your workflow on demand. This is essential for testing, but the goal of automation is to have tasks run without your intervention. The Schedule Trigger is the primary node for achieving time-based automation.
Think of it as the n8n equivalent of a cron job, a concept you're likely familiar with from software development. It allows you to define a precise schedule for when your workflow should kick off.
Let's walk through the process of replacing the default Manual Trigger node with a Schedule Trigger.
The n8n documentation provides a clear, step-by-step guide on how to switch from a manual to a scheduled trigger. This is a fundamental task when moving a workflow from development to production.
Please read through the sections on workflow scheduling ('Scheduling the Workflow', 'Remove the Manual Trigger node', 'Add the Schedule Trigger node', and 'Connect the Schedule Trigger node'). Pay special attention to the 'Keep in mind' box regarding timezone settings—this is a common source of errors in scheduled tasks.
As the guide points out, setting the correct timezone is critical. The Schedule Trigger will use the timezone defined in the workflow's settings. If that's not set, it falls back to the timezone of your n8n instance. Always verify this setting to ensure your workflow runs at the intended time.
2. Configuring Your Schedule
The Schedule Trigger node is highly flexible. You can set it to run based on simple intervals or create complex, specific schedules.
For a quick practical demonstration, let's watch how to set up a simple daily schedule.
Master 80% of n8n in 36 Minutes
This video clip shows a quick setup of a daily weather automation. Observe how the Schedule Trigger node is added and configured to run every day at 6 AM.
About two and a half minutes in, watch the trigger setup. Focus on the parameters being set: 'Trigger Interval' is set to 'Days', 'Days Between Triggers' to 1, and 'Trigger at Hour' to 6.
This covers the most common use case, but there are many more options.
Understanding the Trigger Intervals
The node offers several predefined intervals:
- Seconds
- Minutes
- Hours
- Days
- Weeks
- Months

For a comprehensive overview of all these options and their specific parameters, the official documentation is the best resource.
Schedule Trigger node documentation
Let's review the official documentation for the Schedule Trigger to understand the full range of its capabilities.
Please read the section 'Node parameters' and quickly skim the subsections for each trigger interval (Seconds, Minutes, Hours, Days, Weeks, Months). You don't need to memorize them, just get a feel for the options available for each interval.
The Power of Cron Expressions
For maximum flexibility, the Schedule Trigger supports custom cron expressions. This allows for far more complex schedules than the standard intervals, such as "run at 9 AM and 5 PM on weekdays."
Since you have a development background, you'll find this feature particularly powerful. The official documentation provides an excellent reference for this.
Schedule Trigger node documentation
The documentation for the 'Custom (Cron) interval' is your go-to reference for advanced scheduling. It includes a helpful table of examples and explains n8n's specific cron syntax.
Please read the section 'Custom (Cron) interval'. Just below the heading, read the cron instructions. Note that n8n uses a six-field cron expression, with the first field representing seconds (which is optional). This is different from the standard five-field cron. The page also recommends the crontab.guru tool, which is an excellent utility for building and verifying your expressions.
Test your understanding!
Using the cron syntax described in the documentation, how would you write an expression for a workflow that needs to run every 15 minutes, but only during business hours (9:00 AM to 5:00 PM, inclusive) on weekdays (Monday to Friday)?
(Hint: Refer to the examples table in the documentation for 'Every X Minutes', 'Only Weekdays', and 'Custom Hourly Range'.)
Show answer
The cron expression would be: */15 9-17 * * 1-5
Let's break it down:
*/15: Every 15 minutes.9-17: For any hour from 9 (9 AM) through 17 (5 PM).*: Any day of the month.*: Any month.1-5: On any day of the week from Monday (1) to Friday (5).
(Note: The optional sixth field for seconds is omitted here.)
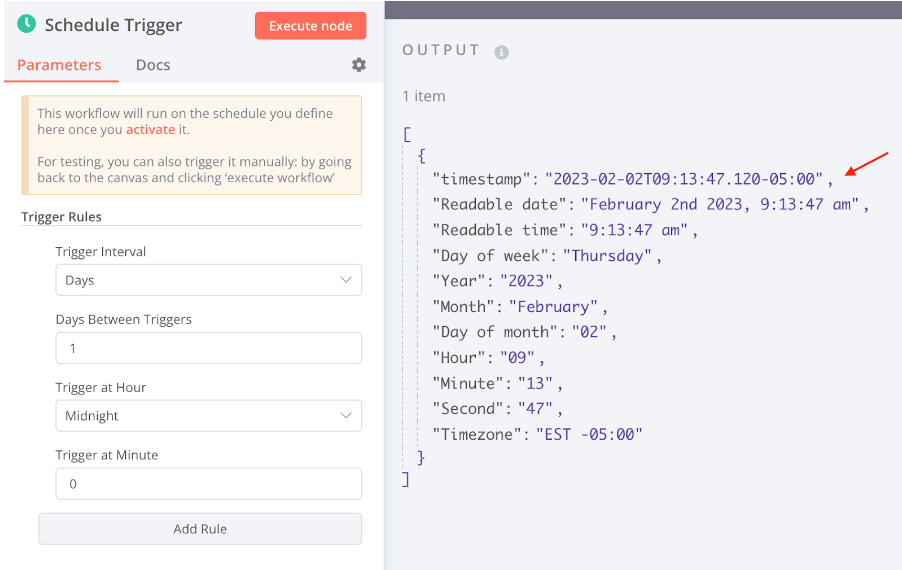
When a Schedule Trigger runs, it doesn't just start the workflow; it also outputs data containing detailed information about the time it was triggered. This can be very useful for logging or for subsequent logic in your workflow.
3. Activating Your Workflow
Configuring the Schedule Trigger is only half the process. For the schedule to actually run, the workflow must be active. An inactive workflow is essentially in "draft mode"; its triggers will not run automatically.
Activating a workflow is simple. You toggle a switch at the top of the workflow editor.
Master 80% of n8n in 36 Minutes
This final clip demonstrates the last crucial step: activating the workflow so that the schedule becomes live.
Around eight and a half minutes in, watch workflow activation. Notice the toggle switch at the top of the UI that changes the workflow state from 'Inactive' to 'Active'.
Once your workflow is active, n8n's internal scheduler will take over and execute it according to the rules you defined. You can then monitor these automated runs in the Executions panel, just as you learned in the previous lesson.
Conclusion
You've now taken a major step towards building true "set and forget" automations. You've learned how to move beyond manual execution and trigger your workflows automatically based on a precise schedule.
Key Takeaways:
- The Schedule Trigger is used to run workflows at specific dates, times, or intervals, similar to a cron job.
- Workflows must be set to Active for their Schedule Triggers to run. Inactive workflows are in a draft state.
- Always be mindful of timezone settings at either the workflow or instance level to ensure accurate execution times.
- The Schedule Trigger provides a variety of intervals, with the Custom (Cron) expression offering the most power and flexibility for complex scheduling needs.
In our next lesson, we will explore a different kind of trigger: the Webhook Trigger. While the Schedule Trigger is time-based, the Webhook Trigger is event-based, allowing you to start workflows from external HTTP requests. This will open the door to integrating your n8n workflows with countless other applications and services in real time.