
Hello, and welcome to the first step in building your own browser dungeon game. This course uses JavaScript with p5.js, a creative-coding library that lets you make game-like visuals and interactions directly in a web browser—ideal for working on a Chromebook without installing software.
This first lesson has one practical goal: open the p5.js Web Editor, create a small JavaScript game-sketch foundation, run it, change it, and save it. A sketch is simply the p5.js name for a small program or prototype. Later, this sketch will grow into a dungeon encounter with a moving player, enemies, collectibles, and game rules.
Plan for about 30–40 minutes.
Open the p5.js Web Editor
In Chrome, visit editor.p5js.org. The editor works in the browser, so there is nothing to download or set up.
Watch this short orientation from How to Use to p5.js Web Editor (1.2) by The Coding Train. It shows the editor, the run control, and how a sketch name can be changed.
How to Use to p5.js Web Editor (1.2)
Watch "How to Use to p5.js Web Editor (1.2)" by The Coding Train for a quick visual tour of the browser-based workspace. Focus on the few controls you need today rather than trying to memorize every option.
First, watch opening the editor to see where the p5.js Web Editor lives and what it looks like. Then watch running a sketch, noticing that changing code does not affect the preview until the sketch runs again. Finally, watch renaming projects to see how to replace an automatically generated name with a useful one.
The editor has four areas worth recognizing now:
| Area | What it is for |
|---|---|
| Code pane | Where you type JavaScript, normally in sketch.js. |
| Preview pane | Where your game canvas appears when the program runs. |
| Play button | Starts or restarts the sketch. It looks like a triangle. |
| Console | Shows messages and errors. You will use it more seriously in a later lesson. |
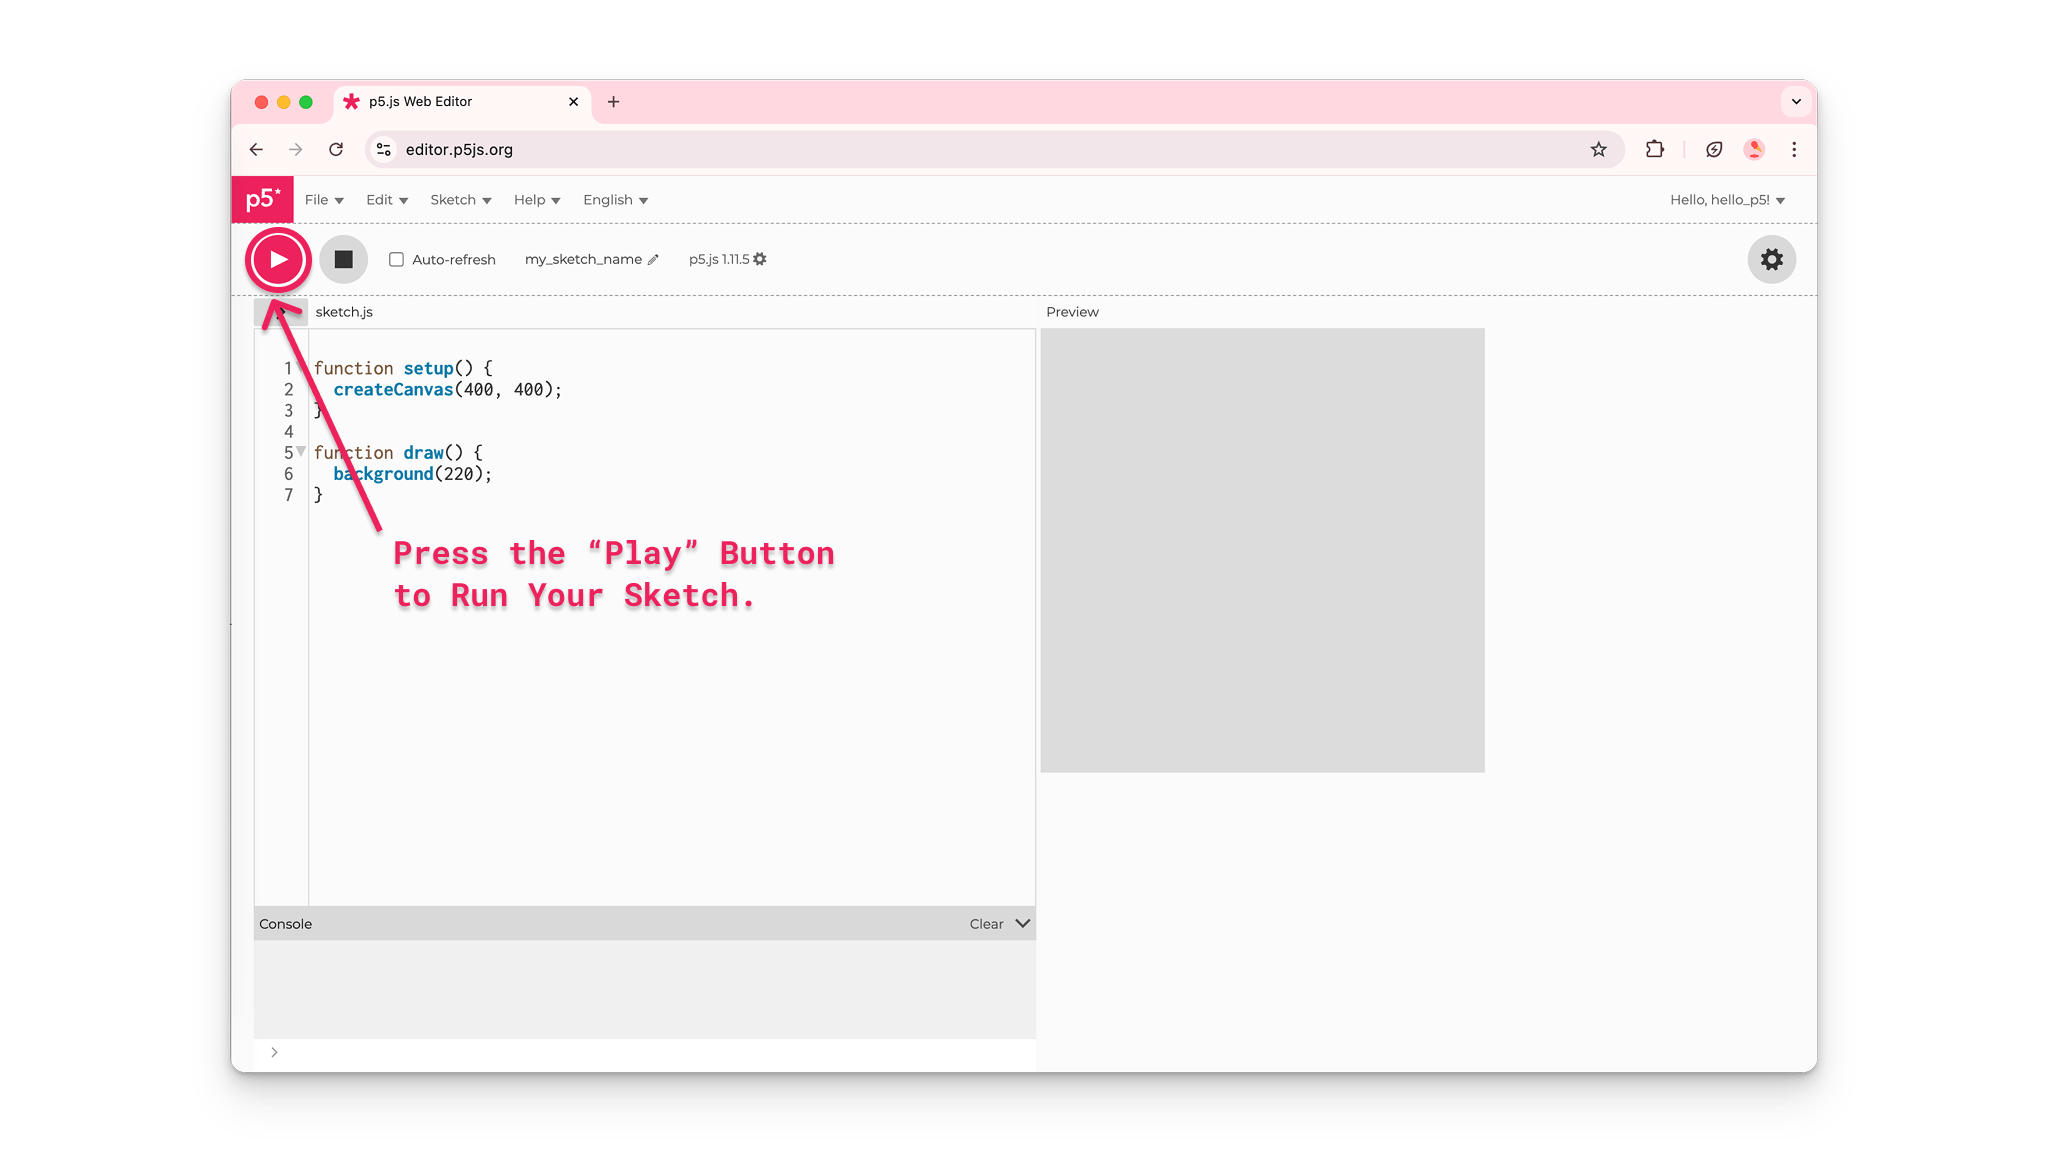
If you are not signed in, you can still experiment. However, create an account or sign in before doing much work if you want the editor to save your sketches. Saving an editable version matters: your future game will be built by gradually improving this same kind of project.
Your first dungeon-game foundation
A new p5.js project usually opens with some starter code. Click in the code pane, select everything in sketch.js, and replace it with this:
// My first dungeon game sketch

function setup() {
  createCanvas(600, 400);
}

function draw() {
  background(28, 31, 46);
}
Now press the Play button.
You should see a wide, dark blue-gray rectangle in the preview pane. It is deliberately plain. Think of it as the first empty room of your future dungeon: not a game yet, but a working place for one.
If nothing changes after you press Play, make sure you replaced the code in sketch.js, not in index.html or style.css.
What the code means
There are two layers here:
- JavaScript is the programming language: its rules include writing
function, using parentheses, commas, curly braces, and statements. - p5.js is a library already included by the web editor. It provides useful game and graphics commands such as
createCanvas()andbackground().
The editor handles the technical setup of loading p5.js. Your job is to write instructions using it.
Let’s read the code from top to bottom.
// My first dungeon game sketch
Anything after // on that line is a comment. Comments are notes for humans; the computer ignores them. Use comments to label parts of a game, explain a tricky choice, or remind yourself what you meant to build.
function setup() {
  createCanvas(600, 400);
}
setup() is a special p5.js function. It runs once, when the sketch begins.
Inside it, this instruction creates the visible game area:
createCanvas(600, 400);
The first number is the canvas width in pixels; the second is its height. So this makes a play area 600 pixels wide and 400 pixels high.
The curly braces { and } form a code block: they mark which instructions belong inside setup(). The semicolon ends the createCanvas instruction. JavaScript often allows semicolons to be omitted, but keeping them is a clear beginner-friendly habit.
function draw() {
  background(28, 31, 46);
}
draw() is another special p5.js function. It runs repeatedly while the sketch is active, by default about 60 times each second.
Right now, each pass draws the same dark background. That may seem unnecessary, but this repeating function is the basis for animation and games. Later, draw() will repeatedly clear the old frame, draw the player in its current position, move enemies, test collisions, and update the display.
The three numbers in background(28, 31, 46) set a color. You do not need to memorize how color numbers work yet. For now, know that this command fills the whole canvas with a dark background suitable for a dungeon scene.
Make one visible change
Programming becomes much less mysterious when you make a prediction, change one value, and see the result.
First, try changing the canvas size:
createCanvas(800, 500);
Press Play again. The preview area should become wider and taller.
Then restore the canvas to a size that fits comfortably in your editor, such as:
createCanvas(600, 400);
Next, change just the background line:
background(80);
Press Play. A single number creates a gray background. Try a few different values between 0 and 255. Smaller values look darker; larger values look lighter.
Finally, restore your dungeon-colored version:
background(28, 31, 46);
Each time you press Play, p5.js stops the old version of the sketch and starts the current version from the top. This restart behavior is useful: when a future player gets stuck or a game needs a fresh attempt, running the sketch resets its starting state.
You may also see an Auto-refresh checkbox near the Play button. With it enabled, the editor reruns your sketch after changes. It can be convenient, but manually pressing Play at first makes the cause-and-effect relationship clearer: you edit code, then you run the updated program.
Confirm the structure with the official guide
The official p5.js tutorial uses the same two-function structure you have just run. Read the selected parts to reinforce what belongs in sketch.js, why setup() and draw() behave differently, and how canvas dimensions are changed.
Read the relevant part of "Get Started" from p5.js. It confirms the purpose of the project files and explains the two functions that will underpin every game sketch in this course.
In the "Default Code" section, begin at the paragraph starting “All p5.js projects include the p5.js library and three files” and read the sketch lifecycle. Focus on the distinction between a one-time setup and the continually repeating draw function. Then go to “Step 2: Change the size of the canvas.” Read the canvas experiment, paying attention to the two arguments inside createCanvas() and the reminder to press Play or use Auto-refresh.
One small detail from the reading is worth remembering: a p5.js project contains multiple files, but for this course you will usually work only in sketch.js. index.html is the web page structure, and style.css controls page styling. The p5.js editor has already prepared those files so you can focus on game code.
Name and save the sketch
Give the project a useful name now. Click the pencil icon near the sketch title and choose something recognizable, for example:
Dungeon Starter
Then use File, Save. If the editor asks you to log in, do that before continuing. Your saved sketches become a small portfolio of experiments, and you can always return to an earlier version if a later experiment goes wrong.
Before leaving the editor, confirm this short checklist:
sketch.jscontains your code.- Pressing Play produces a dark 600-by-400 canvas.
- You changed at least one number and saw the preview change.
- The sketch has a meaningful name.
- It is saved to your account, if you are signed in.
If the preview does not appear, press Play once more and look at the Console at the bottom. A red error message usually means some code was mistyped. For today, the quickest recovery is to compare your file carefully against the working starter code above. In a later lesson, you will learn a systematic way to interpret and fix errors.
Key takeaways
You have now created and run a JavaScript p5.js sketch entirely in the browser.
The essential ideas are:
- The p5.js Web Editor is your Chromebook-friendly workspace for making browser games.
sketch.jsis the file where you will write almost all game code.setup()runs once and is a good place to create the game canvas.draw()runs repeatedly and will become the engine room for animation and game updates.createCanvas(width, height)controls the size of the playable area.- Pressing Play runs or restarts the latest version of your sketch.
- Saving and naming projects protects your work as the game becomes more complex.
Next, you will give names to changing pieces of game information—such as a player name, score, health, or whether the game has started—using JavaScript variables.
Can't find a good explanation? Sign up and we'll make it for you
Sign up