
Welcome back. In our previous lesson, we successfully installed the Capacitor Core and CLI packages into your monorepo, verifying that the cap command is accessible via bunx. With the essential tooling in place, we can now formally initialize Capacitor for your project.
This lesson focuses on generating and configuring the capacitor.config.ts file. This file acts as the central manifest for your Capacitor application, defining its identity and, most importantly, specifying where to find your compiled web assets. We will use the bunx cap init command to create this file and then tailor its core settings—appId, appName, and webDir—to match your existing React SPA within its Turborepo structure.
1. Initializing the Capacitor Project
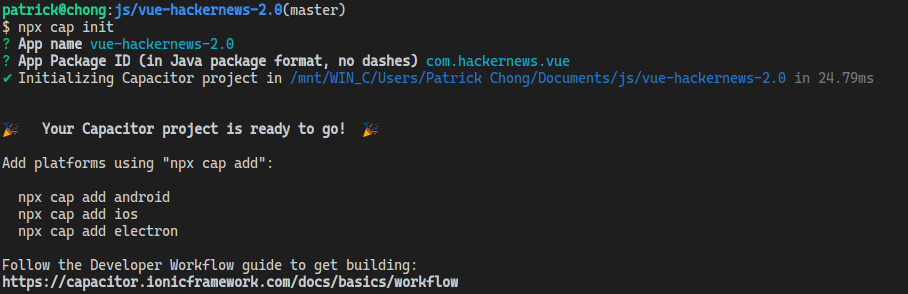
The first step in configuring a Capacitor project is to run the init command. This command interactively prompts you for key project details and generates the capacitor.config.ts file based on your input.
From the root directory of your Turborepo, execute the following command:
bunx cap init
The CLI will ask you for two pieces of information:
- App name: This is the human-friendly name that will appear on the device's home screen and in app stores.
- App Package ID: This is a unique identifier for your app, following reverse domain name notation (e.g.,
com.yourcompany.yourapp). This ID is critically important as it maps directly to the Bundle Identifier in iOS and the Application ID in Android. Given your past experience with mobile development, you'll recognize this as the fundamental unique key for your application on both platforms.
After you provide these values, the CLI will create the capacitor.config.ts file in your project root. The terminal output will look similar to this:
2. The capacitor.config.ts File
The capacitor.config.ts file is the cornerstone of your Capacitor setup. It contains all the high-level configuration options that the Capacitor CLI uses to manage the native projects. Let's examine the three most important properties that are set during initialization.
The following video from Aaron Saunders provides a concise overview of initializing a project and highlights the significance of the web directory configuration.
Build a Mobile App Fast! React + Capacitor + Tailwind + DaisyUI
Watch this segment to see a demonstration of the cap init process and to hear an explanation of why the web output directory is a crucial piece of the configuration.
Please watch from this section. The presenter uses npx, but the commands and concepts are identical for bunx. Focus on his explanation of the capacitor.config file and the role of the dist folder.
As the video explains, the three essential properties are:
appName: The display name of your application.appId: The unique package identifier in reverse domain notation.webDir: The directory containing your compiled web assets. This is how Capacitor finds yourindex.html, JavaScript, and CSS files to bundle into the native app.
For a standard React application built with a tool like Vite, this directory is typically named dist. The following image illustrates the relationship between the webDir property in the configuration file and the project's file structure.
3. Configuring for Your Monorepo
In your Turborepo setup, your React SPA likely lives in a specific workspace, for example, apps/my-react-app. When you run the build command for your SPA, the output directory (dist or similar) will be created inside that workspace path (e.g., apps/my-react-app/dist).
Since you are running Capacitor commands from the monorepo root, the webDir path in capacitor.config.ts must be relative to the root. Therefore, you'll need to adjust the default value.
After running bunx cap init, open the generated capacitor.config.ts and modify the webDir to point to the build output of your web app. For example:
import { CapacitorConfig } from '@capacitor/cli';

const config: CapacitorConfig = {
  appId: 'com.yourcompany.yourapp',
  appName: 'My React App',
  webDir: 'apps/web/dist', // Adjust this path to your SPA's build output
  // ... other options
};

export default config;
For a definitive reference on these configuration properties, the official Capacitor documentation is the best source.
Capacitor Configuration | Capacitor Documentation
This document provides the complete schema for the Capacitor configuration file. It's an essential reference for understanding all available options.
First, look at the example file to see the basic structure. Then, in the "Schema" section, read the descriptions for appId, appName, and webDir to understand their precise purpose and a few other global settings. We will explore the platform-specific sections (android, ios) in later lessons.
As an alternative to the interactive prompts, you can provide the arguments directly on the command line. This is particularly useful for scripting. The Capgo blog post we saw in the last lesson demonstrates this method. It uses the --web-dir flag to set the web directory non-interactively. For your project, the command would look something like this:
bunx cap init "My React App" com.yourcompany.yourapp --web-dir "apps/web/dist"
Conclusion
In this lesson, you have officially initialized Capacitor in your project. By running bunx cap init, you generated the crucial capacitor.config.ts file. You now understand the significance of appName and appId as they relate to the native platforms and, most importantly, how to configure webDir to point correctly to your React SPA's build output within your Turborepo.
Our key takeaways are:
bunx cap initcreates and populates thecapacitor.config.tsfile.appIdserves as the unique Bundle ID (iOS) and Application ID (Android).webDirmust be a path relative to the project root that points to the final, compiled web assets (dist,build, etc.).
With your web app now formally declared to Capacitor, the next step is to create the actual native project folders that will contain it. In the upcoming lesson, we will focus on structuring your monorepo to accommodate these native projects and defining the necessary build pipeline tasks in Turborepo.
Can't find a good explanation? Sign up and we'll make it for you
Sign up