
Welcome to the first lesson in our module on trees! So far, we've focused on linear data structures like arrays and linked lists, where elements follow one another in a sequence. Now, we're moving into the world of non-linear structures, with trees being one of the most fundamental and powerful.
You've likely worked with tree-like structures extensively in your front-end career, even if you didn't call them that. The Document Object Model (DOM) is a perfect example of a tree, with the <html> element as the root and other elements branching out as children. File systems are another common example.
In this lesson, we'll formalize this concept. Our goal is to represent a binary tree in TypeScript and identify leaf, depth, height, and subtree relationships. We will start by defining the essential terminology and then translate that into a concrete TypeScript class you can use to build your own trees. This foundation is crucial for the traversal and manipulation algorithms we'll explore next.
What is a Tree?
At its core, a tree is a collection of nodes connected by edges in a hierarchical fashion. It's an intuitive way to model relationships where there's a clear parent-child connection.
Let's look at a diagram to get familiar with the common terminology.
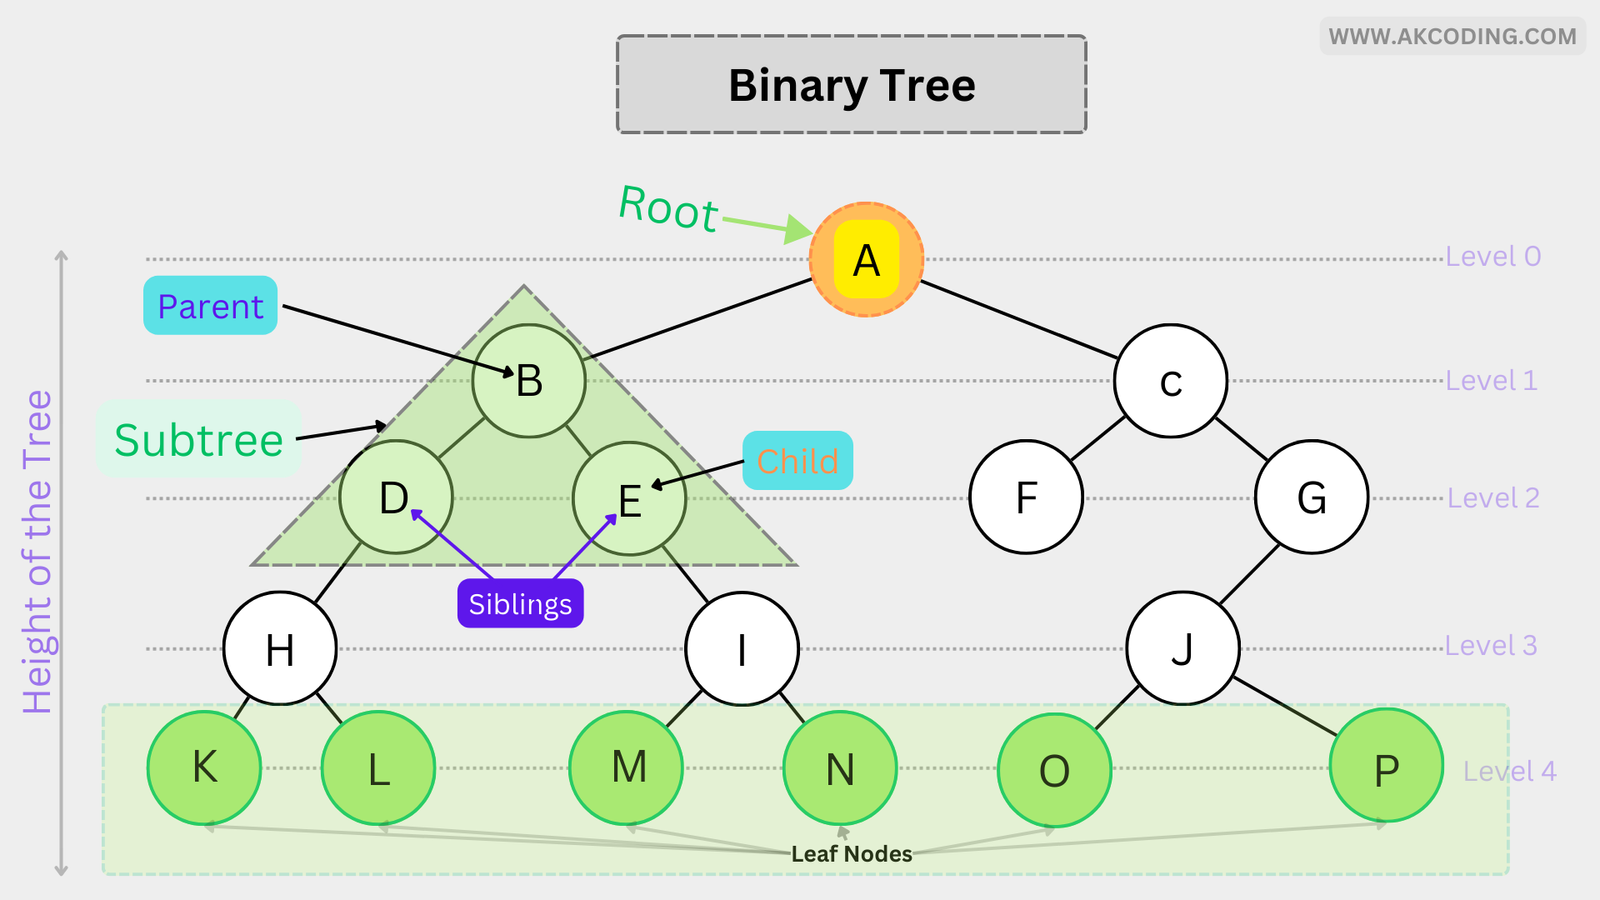
Here are the key terms you'll encounter constantly when working with trees:
- Node: The fundamental part of a tree that holds data (e.g., a number, string, or object). In the diagram, A, B, C, etc., are all nodes.
- Root: The single, top-most node in a tree. It's the only node with no parent (e.g., node A).
- Edge: The link or connection between two nodes.
- Parent: A node that has at least one node connected below it (e.g., B is the parent of D and E).
- Child: A node that has a parent node above it (e.g., D and E are children of B).
- Siblings: Nodes that share the same parent (e.g., D and E are siblings).
- Leaf: A node with no children (e.g., K, L, M, N, O, P). These are the "ends" of the tree.
- Subtree: A tree consisting of a node and all of its descendants. The green triangle in the diagram highlights the subtree rooted at node B.
For a more dynamic introduction to these concepts, the following video provides a clear walkthrough.
Binary Tree Algorithms for Technical Interviews - Full Course
Watch the beginning of this "Binary Tree Algorithms" course from freeCodeCamp. It provides excellent, clear definitions for the core tree terminology.
Please watch from the start until the speaker begins talking about binary trees. This section covers the foundational concepts of nodes and familial relationships (parent, child) and then defines the key terms root and leaf.
From General Trees to Binary Trees
The video and diagram show general trees where a node can have any number of children. In algorithm interviews and many practical applications, you'll most often work with a specific type: the binary tree.
A binary tree is a tree where every node has at most two children. These children are typically referred to as the left child and the right child.
To be precise, a data structure is a binary tree if it satisfies three conditions:
- Each node has at most two children.
- There is exactly one root node.
- There is exactly one path from the root to any other node (which implies there are no cycles).
The video you just watched explains this distinction very well.
Binary Tree Algorithms for Technical Interviews - Full Course
Now, continue with the same video to understand the specific properties that define a binary tree.
This segment, from binary tree criteria, covers the three rules that make a tree a binary tree. Pay close attention to the examples and counter-examples shown, such as structures with cycles or multiple roots, as they clarify why these rules are important.
Measuring Trees: Depth and Height
Two of the most important properties of a tree are its depth and height. These terms are sometimes used interchangeably, but they have distinct meanings.
- Depth of a node: The number of edges on the path from the root to that node. The root itself has a depth of 0. This is a "top-down" measurement.
- Height of a node: The number of edges on the longest path from that node to a leaf. The height of a leaf node is 0. This is a "bottom-up" measurement.
- Height of a tree: This is simply the height of its root node. It represents the length of the longest path from the root to any leaf in the tree.
The following image provides a great visual summary of these concepts.
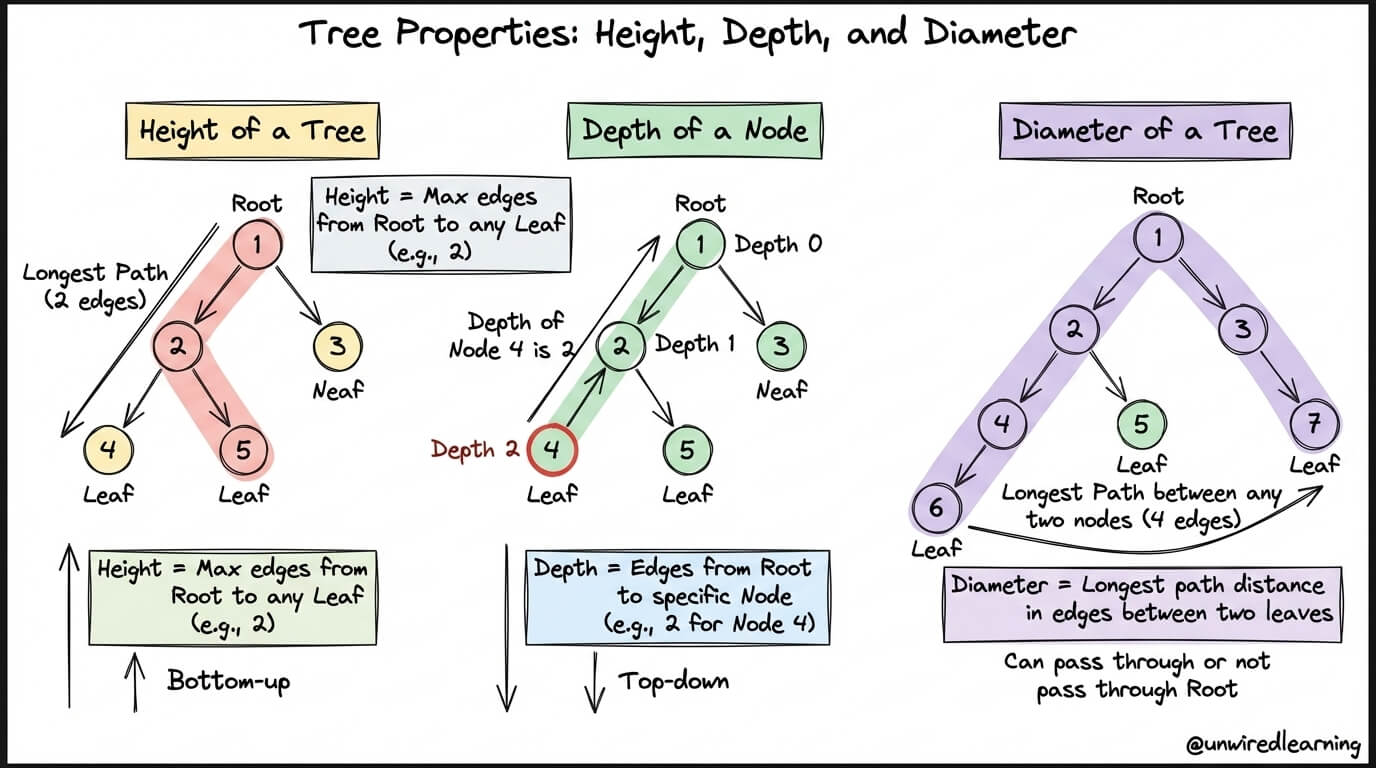
As you can see:
- Height is about the longest path from the root to any leaf.
- Depth is about the path from the root to a specific node.
To solidify these definitions, take a moment to read this short section from Adrian Mejia's blog.
Tree Data Structures in JavaScript for Beginners | Adrian Mejia Blog
This text provides concise, example-based definitions for the core properties of a tree.
Focus on the list of properties under the "Trees: basic concepts" heading. Read the definitions for root, leaf, height, and depth. Notice how the examples (e.g., "Height (h) of the tree is the distance...") directly map to the diagram shown in the article.
Representing a Binary Tree in TypeScript
Now, let's turn these concepts into code. To represent a binary tree, we only need to define a class for a single node. Each TreeNode object will contain its own value and "pointers" to its left and right children. If a child doesn't exist, we can represent that with null.
Since you're comfortable with JavaScript and learning TypeScript, we'll use a class to define our node structure.
class TreeNode {
    value: number; // The data stored in the node
    left: TreeNode | null;
    right: TreeNode | null;

    constructor(value: number) {
        this.value = value;
        this.left = null;
        this.right = null;
    }
}
This simple class is the building block for any binary tree. The left and right properties can either hold another TreeNode object or null, elegantly modeling the connections.
With this class, you can manually construct a tree:
// Create the individual nodes
const root = new TreeNode(1);
const node2 = new TreeNode(2);
const node3 = new TreeNode(3);
const node4 = new TreeNode(4);
const node5 = new TreeNode(5);

// Build the tree structure by linking the nodes
root.left = node2;
root.right = node3;
node2.left = node4;
node2.right = node5;

/*
This creates the following tree:
      1
     / \
    2   3
   / \
  4   5
*/
The following video segment demonstrates this exact process of creating nodes and wiring them together programmatically. While it uses JavaScript, the logic is identical to the TypeScript code above.
Binary Tree Algorithms for Technical Interviews - Full Course
Watch this final clip from the freeCodeCamp video to see how to translate the tree diagram into code.
Focus on the section from programmatic representation. The instructor defines a Node class and then manually creates and connects instances to form a tree, just as we did above. This should make the connection between the abstract diagram and the concrete code object very clear.
And that's it! With the TreeNode class and this method of linking instances, you now have a complete way to represent any binary tree in your code.
Conclusion
In this lesson, we laid the groundwork for our entire study of trees. We started by defining the essential vocabulary—root, leaf, child, parent, and subtree—which gives us a shared language to discuss tree structures. We then narrowed our focus to binary trees, the most common type you'll face in interviews, and established their strict defining properties.
Most importantly, you've learned to:
- Distinguish between the height and depth of a tree and its nodes.
- Represent a binary tree node using a simple TypeScript
class. - Manually construct a tree by creating nodes and linking their
leftandrightproperties.
We now have the ability to build and describe trees. In our next lesson, we will learn how to move through them. We'll explore the fundamental traversal algorithms—preorder, inorder, and postorder—which form the basis for solving almost every tree-related problem.
Can't find a good explanation? Sign up and we'll make it for you
Sign up