
Hello again. In our last lesson, we explored how Alpine.js global stores provide a lightweight but powerful replacement for React's Context API, allowing you to manage shared reactive state across your application. This gave you a clear tool for client-side state that multiple components need to observe and modify.
We now arrive at the final piece of our client-side toolkit. We have HTMX for server interactions and Alpine.js for reactive state. But what about those small, fleeting interactions that don't need a server roundtrip and don't involve state that needs to be tracked? Think of toggling the visibility of a password or copying a snippet of text to the clipboard.
This lesson focuses on how to use small, targeted vanilla JavaScript snippets for transient client-side interactions that do not require a server roundtrip. Mastering this will complete your decision-making framework, giving you a full spectrum of tools from server-rendered hypermedia to minimal, imperative client-side scripts.
The Three-Tier Model for Interactivity
As you plan your migration from React, it's helpful to think of your client-side needs in three tiers. You're already familiar with the first two:
- Server Interaction (HTMX): Any action that requires fetching, creating, updating, or deleting data on the server. This is the default and preferred approach.
- Reactive Client State (Alpine.js): UI interactions that involve state which must be tracked and reactively updated in the DOM, but doesn't need a server roundtrip. Examples include managing the open/closed state of a modal, the currently selected tab, or a shared shopping cart count.
Today, we add the third and lightest tier:
- Transient Client Actions (Vanilla JavaScript): One-off, imperative actions that enhance the UI but don't involve persistent state.
The diagram below illustrates the split between the first two tiers. We're now carving out a niche for interactions that are even simpler than what Alpine.js is designed for.
When does an interaction fall into this third category?
- It's purely a client-side visual effect.
- It doesn't depend on or create reactive state.
- It's often a one-line command to manipulate a DOM element's property or attribute.
A classic example is the "show/hide password" icon on a login form.
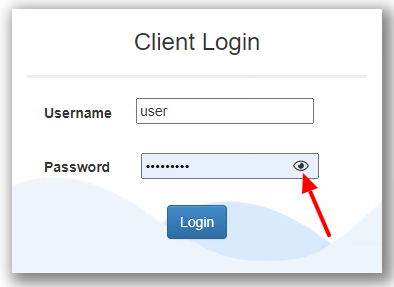
While you could implement this with Alpine.js (x-data="{ show: false }"), it's so simple that a single line of imperative JavaScript can feel more direct and avoids even the minimal overhead of an Alpine component.
The HTMX Way: The hx-on Attribute
Given your extensive JavaScript background, you know you could solve this with document.getElementById and addEventListener. However, the HTMX philosophy favors Locality of Behavior (LoB), keeping the logic that affects an element directly on that element.
The idiomatic way to attach these small JS snippets is with the hx-on family of attributes. It allows you to execute inline JavaScript in response to any DOM event.
The official HTMX documentation provides the definitive guide to this attribute.
Please read the introduction to understand the core syntax and philosophy. Then, jump down to the "Symbols" section. In the intro, focus on the basic syntax: hx-on:click. This shows how to bind a script to a standard DOM event. Under the "Symbols" heading, note that the two familiar variables, this and event, are automatically available inside your script, which is essential for writing targeted interactions.
The hx-on attribute is your gateway to integrating small, imperative JS actions while keeping your markup clean and behaviorally local.
Practical Example: Implementing Password Toggle
Let's implement the password toggle functionality. Here is the HTML for a password field and a button.
<div class="input-group">
  <input type="password" class="form-control" id="password-field">
  <button
    class="btn btn-outline-secondary"
    type="button"
    hx-on:click="
      let input = document.getElementById('password-field');
      if (input.type === 'password') {
        input.type = 'text';
        this.textContent = 'Hide';
      } else {
        input.type = 'password';
        this.textContent = 'Show';
      }
    ">
    Show
  </button>
</div>
Notice how the logic is entirely self-contained in the hx-on:click attribute. We use document.getElementById to find the related input and this to refer to the button itself to change its text. It's a direct, imperative manipulation of the DOM. For a simple, isolated behavior like this, it's a perfectly valid and lightweight approach.
The following video from BugBytes provides a great walkthrough of the hx-on attribute, covering these basic use cases clearly.
HTMX 1.9 - hx-on Attribute for Responding to Events
This video introduces the hx-on attribute and demonstrates its use with standard DOM events.
Watch the initial segment where the presenter demonstrates responding to a click event with an alert, and then to a mouseover event with a confirm dialog. This reinforces the basic syntax and event handling.
Enhancing UX by Intercepting HTMX Events
Where hx-on becomes particularly powerful is in its ability to hook into HTMX's own lifecycle events. This allows you to run client-side code before a request is sent or after content is swapped, opening up many possibilities for UX improvements.
A prime example is improving the perceived responsiveness of a chat application. When a user sends a message, you can use hx-on to immediately add their message to the chat window and clear the input field, before the request even reaches the server. The UI feels instantaneous.
The article "Javascript Fatigue: HTMX Is All You Need to Build ChatGPT" contains an excellent demonstration of this pattern.
Javascript Fatigue: HTMX Is All You Need to Build ChatGPT — Part 1
This section of the article details a chat interface and highlights a specific use of hx-on for a client-side UX enhancement.
In the section "Our first chat with HTMX and FastAPI," locate the paragraph that explains the attributes on the <textarea> tag. Pay close attention to the explanation of hx-on::before-request. This is a perfect example of a transient action that improves the user experience.
This pattern—using hx-on::before-request or hx-on::after-request—is a common and effective way to provide immediate feedback to the user without the complexity of client-side state management.
Running Complex Logic After a Swap
Sometimes, you need to run a script after HTMX has finished swapping new content into the DOM. For example, you might load a new chart and need to initialize the charting library, or you might load a table of data and want to display the number of rows.
This is where the htmx:afterSettle event is invaluable. It fires after a swap has completed and the DOM is in its new state.
While you can write the logic inline, it's often cleaner to call out to a function defined in a separate <script> tag. This maintains the Locality of Behavior (the trigger is on the element) while keeping the implementation details of the script itself organized.
The BugBytes video demonstrates this exact pattern.
HTMX 1.9 - hx-on Attribute for Responding to Events
This part of the video shows how to use hx-on with HTMX lifecycle events and how to structure more complex logic.
First, watch the segment explaining how to hook into HTMX events. The key part is the demonstration of the afterSettle event, which fires after the DOM is updated. Next, see how this is used for a more practical task. The presenter refactors the code to call a separate JavaScript function, outputMessage, from the hx-on attribute. This function then queries the newly-swapped DOM to count table rows. Watch from this point to see the full implementation, including the function definition and the call from hx-on.
This "escape hatch" is your bridge between the declarative world of HTMX and the imperative world of JavaScript. You let HTMX handle the server communication and DOM patching, then use hx-on:htmx:afterSettle to trigger any final, necessary JS operations on the new content.
When to Choose Vanilla JS vs. Alpine
With your background in building complex UIs with React, the key is to develop an intuition for which tool to reach for. The "Dreams of Code" video provides a useful point of contrast.
Alpine.js makes client side interactivity stupidly simple
This video first implements a side-menu toggle with vanilla JS and then explains why Alpine.js is often a better choice.
Watch the initial implementation using vanilla JavaScript. You'll recognize the pattern: an onclick handler calls a function that uses getElementById and classList.toggle. Crucially, listen to the critique that follows from this point. The presenter notes the lack of transitions and the difficulty of keeping the button text ("Show Menu" vs. "Hide Menu") in sync with the menu's state.
This highlights the decision point:
- If you're doing a simple, one-off DOM manipulation (like changing an input's
type),hx-onwith vanilla JS is lean and effective. - If you find yourself needing to keep multiple things in sync (e.g., an element's visibility, a button's text, and a CSS class for transitions), that's a signal that you're managing state. This is where you should reach for Alpine.js's declarative
x-data,x-show, andx-text.
Conclusion
In this lesson, we have finalized your client-side toolkit by adding targeted vanilla JavaScript to your arsenal. You now have a clear, tiered approach for handling interactivity in a hypermedia-driven application.
Key Takeaways:
- Decision Framework: Use HTMX for server trips, Alpine.js for reactive client-side state, and vanilla JS for transient, non-stateful client-side actions.
hx-onis the Key: This attribute is the idiomatic way to embed small JavaScript snippets directly on an element, preserving Locality of Behavior.- Lifecycle Hooks: You can use
hx-onwith HTMX's own events (likehtmx:before-requestandhtmx:afterSettle) to run custom scripts at precise moments, perfect for UX enhancements or initializing third-party libraries. - Know When to Escalate: For simple, one-off actions, inline vanilla JS is fine. When your logic needs to reactively synchronize multiple parts of the UI, it's a sign that you need state, and Alpine.js is the better tool.
This lesson concludes our module on client-side augmentation. You are now equipped with a complete set of tools and, more importantly, a mental model for choosing the right one for the job.
In our next module, we will begin the central task of this course: building The React-to-HTMX Migration Playbook. We will synthesize everything you've learned to create a formal rubric for analyzing your existing React components and confidently mapping them to their new implementation using HTMX, Alpine.js, or plain JavaScript.
Can't find a good explanation? Sign up and we'll make it for you
Sign up