
Hello! Welcome to the final lesson in our HTML Fundamentals module.
In our last session, we focused on structuring tabular data with <table>, which is perfect for organized grids of information like pricing plans. We've consistently emphasized using HTML elements that describe the meaning of your content, like <header>, <nav>, and <article>.
Today, we'll explore two of the most common HTML elements that, interestingly, have no semantic meaning at all: <div> and <span>. This lesson addresses the learning outcome: Organize content using div and span elements for styling and layout purposes.
As a designer, you constantly group elements in your design files (like Figma or Sketch) to organize your layout and apply styles consistently. <div> and <span> are your primary tools for doing the exact same thing in code. They are the foundational containers you'll use to translate your visual designs into web layouts.
1. The Two Types of Containers: Block vs. Inline
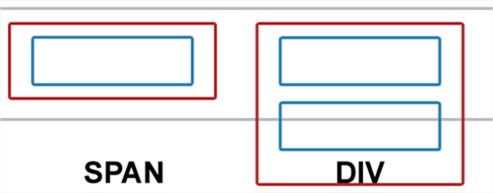
The most important difference between <div> and <span> is their default display behavior.
-
A
<div>(division) is a block-level element. It acts like a structural block. By default, it takes up the full width available to it and starts on a new line. Think of it as grouping a whole section of a design, like a user profile card or a sidebar. -
A
<span>is an inline element. It wraps around a small piece of content within a block, such as a few words in a sentence or an icon next to a button label. It does not start on a new line and only takes up as much width as its content needs.
This image provides a simple visual metaphor for the concept:
To hear this explained with practical examples, please watch the following video.
This video from Steve Griffith provides a clear conceptual overview of div and span, focusing on their purpose as generic containers and the critical difference between block and inline behavior.
Watch from the beginning until 03:09. Pay close attention to how he describes div as a block element that 'takes up the entire width' and span as an inline element that 'just wraps around its content'.
2. <div>: The Generic Block Container
The <div> element is arguably the most used HTML tag for creating layouts. You use it to group larger chunks of content into logical sections. For example, you might wrap an entire product card, a hero section, or a gallery of images in a <div>.
These <div> elements act as "hooks" that you can target with CSS to apply styles like background colors, borders, padding, and, most importantly, layout properties like Flexbox or Grid (which we'll cover in a future module).
A crucial rule of thumb is to always prefer a semantic element over a <div>. Before using a <div>, ask yourself:
- Is this a self-contained piece of content that could be syndicated? Use
<article>. - Is this a major section of the page? Use
<section>. - Is this the main navigation? Use
<nav>.
Only when no other semantic element accurately describes your content should you use a <div>.
<div>: The Content Division element - HTML - MDN Web Docs
The MDN Web Docs for <div> are the definitive source. Please read the introduction and the important usage note.
Read the initial definition of the <div> element and then scroll down to the 'Usage notes' section. The key takeaway is the advice to use <div> only when no other semantic element is appropriate.
3. <span>: The Generic Inline Container
The <span> element is the inline counterpart to the <div>. You use it to wrap a small piece of content inside a block-level element, usually to apply a specific style or to target it with JavaScript.
Common use cases for <span> include:
- Changing the color of a few words in a sentence.
- Applying a different font weight to a product name.
- Placing an icon next to text.
Because it's an inline element, it won't disrupt the flow of your text.
Span VS Div HTML Tags – What is the Difference?
This article from freeCodeCamp provides excellent, side-by-side examples and a clear summary table that contrasts div and span.
Read the sections 'The HTML div Tag' and 'The HTML span Tag' to see code examples of each. Then, review the summary table that highlights the key differences.
4. Putting It All Together: A Quick Demo
Now let's see these two elements used together in a live-coding context.
Learn HTML span & div in 4 minutes! 🏁
This short video from Bro Code is a fast-paced demonstration that clearly shows the visual impact of using div and span with some simple styling.
Watch the entire video. It's only about four minutes long. Notice how applying a background color immediately reveals the block-level nature of the div (it spans the full width) versus the inline nature of the span (it only covers the text).
5. Practice: Structuring a Product Card
As a designer, you've created countless product cards. Now, let's build the HTML structure for one. Your task is to use <div> and <span> to group content appropriately for future styling.
Design Brief:
Imagine a simple card for a plant. It has an image at the top, followed by a text block containing the plant's name, its price, and a short description. The entire card should be a single unit. The price should be visually distinct from the description text.
Instructions:
- Create a main container for the entire card using a
<div>. Give it aclassattribute with the value"product-card". - Inside this
div, add an<img>element (you can use a placeholder URL for thesrc). - Create another
<div>inside the card to hold all the textual content. Give it a class of"card-body". - Inside the
"card-body", add an<h2>for the plant's name (e.g., "Monstera Deliciosa"). - Add a
<p>for the description. It should contain text like "A popular and easy-to-care-for houseplant. Price: $45.00". - Finally, wrap the price (
$45.00) inside a<span>element so we can style it separately later. Give thespana class of"price".
This exercise mirrors how you would group layers in a design tool to create a component.
Click to see the solution
<!DOCTYPE html>
<html lang="en">
<head>
    <meta charset="UTF-8">
    <title>Product Card</title>
</head>
<body>

    <div class="product-card">
        <img src="https://via.placeholder.com/300x200" alt="A photo of a Monstera Deliciosa plant">

        <div class="card-body">
            <h2>Monstera Deliciosa</h2>
            <p>
                A popular and easy-to-care-for houseplant.
                Price: <span class="price">$45.00</span>
            </p>
        </div>
    </div>

</body>
</html>
Notice how div is used to group block-level elements (<img>, <h2>, <p>) into larger containers (product-card, card-body), while span is used to isolate a small piece of inline text ($45.00) within a paragraph.
Conclusion
Congratulations on completing the HTML Fundamentals module! You now have a solid foundation for structuring web content.
Key Takeaways from this lesson:
<div>and<span>are generic containers used for styling and layout when no semantic element is appropriate.<div>is a block-level element that creates a division and starts on a new line. It's used for grouping larger sections of content.<span>is an inline element that wraps small pieces of content within a line, without creating a line break.- The primary purpose of these elements is to act as hooks for CSS and JavaScript.
You've learned how to create a document's skeleton, add text, links, images, forms, tables, and now, generic containers. You are perfectly prepared for the next step.
Next Lesson Preview:
In our next lesson, we will begin Module 2: CSS Fundamentals. We'll finally bring your designs to life by learning how to apply styles—colors, fonts, spacing, and more—to the HTML structures you've learned to build. We'll start with the three ways to apply CSS and the basic selectors you'll use to target elements like the divs and spans you used today.
Can't find a good explanation? Sign up and we'll make it for you
Sign up