
Hello! Welcome back to your front-end programming course.
In our last lesson, we explored HTML attributes and got a brief introduction to how they add functionality to elements. We saw that the href attribute on an <a> tag is what makes a link clickable. Today, we're going to dive deep into that concept, which is the very foundation of how we navigate the web.
This lesson focuses on the learning outcome: Create links using the anchor element with href attributes to navigate between pages. We will cover how to link to other pages within your own website, how to link to external sites, and best practices for making your links user-friendly. As a designer, understanding how user flows are implemented in code is a crucial step in bridging the gap between design and development.
1. Recap: The Anatomy of a Link
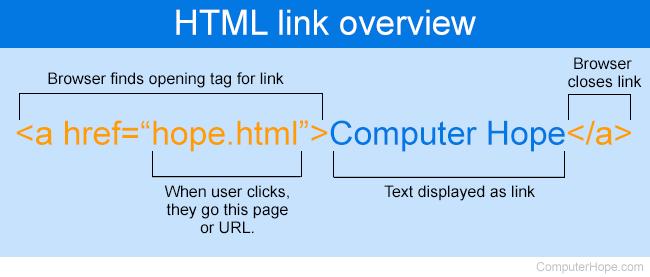
Let's start with a quick review. A link, or hyperlink, is created using the <a> element, which stands for "anchor". The element itself consists of three main parts:
- An opening tag
<a>that includes thehrefattribute. - The content the user sees and clicks on (e.g., text or an image).
- A closing tag
</a>.
The href (hypertext reference) attribute is the most important part, as it specifies the destination address of the link.
2. Absolute vs. Relative URLs
The value you put in the href attribute is a URL (Uniform Resource Locator). There are two main types of URLs you will use:
-
Absolute URLs: This is a full web address, including the protocol (
https://) and the domain name. You use absolute URLs to link to external websites.- Example:
https://www.google.com
- Example:
-
Relative URLs: This is a partial address that is "relative" to the current page's location. You use relative URLs to link to other pages within your own website. This is powerful because you can move your entire project folder to a different server, and the links won't break.
- Example:
about.html(links to a file in the same folder) - Example:
pages/contact.html(links to a file in a sub-folder namedpages) - Example:
../index.html(links to a file in the parent folder)
- Example:
Think of it like giving directions. An absolute URL is like giving a full mailing address (Street, City, State, Zip Code), which can be used from anywhere in the world. A relative URL is like saying "it's the next door down the hall," which only makes sense from your current position.
3. Creating Links in Practice
The best way to understand linking is to see it in action. The following video provides a clear, step-by-step guide to creating the most common types of links.
HTML Tutorial for Beginners 10 - HTML Links
This video, 'HTML Tutorial for Beginners 10 - HTML Links' from The Net Ninja, is a great practical guide. It walks through building a file structure and creating links between pages, which is exactly what we need to do.
Please watch the following segments: Introduction to HTML Links (00:07 - 00:39): A quick overview of the <a> tag. Creating Internal Links (01:35 - 05:48): Pay close attention to how he navigates between directories (prices/page.html and ../index.html). This demonstrates relative URLs. Creating External Links (05:48 - 07:17): Note the requirement for the full https:// protocol. Opening Links in New Tabs (10:58 - 01:56): This covers the target attribute, which is an important UX consideration.
Key Concepts from the Video:
- Internal Links: You link to pages within your site using relative file paths. If
about.htmlis in the same folder asindex.html, the link fromindex.htmlis simply<a href="about.html">About</a>. - External Links: You must use the full, absolute URL, including
https://. Forgetting this is a common mistake. - The
targetAttribute: To make a link open in a new browser tab, you add the attributetarget="_blank". From a UX perspective, this is standard practice for external links, as it prevents users from losing their place on your site.
4. A Note on Accessibility and UX
As a designer, you know that clear labeling is essential for a good user experience. This principle applies directly to link text. Vague phrases like "Click Here" or "More Info" are bad for accessibility and usability. Screen reader users often navigate by pulling up a list of all links on a page. A list of "Click here," "Click here," "Click here" is useless.
The link text itself should describe the destination.
- Bad: To read our case study, click here.
- Good: Read our full case study on the banking app redesign.
Let's quickly read the official recommendation on this.
<a>: The Anchor element - HTML - MDN Web Docs - Mozilla
The MDN Web Docs for the <a> element has an excellent section on accessibility that reinforces this point.
Please read the section titled 'Strong link text'. It's a short section that clearly explains why descriptive link text is so important.
5. Practice: Building a Mini-Site
Now it's time to put this all together. Let's create a simple two-page website to practice navigating between pages.
- Create a new folder on your computer named
my-mini-site. - Inside that folder, create two HTML files:
index.htmlandabout.html. - Copy the code below into
index.html. Notice the links in the code. One is a relative link toabout.html, and the other is an absolute link to your portfolio (or any other site) that opens in a new tab. - Copy the code below into
about.html. This page contains a relative link back toindex.html.
index.html file:
<!DOCTYPE html>
<html lang="en">
<head>
    <meta charset="UTF-8">
    <meta name="viewport" content="width=device-width, initial-scale=1.0">
    <title>Home Page</title>
</head>
<body>
    <h1>Welcome to the Home Page</h1>
    <p>This is the main page of our mini-site.</p>

    <p>
        <a href="about.html">Go to the About Page</a>
    </p>

    <p>
        <a href="https://www.tutorful.co.uk/" target="_blank">Visit Tutorful (opens in new tab)</a>
    </p>
</body>
</html>
about.html file:
<!DOCTYPE html>
<html lang="en">
<head>
    <meta charset="UTF-8">
    <meta name="viewport" content="width=device-width, initial-scale=1.0">
    <title>About Page</title>
</head>
<body>
    <h1>About This Site</h1>
    <p>This is the about page. From here, you can go back to the home page.</p>

    <p>
        <a href="index.html">Go back to the Home Page</a>
    </p>
</body>
</html>
After saving both files, open index.html in your browser. Click the links to navigate between your two local pages and to the external site. This simple exercise demonstrates the core mechanics of website navigation.
Conclusion
Excellent work! You've now mastered one of the most fundamental skills in web development: creating hyperlinks. You can now connect pages to form a cohesive website and link out to the wider web.
Key Takeaways:
- The
<a>tag creates a hyperlink, and its destination is set by thehrefattribute. - Absolute URLs (full addresses) are for external sites.
- Relative URLs (file paths) are for internal pages within your site.
- Using
target="_blank"on external links is a good user experience practice. - Link text should be descriptive to improve accessibility and usability.
In our next lesson, we'll learn how to give our pages more meaningful structure. We'll cover semantic HTML elements like <header>, <nav>, <main>, and <footer>. You'll see how the links you just learned to create are a perfect fit for building a site's main navigation menu inside a <nav> element.
Can't find a good explanation? Sign up and we'll make it for you
Sign up