
Hello! Welcome to your first lesson in the Front-End Programming course.
As a product designer, you're an expert at defining the structure, hierarchy, and user flow of a digital product. This course is designed to help you translate those design skills into the language of the web, starting with HTML, the foundational layer of every website and web application.
This first lesson focuses on the absolute fundamentals. Our goal is to create a basic HTML document with the proper structure, including the doctype, head, and body elements. Think of this as learning how to create the main artboard or frame for a web page, upon which all other design elements will eventually be placed.
Let's get started.
1. Setting Up Your Development Environment
Before we can build a webpage, we need the right tools. In design, you might use Figma or Sketch. In web development, a code editor is our primary tool. We also need a way to view our work in a web browser, just like a user would.
For this course, we'll use Visual Studio Code (VS Code), a popular and powerful free code editor. We'll also install two essential extensions:
- Prettier: To automatically format our code, keeping it clean and readable.
- Live Server: To launch a local development server that automatically refreshes the browser when we save our file. This provides a live preview, similar to what you might be used to in design software.
This first video will walk you through the setup process.
HTML Tutorial for Beginners: HTML Crash Course
Watch this segment from the 'HTML Tutorial for Beginners' by Programming with Mosh to set up your code editor and extensions.
Watch the section 'Setting Up Your Development Environment' from 01:14 to 02:48. Follow the steps to install VS Code, the Prettier extension, and the Live Server extension.
2. The Anatomy of a Web Page
Every website you've ever visited is built with three core technologies: HTML, CSS, and JavaScript. As a designer, it's helpful to think of their roles in a way that relates to your own work:
- HTML (HyperText Markup Language): Provides the structure and content of the page. It's the skeleton. In design terms, this is your wireframe—it defines the elements on the page (like headings, buttons, images) and their hierarchy.
- CSS (Cascading Style Sheets): Controls the presentation and styling. It's the visual layer. This is your UI design—colors, fonts, spacing, and layout.
- JavaScript: Adds interactivity and functionality. It's the logic that makes the page dynamic. This corresponds to the prototyping phase where you define user interactions, like what happens when a button is clicked.
In this first module, we're focusing exclusively on HTML—the structure.
3. The HTML Boilerplate
Every HTML document, regardless of its content, starts with the same fundamental structure. This is often called "boilerplate" code. It's a template that ensures the browser can understand and render your page correctly.
Let's break down the essential components.
The Odin Project HTML Boilerplate
This article from The Odin Project, titled 'HTML Boilerplate', provides a clear, step-by-step explanation of the essential parts of an HTML document. It's a great reference for the fundamentals.
Read the sections from 'Creating an HTML file' through to the end of 'Body element'. Focus on understanding the purpose of each part: creating the file, the DOCTYPE, and the html, head, and body elements.
As you read, you'll see that an HTML document has a clear, nested hierarchy. This is very similar to how you might organize layers and groups in a Figma file.
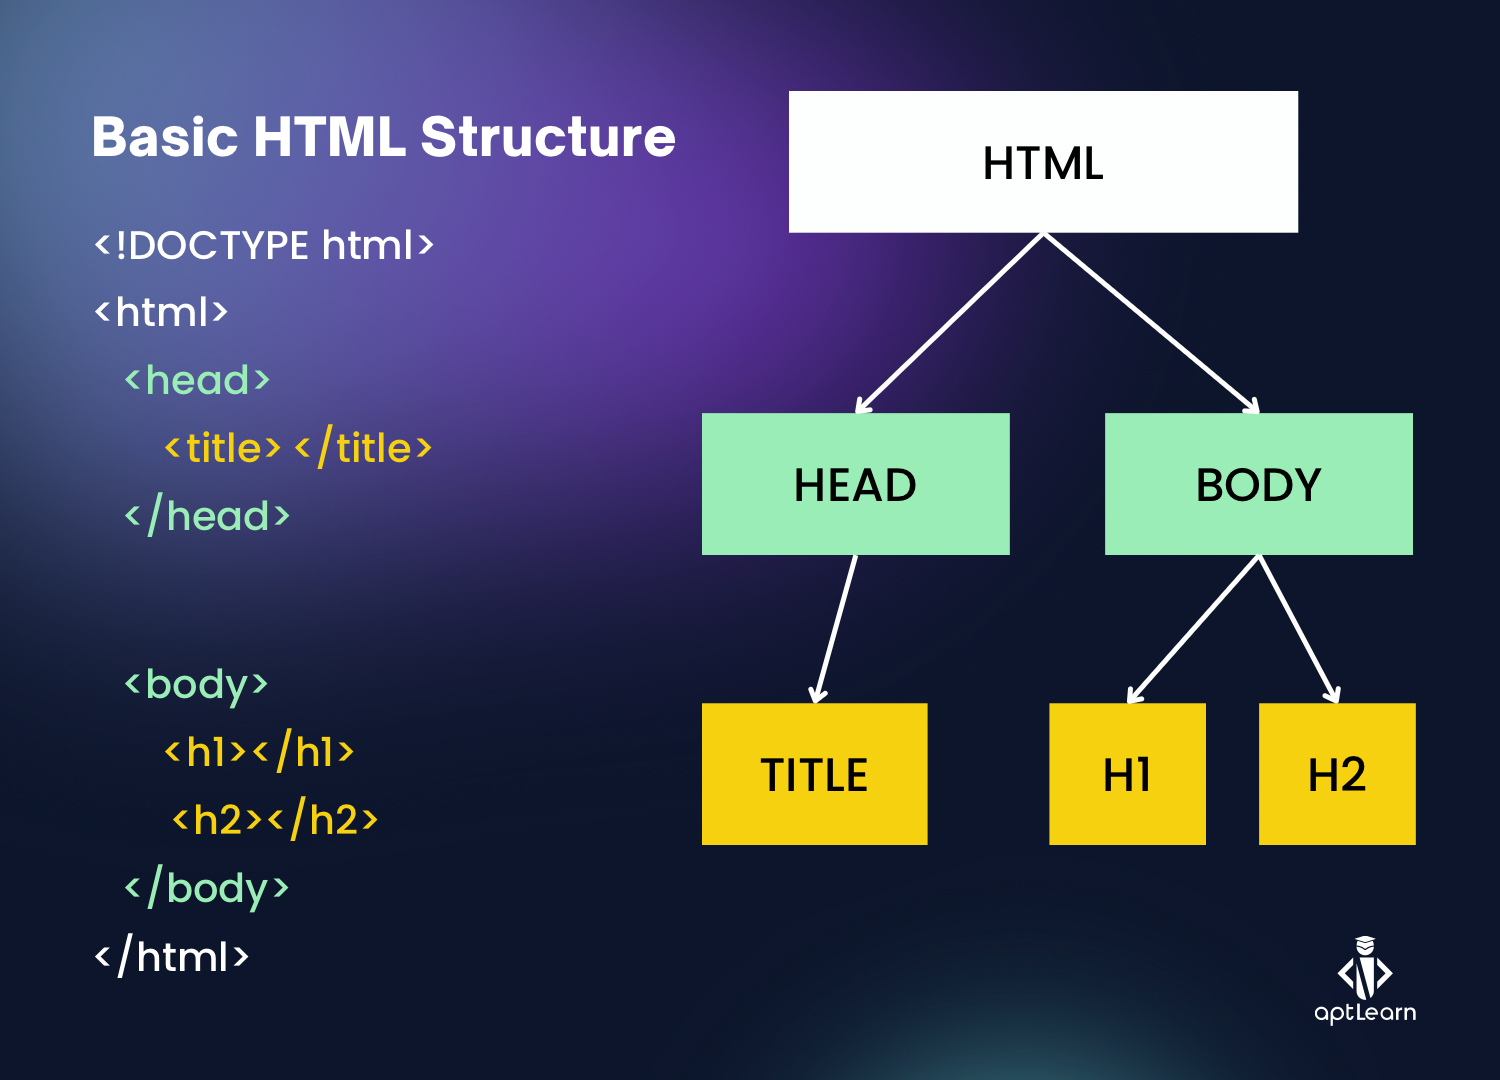
Let's review the key pieces from the reading:
<!DOCTYPE html>
This is always the very first line. It's not an HTML element (or "tag"), but a declaration. It simply tells the browser, "The code that follows is modern HTML (specifically, HTML5)."
The <html> Element
This is the root element of the entire document. Everything else is nested inside it. It's like the main frame or artboard for your webpage. Notice the lang="en" attribute; this tells the browser and assistive technologies (like screen readers) that the page's content is in English, which is important for accessibility.
The <head> Element
The <head> section contains metadata—information about the webpage. None of the content inside the <head> is displayed on the actual page. It includes things like:
<meta charset="UTF-8">: Specifies the character encoding for the document, allowing it to handle a vast range of characters and symbols from different languages.<title>: Sets the text that appears in the browser tab. This is crucial for user navigation and search engine results.
The <body> Element
The <body> section contains all the visible content of the webpage—the text, images, links, and buttons that the user will see and interact with. This is where you'll spend most of your time adding content.
The video below provides a great recap of this fundamental head/body distinction.
This short video from CJ Avilla, 'HTML: head and body', clearly explains the different roles of the head and body sections.
Watch from 03:05 to 05:43. Pay close attention to the explanation of what belongs in the head versus what belongs in the body.
4. Your First HTML Document
Now, let's put this all together and create your first webpage.
- Open VS Code.
- Go to
File > Open Folder...and select thehtml-boilerplatefolder you created earlier (or create a new one). - In the Explorer panel on the left, click the "New File" icon and name your file
index.html. The nameindex.htmlis a special convention; web servers automatically look for this file as the homepage of a directory. - In the empty
index.htmlfile, you can type out the full boilerplate structure.
Here is the complete HTML boilerplate:

<!DOCTYPE html>
<html lang="en">
<head>
    <meta charset="UTF-8">
    <meta name="viewport" content="width=device-width, initial-scale=1.0">
    <title>My First Webpage</title>
</head>
<body>

</body>
</html>
Note: The <meta name="viewport"...> tag is important for responsive design, ensuring your site looks good on all devices. We'll cover this in detail in a later module.
Productivity Tip: VS Code has a fantastic shortcut. In an empty .html file, simply type ! and press Enter. It will automatically generate this entire boilerplate for you.
5. Viewing Your Page
Now that you have your index.html file with the boilerplate code, let's see it in the browser.
- Save your
index.htmlfile. - Right-click anywhere in your code editor.
- Select "Open with Live Server".
A new browser tab will open, showing your page. It will be blank, because there's nothing in the <body> yet. However, look at the browser tab—it should say "My First Webpage," which is the text from your <title> tag!
Now, add a line of text inside the <body> tags:
<body>
    <h1>Hello, World!</h1>
</body>
Save the file. Your browser should automatically refresh, and you'll see "Hello, World!" displayed on the page.
Conclusion
Congratulations on creating your first webpage! It might seem simple, but you've just mastered the essential structure that underpins the entire web.
Key Takeaways:
- Every HTML document starts with a
<!DOCTYPE html>declaration. - The
<html>element is the root container for the entire page. - The
<head>section contains metadata (like the<title>) and is not visible to the user. - The
<body>section contains all the visible content that the user sees and interacts with. - This structure is the non-negotiable foundation for every webpage you will build.
In our next lesson, we'll start populating the <body> by learning how to use common HTML elements for text content, including headings, paragraphs, and lists. This is where you'll begin to add the actual content and structure that you've previously defined in your wireframes and designs.
Can't find a good explanation? Sign up and we'll make it for you
Sign up