
Hello. In the previous lesson, you learned to identify organelles in light and electron micrographs by using visible structural clues. This lesson adds the measurement skill that makes micrographs scientifically useful: determining how large a cell or specimen actually is, or how much an image has been magnified.
By the end, you should be able to choose the correct magnification relationship, convert units accurately, use a scale bar properly, and show clear exam-style working.
Magnification is a ratio
A micrograph enlarges a real specimen. Magnification describes how many times larger the image is than the actual object.
Magnification has no unit because it is a ratio of two lengths in the same unit. Write it as, for example, , meaning that the image is 400 times larger than the specimen.
You need to rearrange this relationship in two other ways:
Rather than relying only on the formula triangle, decide what the question gives you and what it asks for:
| If the question asks for… | Use… |
|---|---|
| Magnification | image size ÷ actual size |
| Actual specimen size | image size ÷ magnification |
| Size of the image | actual size × magnification |
A quick sense-check helps. Since a micrograph is enlarged, the image size should usually be much greater than the actual size. Therefore, when finding actual size, dividing by a large magnification should produce a smaller number.
Units: the step that decides whether an answer is right
Before dividing or multiplying, make the image size and actual size use the same unit.
The conversions most common in Year 11 Biology are:
A convenient conversion chain is:
| To convert | Operation |
|---|---|
| cm to mm | multiply by |
| mm to micrometres | multiply by |
| micrometres to mm | divide by |
| micrometres to nanometres | multiply by |
For example:
You cannot calculate magnification by dividing by directly. First convert one measurement so both are in millimetres or both are in micrometres.
The following short reading gives a useful summary of the three formula arrangements and a worked scale-bar example.
Calculating Actual Size | Cambridge (CIE) AS Biology Revision Notes 2023
Read Cambridge's “Calculating Actual Size” revision note to consolidate the core formula, then watch how the same formula is applied to a scale bar and a bacterial micrograph.
In the section “Calculating actual size,” read the formula overview, focusing on the distinction between image size, actual size, and magnification. Then, in the “Using a scale bar to calculate actual size” worked example, read the worked method. Notice that both centimetre measurements are converted into micrometres before division.
What a scale bar tells you
A scale bar is a line placed on an image with a label such as “ micrometres.” The label gives the actual distance represented by that line, not the length of the line on your page.
If a scale bar is labelled micrometres, any specimen distance that is the same length as that bar represents an actual distance of micrometres.
The crucial idea is that the scale bar and specimen have been enlarged by the same amount. This lets you calculate magnification from the scale bar:
When you have a printed exam paper:
- Measure the horizontal line of the scale bar with a ruler. Do not measure the label or the blank space around it.
- Convert your ruler measurement into the same unit as the scale-bar label.
- Divide image scale-bar length by actual scale-bar length.
- Write the result as followed by your calculated magnification.
Watch Jo Phillips’ explanation before applying this process. It clearly distinguishes what the scale bar looks like on the page from the real-world distance it represents.
AS Biology - Using scale bars to calculate magnification
Watch “AS Biology – Using scale bars to calculate magnification” by Jo Phillips A Level Biology. It explains why a scale bar is a reliable reference and demonstrates the full calculation process, including unit conversion.
Watch the scale-bar idea to establish what the labelled line represents. Then watch the calculation method, focusing on why the scale bar—not the cell—is measured when calculating magnification, and why matching units is essential.
Worked example: finding magnification from a scale bar
The tardigrade example below states that the scale bar measures cm on the image and represents an actual distance of micrometres.
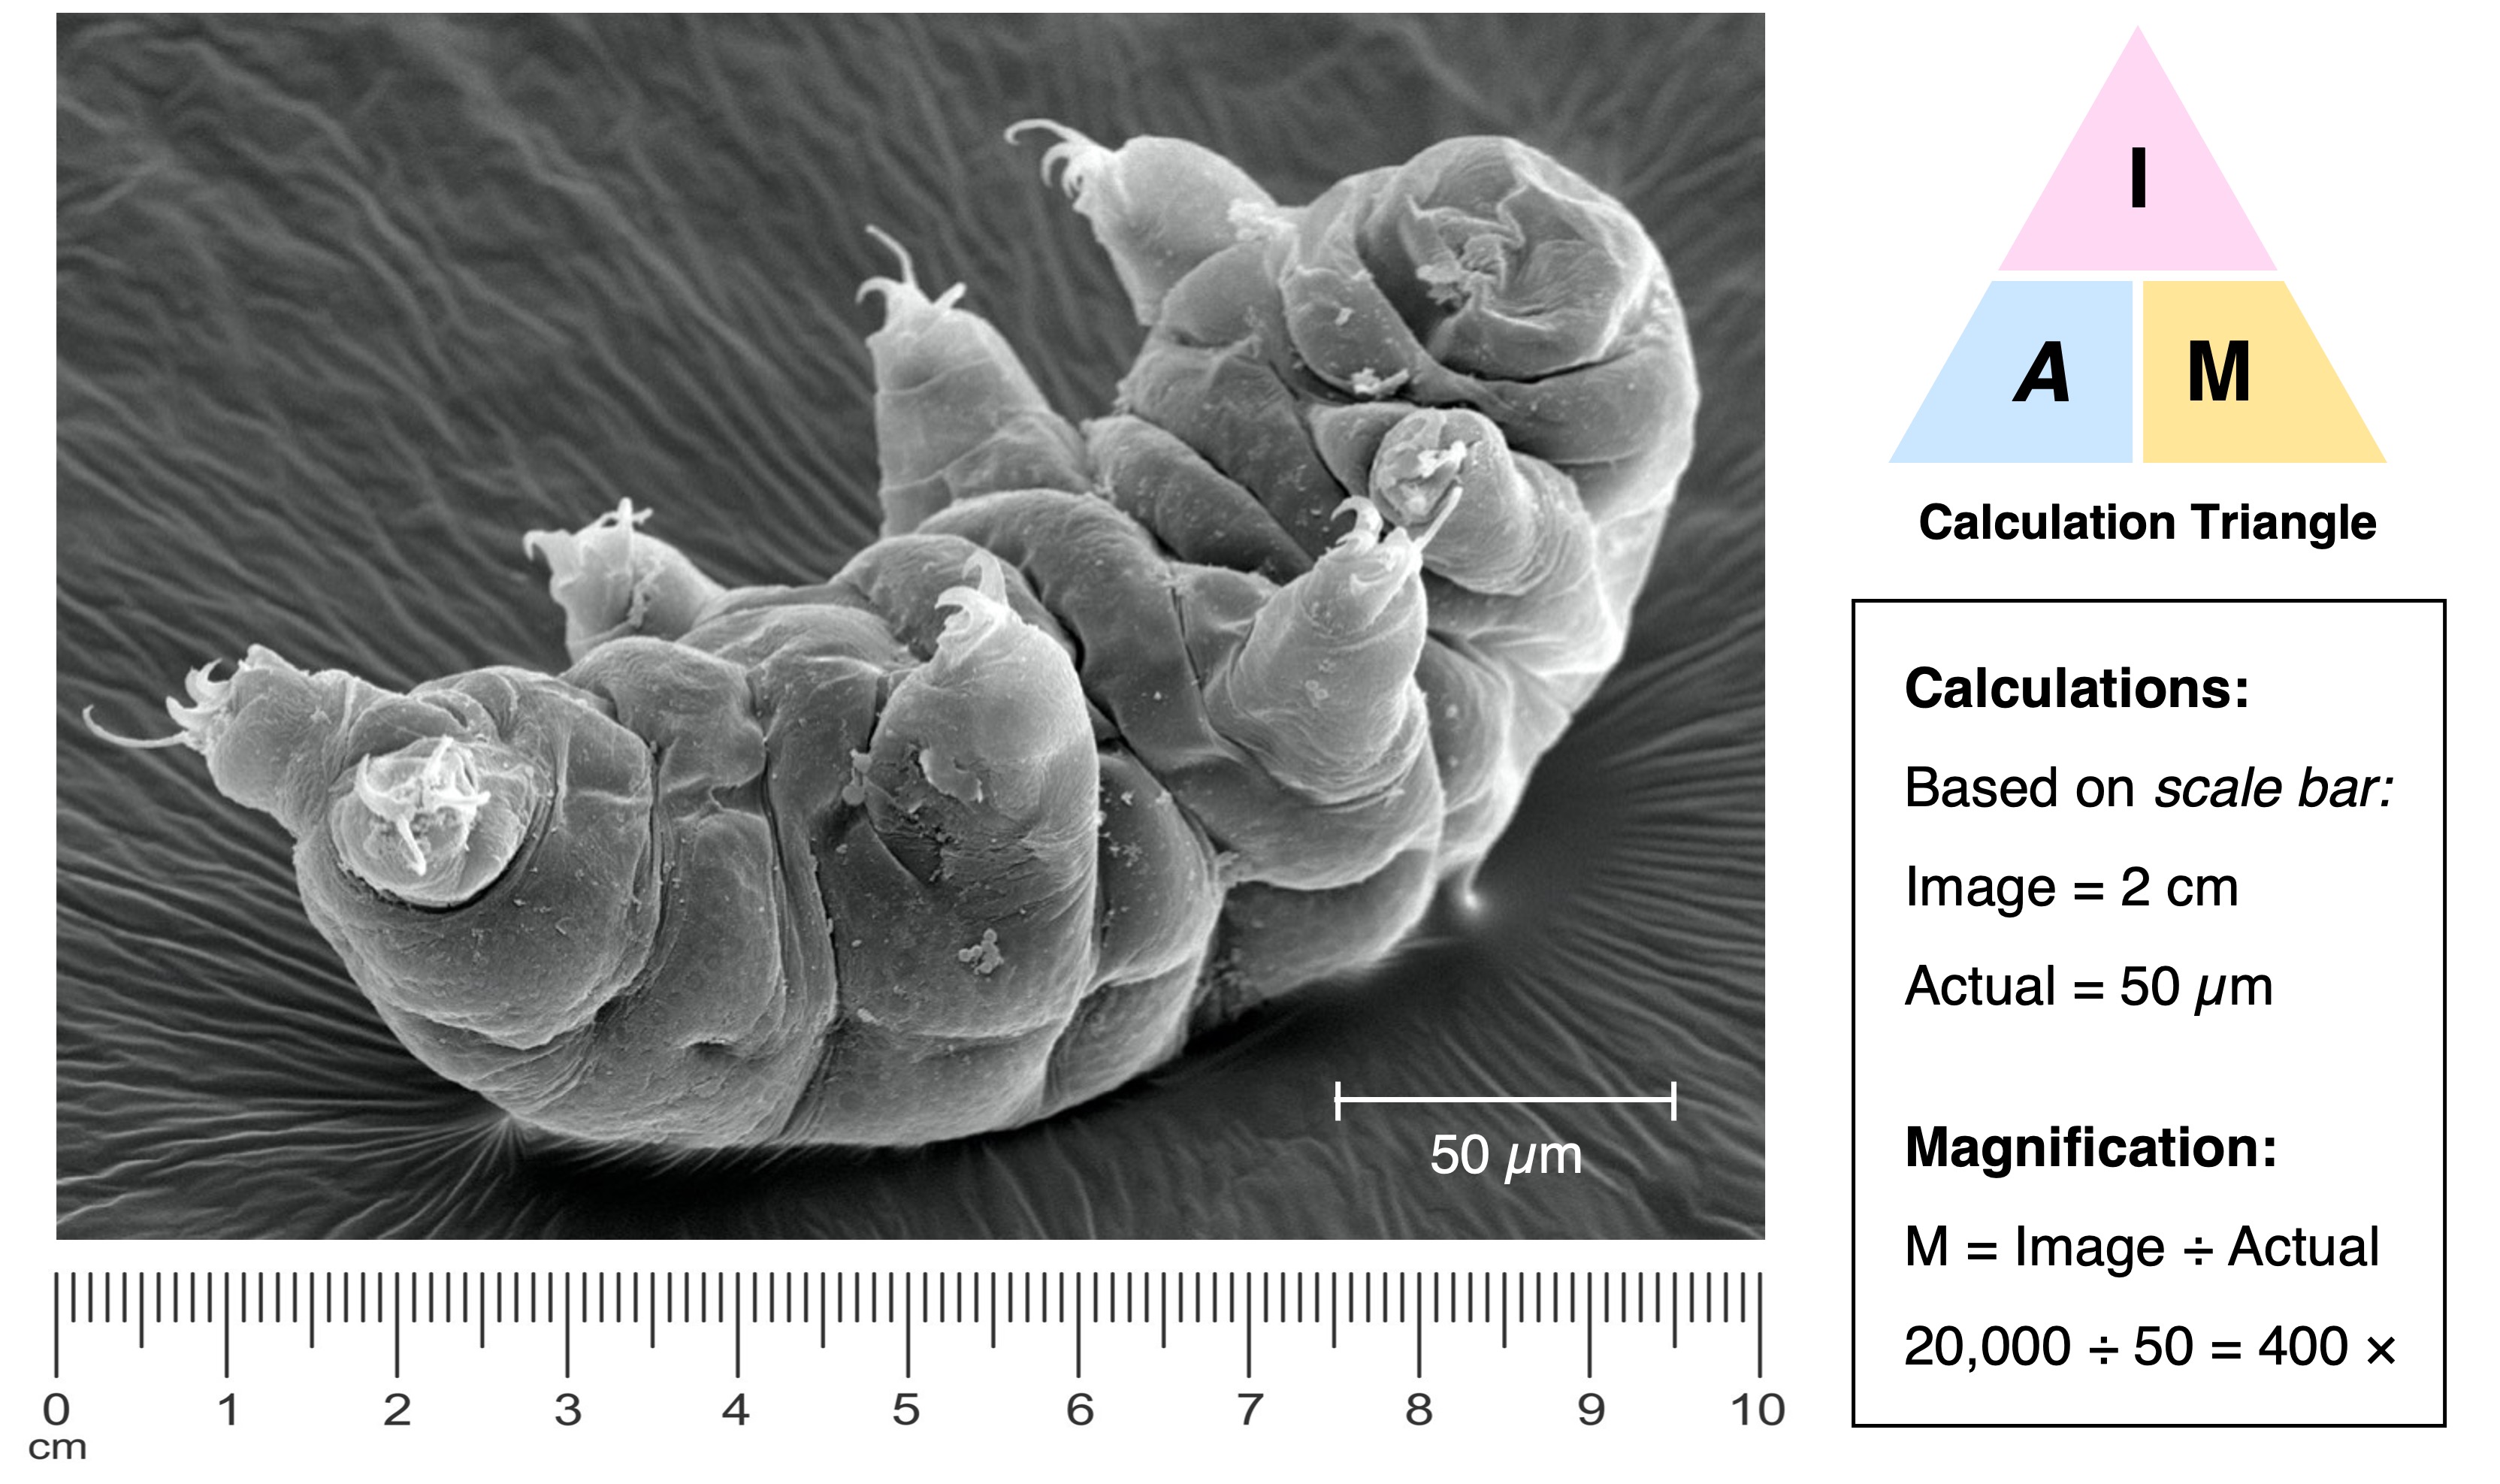
Set out the calculation in full:
Now both measurements are in micrometres:
Therefore, the micrograph has a magnification of:
The calculation is not . That would mix centimetres and micrometres, producing an incorrect answer.
Important digital-image warning
On a printed page, you can measure a scale bar with a ruler. On a screen, however, zooming or resizing changes the apparent image length. Therefore:
- use measurements provided in the question or source;
- measure the scale bar only when the exam image is printed at its intended size;
- do not assume the magnification written on an image remains correct after it has been enlarged or shrunk digitally.
The actual distance stated by a scale bar remains meaningful even if an image is resized, provided you compare the specimen and scale bar within that same image.
Finding the actual size of a specimen
Sometimes an exam gives you a magnification directly. In that case, measure the specimen on the image, convert units, then divide.
Example: actual cell diameter from stated magnification
A cell measures mm across in a micrograph. The magnification is . Calculate the actual diameter in micrometres.
First convert the image measurement:
Then apply the actual-size formula:
The answer is sensible: the real cell is far smaller than its -mm image.
Finding actual size directly from a scale bar
You do not always need to calculate magnification first. If a specimen and scale bar are on the same image, you can use proportional reasoning:
For example, on a printed micrograph:
- scale bar measures mm on the page;
- scale bar label says micrometres;
- a cell measures mm on the page.
Because both page measurements are in mm, their ratio can be used directly:
This method is especially useful when the question asks only for actual size. It also avoids an unnecessary intermediate calculation.
You could check the result by calculating magnification first:
Both methods agree, which is strong evidence that the calculation is correct.
Choosing the right method in an exam
When confronted with a micrograph, pause for a few seconds and identify the information supplied.
| Information provided | Most efficient method |
|---|---|
| Image measurement and magnification | Use actual size = image size ÷ magnification |
| Measured scale bar and its actual label | Use magnification = image bar ÷ actual bar |
| Scale bar and a specimen measurement on the same page | Use the direct proportional scale-bar method |
| Eyepiece and objective magnifications | Multiply them to find total magnification, if the question treats this as the image magnification |
For direct microscope viewing, total magnification is often calculated using:
For example:
In school-style questions, you may then use to find an actual specimen size. In real scientific imaging, printed or digital images can be resized after capture, which is why a scale bar is generally more reliable than a magnification label on a reproduced image.
A reliable answer layout
Show enough working that a marker can see your method even if your final number is wrong. A clear response has four parts:
- State the relevant formula.
- Convert units explicitly.
- Substitute and calculate.
- Give the final answer with a correct unit — or write magnification as a number.
For example:
Common errors to eliminate
These questions are usually straightforward once the setup is correct, but a few errors recur.
- Mixing units: Dividing millimetres by micrometres without conversion changes the answer by a factor of .
- Measuring the specimen to find magnification: You do not know its actual size yet. Measure the scale bar because its actual length is supplied.
- Forgetting the magnification symbol: Write , not mm or micrometres.
- Giving actual size without a unit: A numerical answer alone is incomplete.
- Measuring a curved cell with a straight line: Measure the specific dimension requested, such as maximum length or diameter. For a curved organism, follow its length only if the question explicitly requires body length along the curve.
- Using a magnification label after an image has been resized: Prefer the scale bar, or use only measurements specified in the question.
For quick revision, practise saying this sequence aloud whenever you see a scale bar: measure the bar, convert units, calculate the ratio, then state magnification.
Key takeaways
- Magnification compares image size with actual size:
- To find actual specimen size, divide image size by magnification.
- Both values in a magnification calculation must use the same unit.
- A scale bar gives an actual reference distance and is usually the most dependable feature of a reproduced micrograph.
- Show conversions and working clearly; this earns method marks and prevents factor-of- mistakes.
Next, you will apply the same quantitative thinking to cell membranes, predicting net movement by diffusion, osmosis, and active transport.
Can't find a good explanation? Sign up and we'll make it for you
Sign up