
Hello! Welcome to your fourth lesson.
In our last session, we mastered passive reconnaissance, using OSINT techniques like Google dorking and GitHub analysis to gather intelligence without touching the target's systems. You learned how to find what's hiding in plain sight. Now, it's time to transition from a passive observer to an active investigator.
This lesson addresses the learning outcome: Conduct active network discovery using tools like Nmap to identify live hosts and open ports (SYN, UDP, Connect scans). We will be "knocking on the doors" of the target network to see which machines are online and what services they are exposing. This process is a cornerstone of both penetration testing and bug bounty hunting, as it builds the foundational map of your target's attack surface.
1. From Passive to Active: Introducing Nmap
Active reconnaissance involves direct interaction with the target's infrastructure. Unlike the passive techniques we've covered, these actions can be logged and detected by security systems like firewalls and Intrusion Detection Systems (IDS). The primary tool for this phase is Nmap (Network Mapper).
Nmap is an open-source utility for network discovery and security auditing. It is the undisputed industry standard, used by security professionals and system administrators to:
- Identify which hosts are available on a network.
- Discover the services (and their open ports) those hosts are offering.
- Determine the operating systems and software versions running on those services.
- Find potential vulnerabilities using the Nmap Scripting Engine (NSE).
Today, we'll focus on the first two points: discovering live hosts and identifying open TCP and UDP ports.
2. Phase 1: Host Discovery – Who is Online?
Before you can scan for open ports, you need to know which IP addresses on the network belong to live machines. Wasting time scanning offline hosts is inefficient. This first step is called host discovery.
Nmap does this by sending a series of probes to determine if a host is responsive. For local networks, this often involves ARP requests. For remote networks, it uses a combination of ICMP echo requests (pings), TCP SYN packets to port 443, TCP ACK packets to port 80, and other probes.
The simplest way to perform a host discovery scan is with the -sn flag (which stands for "scan, no ports").
nmap -sn <target>
This command tells Nmap to identify live hosts but not to perform a port scan on them. It's a quick and relatively quiet way to get a list of active targets.
Your Computer Science background gives you a solid foundation in networking, so you know that targets can be specified in several ways:
- Single IP:
192.168.1.1 - Domain Name:
scanme.nmap.org - IP Range:
192.168.1.1-100 - CIDR Notation:
192.168.1.0/24
The video below gives a practical demonstration of these basic host discovery techniques.
Nmap Full Guide (41 min) — You'll Never Ask About Nmap Again
Watch this segment from 'Nmap Full Guide' to see host discovery in action. It demonstrates how to check if hosts are alive using various discovery probes.
Watch from 13:00 to 14:28. Focus on the purpose of the Ping Scan (-sn) and the ARP Scan (-PR), and understand when you would use one over the other.
When Pings are Blocked: The -Pn Flag
Modern firewalls often block the ICMP echo requests used in a standard ping. If a host doesn't respond to discovery probes, Nmap will assume it's offline and won't scan it. To override this, you can use the -Pn flag.
nmap -Pn <target>
This flag tells Nmap to skip the host discovery phase and proceed directly to port scanning, treating every specified IP address as if it were online. This is essential when you have strong reason to believe a host is active despite not responding to pings, but be aware that it can significantly slow down scans of large networks.
3. Phase 2: Port Scanning – Finding the Open Doors
Once you've identified live hosts, the next step is to find out which "doors" (ports) are open. Nmap provides many techniques for this. A port can be in one of three main states:
- Open: An application is actively accepting connections on this port.
- Closed: The port is accessible, but there is no application listening on it.
- Filtered: A firewall, filter, or other network device is blocking the port, so Nmap cannot tell if it is open or closed.
We'll now cover the three fundamental scan types specified in the learning outcome. For a deep and authoritative understanding, you should read the official Nmap documentation on these techniques after reviewing the summaries here.
The official Nmap documentation, titled 'Port Scanning Techniques', is the definitive source for understanding how each scan type works. It's a valuable resource to bookmark for your career.
Read the sections describing the 'TCP SYN scan (-sS)', 'TCP connect scan (-sT)', and 'UDP scans (-sU)'. Focus on how Nmap interprets responses to determine if a port is open, closed, or filtered for each scan type.
TCP Connect Scan (-sT)
This is the most basic TCP scan. It works by asking the underlying operating system to establish a full connection, just like a web browser would. It completes the TCP three-way handshake (SYN, SYN/ACK, ACK).
- How it works: Nmap sends a
SYNpacket. If the port is open, the target responds withSYN/ACK. Nmap completes the connection with anACKand then immediately closes it. If the port is closed, the target responds with aRST(reset) packet. - Command:
nmap -sT <target> - Pros: Reliable. Does not require special privileges.
- Cons: Noisy. Easily detected and logged because it establishes a full connection. Slower than a SYN scan.
This is the default scan type if you run Nmap without sudo or as a non-administrator user.
TCP SYN Scan (-sS)
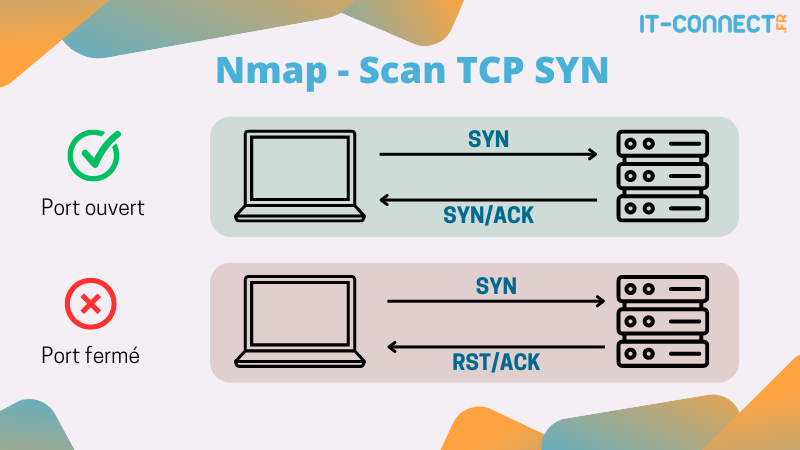
This is the most popular scan option and the default for privileged (root/admin) users. It's often called a "half-open" scan because it never completes the TCP handshake.
- How it works: Nmap sends a
SYNpacket. If the port is open, the target responds withSYN/ACK. Instead of sending the finalACKto complete the connection, Nmap sends aRSTpacket, tearing down the connection. If the port is closed, the target responds withRST. - Command:
sudo nmap -sS <target> - Pros: Stealthier than a connect scan, as the connection is never fully established, making it less likely to be logged. It's also faster.
- Cons: Requires raw socket privileges (i.e., you need to run it with
sudoon Linux/macOS or as an administrator on Windows).
The following image provides a clear visual of how a SYN scan differentiates between open and closed ports.
UDP Scan (-sU)
Not all services run over TCP. Critical services like DNS (port 53), SNMP (port 161), and DHCP (port 67/68) use the connectionless UDP protocol. Ignoring UDP ports means you could miss significant vulnerabilities.
- How it works: Nmap sends a UDP packet to the target port.
- If a UDP response is received, the port is
open. - If an ICMP "port unreachable" error is returned, the port is
closed. - If there is no response, the port is marked
open|filtered.
- If a UDP response is received, the port is
- Command:
sudo nmap -sU <target> - Pros: The only way to find open UDP services.
- Cons: Very slow and sometimes unreliable. Many hosts rate-limit ICMP error messages, forcing Nmap to slow down dramatically. No response is ambiguous.
To get a practical feel for these scans, watch the following demonstration.
Nmap Full Guide (41 min) — You'll Never Ask About Nmap Again
This segment of 'Nmap Full Guide' demonstrates the TCP Connect, SYN, and UDP scans. It clearly explains the key differences and shows the command-line usage.
Watch from 08:46 to 11:15. Pay attention to the distinction between the Connect scan (-sT), the SYN scan (-sS), and the UDP scan (-sU).
4. Practical Scanning: Putting It All Together
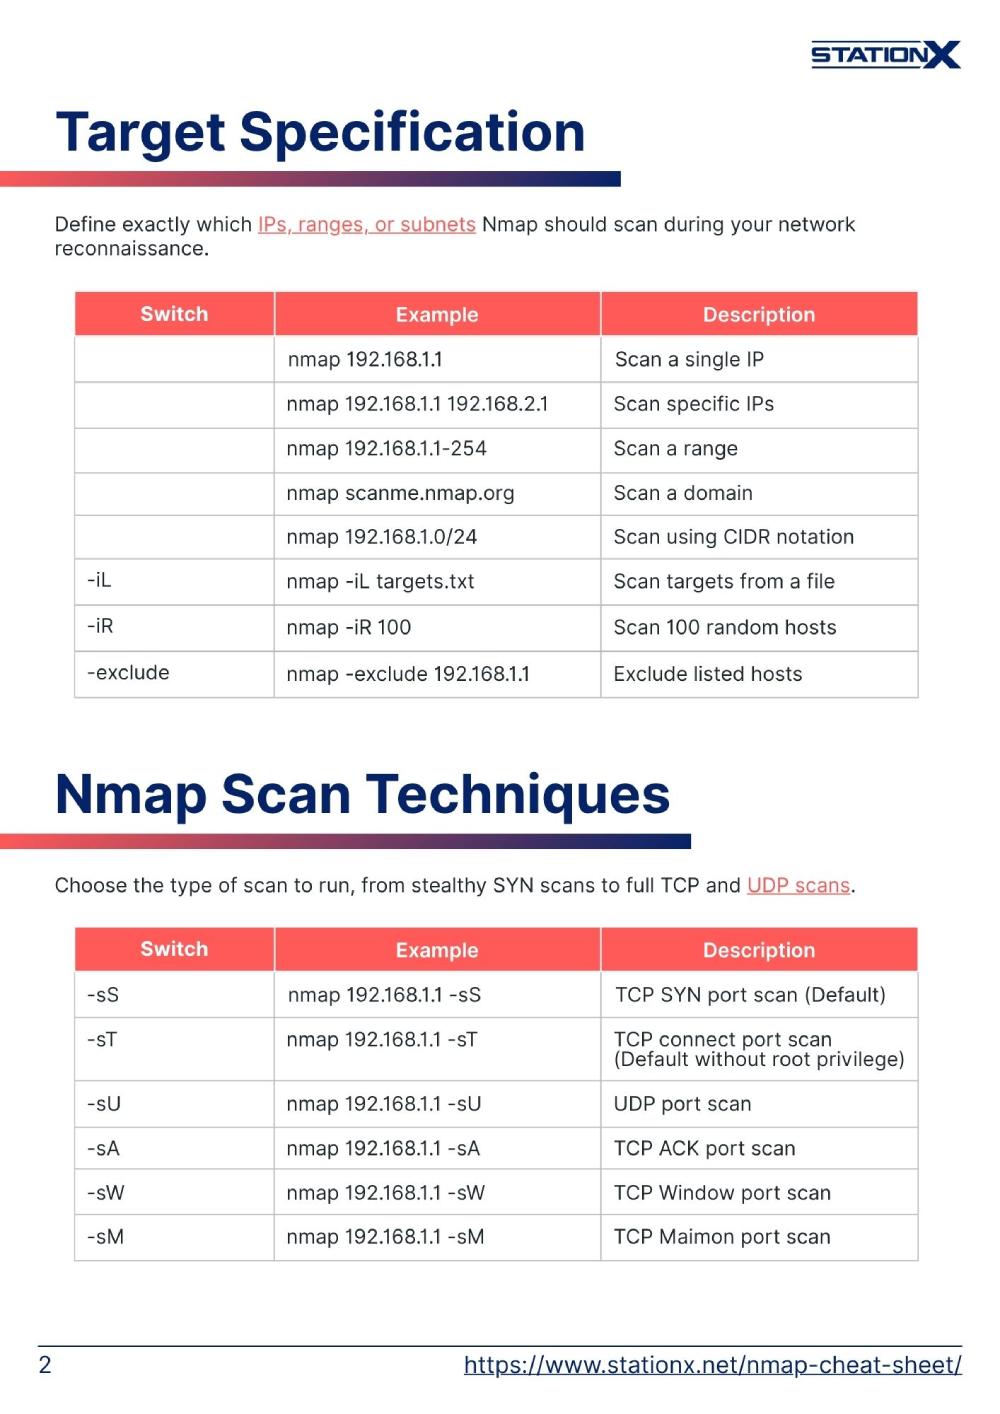
Now let's combine these concepts into a practical workflow. This cheat sheet is a great reference to keep handy.
Here are some essential flags to make your scans more effective:
- Specify Ports (
-p): By default, Nmap scans the 1,000 most common ports. To be thorough, you might need to scan all 65,535 ports.-p 80,443: Scan specific ports.-p 1-100: Scan a range of ports.-p-: Scan all ports from 1 to 65,535.
- Timing Templates (
-T): Nmap's timing affects the trade-off between speed and stealth.-Tranges from 0 (paranoid, very slow) to 5 (insane, very fast).-T4(Aggressive) is a good balance for fast scans in lab environments or when you have permission and aren't concerned about detection.-T2(Polite) or-T1(Sneaky) are better if you want to be less disruptive.
- Save Output (
-oN,-oX): Documenting your findings is crucial.-oN <filename>: Saves output in Nmap's normal, human-readable format.-oX <filename>: Saves output in XML format, which is useful for importing into other tools.
Example Workflow
Let's say your target is the network 192.168.1.0/24.
-
Host Discovery: First, find the live hosts.
sudo nmap -sn 192.168.1.0/24 -oN live_hosts.txt -
Fast Initial Port Scan: Run a quick SYN scan on the top ports of a discovered host (e.g.,
192.168.1.101).sudo nmap -sS 192.168.1.101 -
Thorough TCP Scan: For a more detailed look, scan all TCP ports on that host with a faster timing template.
sudo nmap -sS -p- -T4 192.168.1.101 -oN full_tcp_scan.txt -
UDP Scan: Finally, check for common UDP ports. Since this is slow, you usually focus on a smaller, more common range.
sudo nmap -sU --top-ports 200 192.168.1.101 -oN udp_scan.txt
Test your understanding!
You are tasked with scanning a single server at 10.10.10.5. You need to perform a stealthy scan, check all TCP ports, and save the results in a normal text file named scan_results.txt. The target is on a fast, stable network, so you can use an aggressive timing template to speed things up.
What Nmap command would you use?
Show answer
sudo nmap -sS -p- -T4 -oN scan_results.txt 10.10.10.5
sudo: Required for a SYN scan.-sS: Selects the stealthy TCP SYN scan.-p-: Specifies that all 65,535 TCP ports should be scanned.-T4: Uses the "aggressive" timing template for a faster scan.-oN scan_results.txt: Saves the output in a normal format to the specified file.10.10.10.5: The target IP address.
Conclusion
You have now executed your first active reconnaissance scans, moving beyond passive intelligence gathering to directly probing a target. This is a critical step in mapping the attack surface and identifying potential points of entry.
Key Takeaways:
- Active reconnaissance begins with host discovery (
-sn) to find live machines. - The TCP SYN scan (
-sS) is the preferred method for port scanning due to its speed and stealth, but it requires administrative privileges. - The TCP Connect scan (
-sT) is a reliable but "noisy" alternative when you lack privileges. - UDP scans (
-sU) are essential for discovering services like DNS but are significantly slower. - Effective scanning involves combining flags like
-p(for port selection),-T(for timing), and-oN(for output) to tailor the scan to your specific needs.
Next Lesson Preview:
Finding an open port is just the first step. Is it a web server, an FTP server, or something else? Is it running an old, vulnerable version of the software? In our next lesson, we will learn how to perform service and version enumeration on the open ports we've discovered. This is how we turn a list of open ports into a list of actionable targets.