
Welcome back. In our previous lesson, we explored how to hook into HTMX's request lifecycle using its event system. This powerful mechanism allows for custom client-side logic, but it's fundamentally based on a pull model: the client requests data from the server. Now, we'll invert that relationship.
This lesson completes our module on advanced interactivity by tackling the learning outcome: Implement real-time updates by connecting to a Server-Sent Events (SSE) stream from an HTMX element. We will explore how the server can push updates directly to the client, enabling real-time features like live notifications, dashboards, and activity feeds. For someone experienced with real-time solutions in the SPA world, like WebSockets paired with a state management library, this lesson will demonstrate the hypermedia approach to the same problem set.
What are Server-Sent Events (SSE)?
Server-Sent Events are a web standard that allows a server to maintain a persistent, unidirectional HTTP connection with a client. Once established, the server can push data to the client at any time.
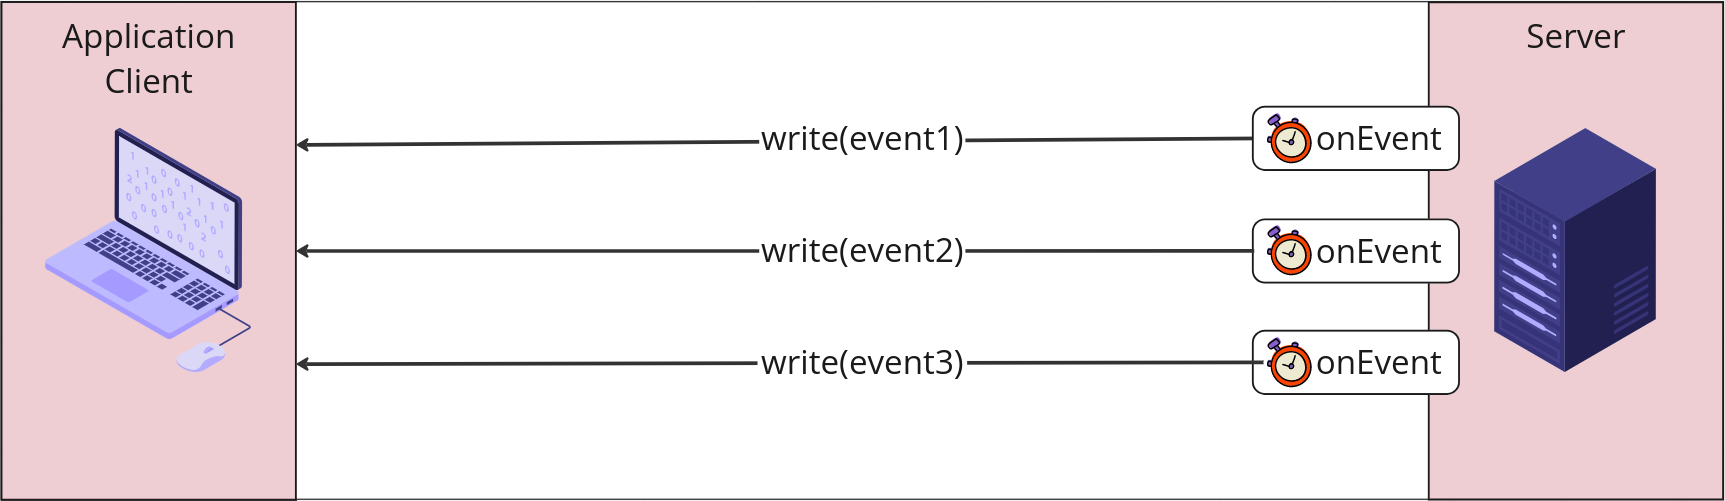
This "broadcast" model is distinct from both traditional polling (where the client repeatedly asks for updates) and WebSockets. A video from the BugBytes channel provides an excellent clarification on when to choose SSE over the more complex, bidirectional WebSockets.
Django & HTMX - with Server-Sent Events (SSE)!
This clip distinguishes between Server-Sent Events and WebSockets.
Watch from the explanation to understand the key difference: SSE is a one-way street (server-to-client), making it a simpler and more efficient choice for use cases like live score updates or stock tickers where the client is a passive listener.
The Server Side: An SSE Endpoint in Express.js
Given your preference for a Node.js stack, let's build an SSE endpoint using Express. To establish an SSE connection, the server must send a specific set of HTTP headers and then keep the connection open to stream data.
A video from Coding With Adam demonstrates exactly how to configure these headers in an Express application.
Crash Course: Server-Sent Events (SSE) with Express.js & EventSource
This segment shows how to set up the necessary HTTP headers for an SSE stream in Express.
Watch from this part of the video. Pay attention to the three key headers being set: Content-Type: 'text/event-stream' tells the browser to interpret the response as an SSE stream. Cache-Control: 'no-cache' prevents any intermediate proxies from caching the response. Connection: 'keep-alive' signals that the connection should remain open. The res.flushHeaders() call is also important, as it sends these headers to the client immediately, establishing the stream.
Once the headers are sent, you can write data to the stream using res.write(). Each message must follow a specific format, ending with two newline characters (\n\n). The simplest message is just a data payload, prefixed with data:.
// In an Express route
res.write('data: This is a message from the server\n\n');
For a complete server-side implementation, the following article provides a well-structured example, including logic for sending data periodically and cleaning up the connection when the client disconnects.
Implementing Server-Sent Events (SSE) with Node.js
This resource contains a full, practical example of an SSE server in Node.js.
Focus on the <span data-type="resource_reading_textrange" data-resource-subitem-id="bb465cde" data-range-start="const express = require('express');" data-range-end="process.exit(); }); });">server.js code block. Notice how it uses setInterval to push data every second and, critically, how it uses req.on('close', ...) to clear the interval when the client closes the connection. This prevents memory leaks on the server.
The Client Side: The HTMX SSE Extension
With a server endpoint ready to stream events, we can now configure HTMX to consume them. This is handled by the official SSE extension. The HTMX documentation provides a complete guide to its features.
</> htmx ~ The htmx Server Sent Event (SSE) Extension Extension
This is the official documentation for the HTMX SSE extension.
Skim the Installing section to see how to include the extension script. Read the Usage section carefully. The key attributes are hx-ext="sse" to enable the extension, sse-connect to specify the URL of your SSE endpoint, and sse-swap to define which server event to listen for. Continue reading through <tf start="Receiving Named Events" end="for it by including sse-swap=\"message\"">Receiving Named and Unnamed Events. This explains that if the server doesn't specify an event name, it defaults to message. Finally, review the examples under Receiving Multiple Events, which show different ways to structure your listeners.
Let's apply this. Imagine our Express server at /ticker is sending unnamed events. A div on the client could listen and display these messages like so:
<!-- 1. Include the htmx and sse extension scripts -->
<script src="/path/to/htmx.min.js"></script>
<script src="/path/to/sse.js"></script>

<!-- 2. Enable the extension and connect to the stream -->
<body hx-ext="sse">
    <h1>Live Ticker</h1>
    <div sse-connect="/ticker" sse-swap="message">
        Waiting for updates...
    </div>
</body>
When this page loads, the div will establish an SSE connection to /ticker. Whenever the server sends a message, the SSE extension will take its data payload and swap it into the div's innerHTML.
In your browser's developer tools, you can see this persistent connection in the Network tab. It will remain in a "pending" state, and you can inspect the individual event messages as they arrive.

Advanced Patterns: Sending HTML and Named Events
The real power of this pattern in HTMX is not sending plain text or JSON, but sending fully-rendered HTML fragments. The server does the work of preparing the UI, and the client simply swaps it into place.
Named Events
Instead of sending default "message" events, it's often better to use custom names to distinguish different types of updates. On the server, you prefix the data with an event: line.
// Express.js server
res.write('event: new-price\n');
res.write('data: <li>BTC: $70,000</li>\n\n');
On the client, you simply change sse-swap to match the custom event name.
<ul sse-connect="/ticker" sse-swap="new-price" hx-swap="afterbegin">
    <!-- New prices will be prepended here -->
</ul>
Here, hx-swap="afterbegin" is used to prepend new items to the top of the list, creating a reverse-chronological feed.
Handling Multi-line HTML
A significant challenge arises when your HTML fragment spans multiple lines. The SSE protocol requires that every line in the data payload be prefixed with data:. The BugBytes video we saw earlier has a masterful explanation of this problem and its solution.
Django & HTMX - with Server-Sent Events (SSE)!
This tutorial demonstrates how to send multi-line HTML fragments over SSE and handle custom event names.
First, watch the segment on sending HTML. It highlights the problem with multi-line strings and presents a simple solution by removing newlines. Then, watch the section on a more robust solution. It introduces a helper function that correctly formats multi-line data by prefixing each line with data:. This is the recommended approach for production code.
Inspired by that helper function (which was for Python/Django), here is an equivalent for your Node.js/Express server. This function takes a data string (your rendered HTML) and an optional event name, and formats it correctly for SSE.
// sse-helper.js
function formatSseEvent(data, eventName) {
    let message = '';
    if (eventName) {
        message += `event: ${eventName}\n`;
    }

    // Split the data by newlines and prefix each line with "data: "
    const dataLines = data.split('\n').map(line => `data: ${line}`).join('\n');
    message += `${dataLines}\n\n`; // Add the final double newline

    return message;
}

// In your Express route
const htmlFragment = '<div>\n  <p>Some content</p>\n</div>';
const formattedMessage = formatSseEvent(htmlFragment, 'my-update');
res.write(formattedMessage);
Triggering Other Requests
Finally, an SSE event doesn't have to directly contain the HTML to be swapped. It can act as a simple notification that triggers another HTMX request. This is useful for decoupling the real-time notification from the data-fetching logic.
You achieve this with a special hx-trigger syntax.
<div hx-ext="sse" sse-connect="/notifications">
    <!-- This div will be updated when the 'reload-list' event is received -->
    <div id="item-list" hx-get="/latest-items" hx-trigger="sse:reload-list">
        <!-- ... list of items ... -->
    </div>
</div>
In this example, when the server sends an event named reload-list, the inner div will be triggered to issue a GET request to /latest-items and swap the response into itself. The SSE event itself carries no data payload; it's just a signal.
Conclusion
You have now learned how to implement server-push functionality in a hypermedia application. This pattern is a powerful, simple, and standard-based alternative to WebSockets for many real-time use cases.
Key Takeaways:
- Server-Sent Events (SSE) provide a one-way, server-to-client communication channel over a persistent HTTP connection.
- An Express.js SSE endpoint requires specific headers (
Content-Type: text/event-stream) and careful connection management to prevent resource leaks. - The HTMX SSE extension declaratively connects an element to an event stream using
sse-connectand swaps incoming data withsse-swap. - The most powerful pattern is to send pre-rendered HTML fragments from the server. For multi-line HTML, you must ensure every line of the payload is prefixed with
data:. - SSE events can also be used as triggers (
hx-trigger="sse:...") to initiate other HTMX requests, decoupling notification from content.
In this module, we've covered a wide range of advanced HTMX patterns for building rich, interactive user experiences that are still fundamentally driven by the server. However, some UI state is purely ephemeral and doesn't belong on the server (e.g., the open/closed state of a dropdown menu). In our next module, we'll introduce Alpine.js, a minimal JavaScript framework that works beautifully with HTMX to manage this kind of client-only state.
Can't find a good explanation? Sign up and we'll make it for you
Sign up