
Welcome to your next lesson on building scalable systems. In our previous session, we established the crucial difference between Layer 4 and Layer 7 load balancing. We concluded that for modern applications, especially microservices, the intelligence of L7 routing is indispensable.
Today, we transition from theory to practice. You'll learn how to configure Nginx, one of the most popular and powerful tools in a backend engineer's arsenal, to act as a high-performance L7 reverse proxy and load balancer. This skill is a cornerstone of scalable architecture, allowing you to manage traffic, improve resilience, and scale your backend services effectively. Mastering this is a key step toward your goal of designing and operating large-scale distributed systems.
From Web Server to Reverse Proxy
While Nginx is famous as a web server for static content, its role as a reverse proxy is arguably more critical in modern architectures. A reverse proxy is a server that sits in front of one or more backend applications, intercepting requests from clients and forwarding them to the appropriate backend server.
The diagram below illustrates this exact setup. A client sends an HTTPS request to a domain, which is handled by Nginx. Nginx terminates the SSL connection and forwards the request as a plain HTTP call to a pool of backend servers.
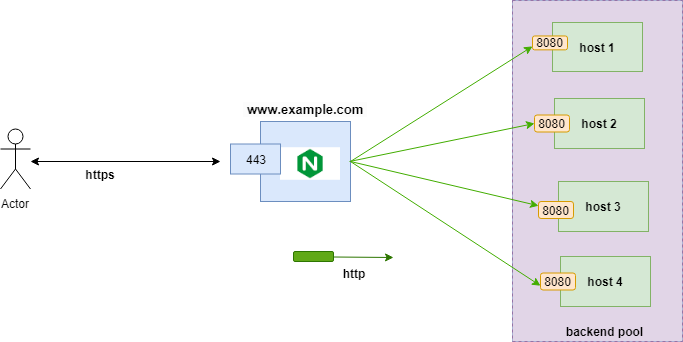
This architecture offers several advantages:
- Decoupling and Security: It hides your backend servers' topology and prevents them from being directly exposed to the internet.
- SSL Termination: Nginx can handle the computational overhead of SSL/TLS encryption and decryption, freeing up your application servers to focus on business logic.
- Centralized Control: It provides a single point for logging, authentication, caching, and rate limiting.
- Load Balancing: It serves as the foundation for distributing traffic across multiple servers, which is our ultimate goal.
The following video from the official NGINX channel provides an excellent introduction to the concept and the core directive that makes it all possible: proxy_pass.
Configure NGINX as a Reverse Proxy
This video introduces the concept of a reverse proxy and explains how the proxy_pass directive works in Nginx.
Watch the initial explanation of what a reverse proxy is and how the proxy_pass directive is used. Focus on the segment from what what exactly is.
Passing Client Information to the Backend
A critical detail to understand is that when Nginx acts as a proxy, it establishes a new connection to the backend server. By default, your backend application will see all requests as coming from the Nginx server's IP address, not the original client's. This is a problem for logging, analytics, and any logic that depends on the client's IP.
To solve this, we must explicitly tell Nginx to forward the original request details using the proxy_set_header directive. These headers are a convention that most backend frameworks understand.
proxy_set_header Host $host;: Passes the originalHostheader from the client.proxy_set_header X-Real-IP $remote_addr;: Passes the original client's IP address.proxy_set_header X-Forwarded-For $proxy_add_x_forwarded_for;: Creates a list of all IPs the request has passed through.proxy_set_header X-Forwarded-Proto $scheme;: Tells the backend whether the original client request was HTTP or HTTPS.
This next segment of the video explains why this is necessary and demonstrates how to use proxy_set_header.
Configure NGINX as a Reverse Proxy
This part of the video covers the importance of proxy_set_header and shows a practical demonstration.
First, watch the explanation of why you need to forward headers from one thing we need. Then, follow the practical demo where a basic reverse proxy is configured (quickly jump into a demo) and then updated to include proxy_set_header and custom logging to verify the result (to try and capture).
From Reverse Proxy to Load Balancer
Now that we have a working reverse proxy for a single server, extending it to a load balancer is straightforward. Instead of pointing proxy_pass to a single server, we point it to an upstream block, which defines a pool of backend servers.
This upstream block is the core of Nginx's load balancing capabilities.
Nginx Reverse Proxy: 5-Step Setup in 10 Min [2026] - Tech Insider
The "Tech Insider" article provides a production-grade configuration for both a reverse proxy and a load balancer. It's an excellent reference for best practices.
First, read through Step 4, Configuring Nginx as a Reverse Proxy. Pay close attention to the full configuration example. Notice the use of an upstream block even for a single server and the essential proxy_set_header directives. Next, read Step 6, Load Balancing with Nginx. This section explains how to expand the upstream block to include multiple servers and introduces key concepts like load balancing algorithms and health checks.
Load Balancing Algorithms and Health Checks
Nginx offers several methods for deciding which server in the upstream pool should receive the next request. For open-source Nginx, the most common are:
- Round Robin (Default): Requests are distributed evenly across the servers in sequence. Simple and effective for homogenous backends where requests are of similar complexity.
- Least Connections (
least_conn): Nginx sends the next request to the server with the fewest active connections. This is a smarter choice for scenarios where some requests may take longer to process than others, preventing one server from getting overloaded. - IP Hash (
ip_hash): The server is chosen based on a hash of the client's IP address. This ensures that requests from the same client will always be directed to the same server (as long as it's available). This is crucial for stateful applications that require session persistence, but can lead to uneven load distribution. - Weighted: You can assign a
weightto each server. A server with a higher weight will receive proportionally more traffic. This is useful when your backend servers have different hardware capacities.
The official NGINX documentation provides a concise overview of these methods.
Using nginx as HTTP load balancer
This is the official documentation for Nginx load balancing. It's the ultimate source of truth.
Read the sections covering the main load balancing mechanisms, least-connected, session persistence (ip-hash), weighted load balancing, and passive health checks.
The following video provides a fantastic hands-on demonstration of configuring an upstream group and observing how weighted round-robin works in practice.
This video from the NGINX channel is a practical walkthrough of setting up a load balancer.
Start by watching the introduction to the upstream directive from nginx uh what you do. Next, watch the explanation of the default weighted round-robin algorithm from nginx uses the weighted round robin. Finally, watch the full practical demo from now it's time, which shows how to configure an upstream group and observe the traffic distribution changing as server weights are adjusted.
A crucial feature for a resilient system is health checks. Nginx can automatically detect if a backend server has failed and temporarily stop sending traffic to it. The max_fails and fail_timeout parameters on each server line in the upstream block control this behavior. If a server fails max_fails consecutive times, Nginx will consider it down for the fail_timeout duration before trying to send traffic to it again.
A Complete Load Balancer Configuration
Let's synthesize everything into a complete, annotated configuration for a load balancer. This example uses the least_conn algorithm, assigns weights to servers, and includes passive health checks and a backup server.
# /etc/nginx/conf.d/loadbalancer.conf
# This block defines the pool of backend application servers.
upstream app_cluster {


    # Use the 'least_conn' algorithm to send requests to the server
    # with the fewest active connections.
    least_conn;


    # Define the primary servers.
    # Nginx will stop sending traffic to a server if 3 failures occur
    # within 30 seconds. It will be marked as down for 30s.
    server 10.0.1.10:8080 weight=5 max_fails=3 fail_timeout=30s;
    server 10.0.1.11:8080 weight=5 max_fails=3 fail_timeout=30s;
    server 10.0.1.12:8080 weight=3 max_fails=3 fail_timeout=30s; # This server has less capacity


    # Define a backup server. It only receives traffic if all
    # primary servers are unavailable.
    server 10.0.1.20:8080 backup;


    # Keep a cache of idle connections open to the backends for performance.
    keepalive 128;
}

server {
    listen 443 ssl http2;
    server_name app.example.com;


    # SSL/TLS configuration would go here...
    # ssl_certificate /path/to/fullchain.pem;
    # ssl_certificate_key /path/to/privkey.pem;

    location / {


        # Pass all requests to the 'app_cluster' upstream group.
        proxy_pass http://app_cluster;


        # Forward essential client headers to the backend.
        proxy_set_header Host $host;
        proxy_set_header X-Real-IP $remote_addr;
        proxy_set_header X-Forwarded-For $proxy_add_x_forwarded_for;
        proxy_set_header X-Forwarded-Proto $scheme;


        # Settings to enable keep-alive connections to the upstream.
        proxy_http_version 1.1;
        proxy_set_header Connection "";


        # Configure failover behavior. If a request fails with one of these errors,
        # Nginx will try the next server in the upstream group.
        proxy_next_upstream error timeout http_502 http_503 http_504;
    }
}
This configuration provides a robust starting point for a production environment. It not only distributes load but also automatically handles server failures, a key requirement for building highly available systems.
Nginx in a Containerized World
In modern deployments, your Go or JavaScript backend services are likely running inside Docker containers. Nginx integrates seamlessly into this workflow. You run Nginx in its own container and, within the Nginx configuration, you use the Docker service names as the hostnames in your upstream block. Docker's internal DNS handles resolving these names to the correct container IP addresses.
The "Tech Insider" article you reviewed has an excellent section on this pattern. It's worth a second look if you're interested in how this is implemented with docker-compose.
Nginx Reverse Proxy: 5-Step Setup in 10 Min [2026] - Tech Insider
This section provides a complete docker-compose.yml file and corresponding Nginx configuration to demonstrate how to use Nginx as a reverse proxy in a containerized environment.
Review Step 9, Docker and Nginx as a Containerized Reverse Proxy. Notice how the upstream block in the Nginx config uses service names like api and frontend, which match the service names defined in the docker-compose.yml file.
Conclusion
In this lesson, you've moved from theory to a practical, hands-on understanding of how to configure Nginx as a reverse proxy and load balancer. This is a fundamental skill for any engineer working on scalable backend systems.
Key Takeaways:
- Reverse Proxy: Nginx uses the
proxy_passdirective to forward requests to a backend server, providing a secure and manageable entry point to your application. - Preserving Client Info: The
proxy_set_headerdirective is essential for passing original client information like IP address and protocol to your backend applications. - Load Balancing: The
upstreamblock defines a pool of backend servers, enabling Nginx to distribute traffic and improve scalability and availability. - Algorithms & Health Checks: You can choose a load balancing algorithm (
least_conn,ip_hash) and configure passive health checks (max_fails) to build a smart, resilient system.
In our next lesson, we will address a critical question: now that your services are running behind a load balancer, how do you know if they are healthy and meeting performance expectations? We will explore this by learning to define and track Service Level Indicators (SLIs) and Service Level Objectives (SLOs), the language of reliability in modern engineering.