
Hello! Welcome back to our Secure ThinkPad project.
In the last lesson, we performed a crucial piece of digital surgery. We took a clean backup of your x230's firmware and used the me_cleaner script to create neutralized-12MB.bin, a modified image where the Intel Management Engine has been functionally disabled. This was a massive step in reducing your laptop's Trusted Computing Base (TCB).
This lesson is the final preparatory step before we create our new firmware. We will now instruct the Coreboot build system on exactly how to construct our desired firmware image. Think of the previous steps as gathering and preparing high-quality ingredients; today, we write the recipe.
Lesson Outline
This lesson focuses on the learning outcome: Configure the Coreboot build for the x230, selecting a payload (e.g., SeaBIOS) and specifying the neutralized ME region.
We will cover:
- Preparing the Blobs: Extracting the necessary proprietary components (the descriptor, network firmware, and our neutralized ME) from the firmware image.
- Understanding Payloads: Discussing the role of a "payload" like SeaBIOS and why Coreboot needs one.
- The Configuration Blueprint: A guided tour through the Coreboot configuration menu (
nconfig) to create the.configfile that will direct the build process.
Estimated time to complete: 60 minutes.
1. Preparing the Ingredients: The Binary Blobs
As we've discussed, Coreboot's philosophy is to be as open-source as possible. However, to initialize the complex hardware of a modern machine like the x230, it still relies on a few proprietary, closed-source binary blobs provided by the manufacturer. Our goal is to use the absolute minimum required.
In the previous module, you set up the Coreboot build environment and cloned the source code. Now, we need to extract these blobs and place them where the build system can find them. The key insight here is that we will extract these blobs from the neutralized-12MB.bin file you created in the last lesson. This ensures that the ME blob we use is the one we've already "cleaned."
Step 1: Extracting Blobs with ifdtool
The Intel Firmware Descriptor (IFD) acts as a table of contents for the firmware chip, defining the different regions. We'll use Coreboot's ifdtool (Intel Firmware Descriptor tool) to parse our neutralized image and extract the required parts.
Navigate to your Coreboot source directory and run the following commands. Make sure you have the neutralized-12MB.bin file handy.
# Navigate to the ifdtool directory within your coreboot source
cd ~/coreboot/util/ifdtool

# If you haven't already, build the tool
make

# Copy your neutralized firmware image into the current directory for ease of use
# Adjust the path as necessary
cp /path/to/your/neutralized-12MB.bin .

# Use ifdtool to extract the regions from your neutralized image
./ifdtool -x neutralized-12MB.bin
This command will produce several files. We are interested in three of them:
flashregion_0_flashdescriptor.bin: The firmware's "map."flashregion_2_intel_me.bin: The Management Engine region. Crucially, this is the neutralized version.flashregion_3_gbe.bin: The firmware for the Gigabit Ethernet controller.
Step 2: Staging the Blobs
The Coreboot build system expects to find these blobs in a specific directory. Let's rename them and move them into place.
# Still in ~/coreboot/util/ifdtool

# Rename the files to what the build system expects
mv flashregion_0_flashdescriptor.bin descriptor.bin
mv flashregion_2_intel_me.bin me.bin
mv flashregion_3_gbe.bin gbe.bin

# Create the target directory for the x230 blobs
mkdir -p ~/coreboot/3rdparty/blobs/mainboard/lenovo/x230/

# Move the blobs into the target directory
mv descriptor.bin me.bin gbe.bin ~/coreboot/3rdparty/blobs/mainboard/lenovo/x230/
Excellent. All our necessary components are now staged and ready. We can now proceed to write the "recipe" for the build.
2. The Blueprint: Configuring Coreboot with nconfig
The Coreboot build process is controlled by a .config file in the root of the source directory. Manually editing this file would be incredibly tedious. Instead, we use a menu-driven interface to generate it. We'll use nconfig, which provides a text-based UI inside your terminal.
Your background in statistics and MARL involves setting numerous parameters to define a model's behavior. Think of this configuration process in the same way: we are setting the parameters that define the "behavior" of your machine's boot process.
Navigate to the root of your Coreboot directory and launch the configuration utility:
cd ~/coreboot
make nconfig
You will be presented with a menu. Use the arrow keys to navigate and the spacebar to select options. We will now walk through the most important settings.
📖 Reading (10 mins)
The blog post by Cal Bryant provides an excellent walkthrough of the configuration process. We will follow a similar path, but with some key differences based on our prior work. Read through his configuration section to familiarize yourself with the menu options.
The "ultimate" Thinkpad X230 - Cal Bryant (Configuring coreboot)
Here is a guided tour of the essential options you need to set.
General setup
This section contains high-level options. One crucial but easily missed setting is for saving configuration changes you might make later (like boot order).
---> General setup[*] Use CMOS for configuration values(Ensure this is selected[*]). As noted in the video "Installing and Experimenting with Tianocore," forgetting this means your BIOS settings won't save.
Mainboard
Here, you tell Coreboot what hardware it's being built for.
---> MainboardMainboard vendor--->(Lenovo)Mainboard model--->(ThinkPad X230)ROM chip size--->(12288 KB (12 MB))(0x100000) Size of CBFS filesystem in ROM(Leave this at the default 1MB for now. We'll discuss this more in the Payload section).
Chipset
This is the most critical section for our current goal. Here we tell Coreboot to include our blobs.
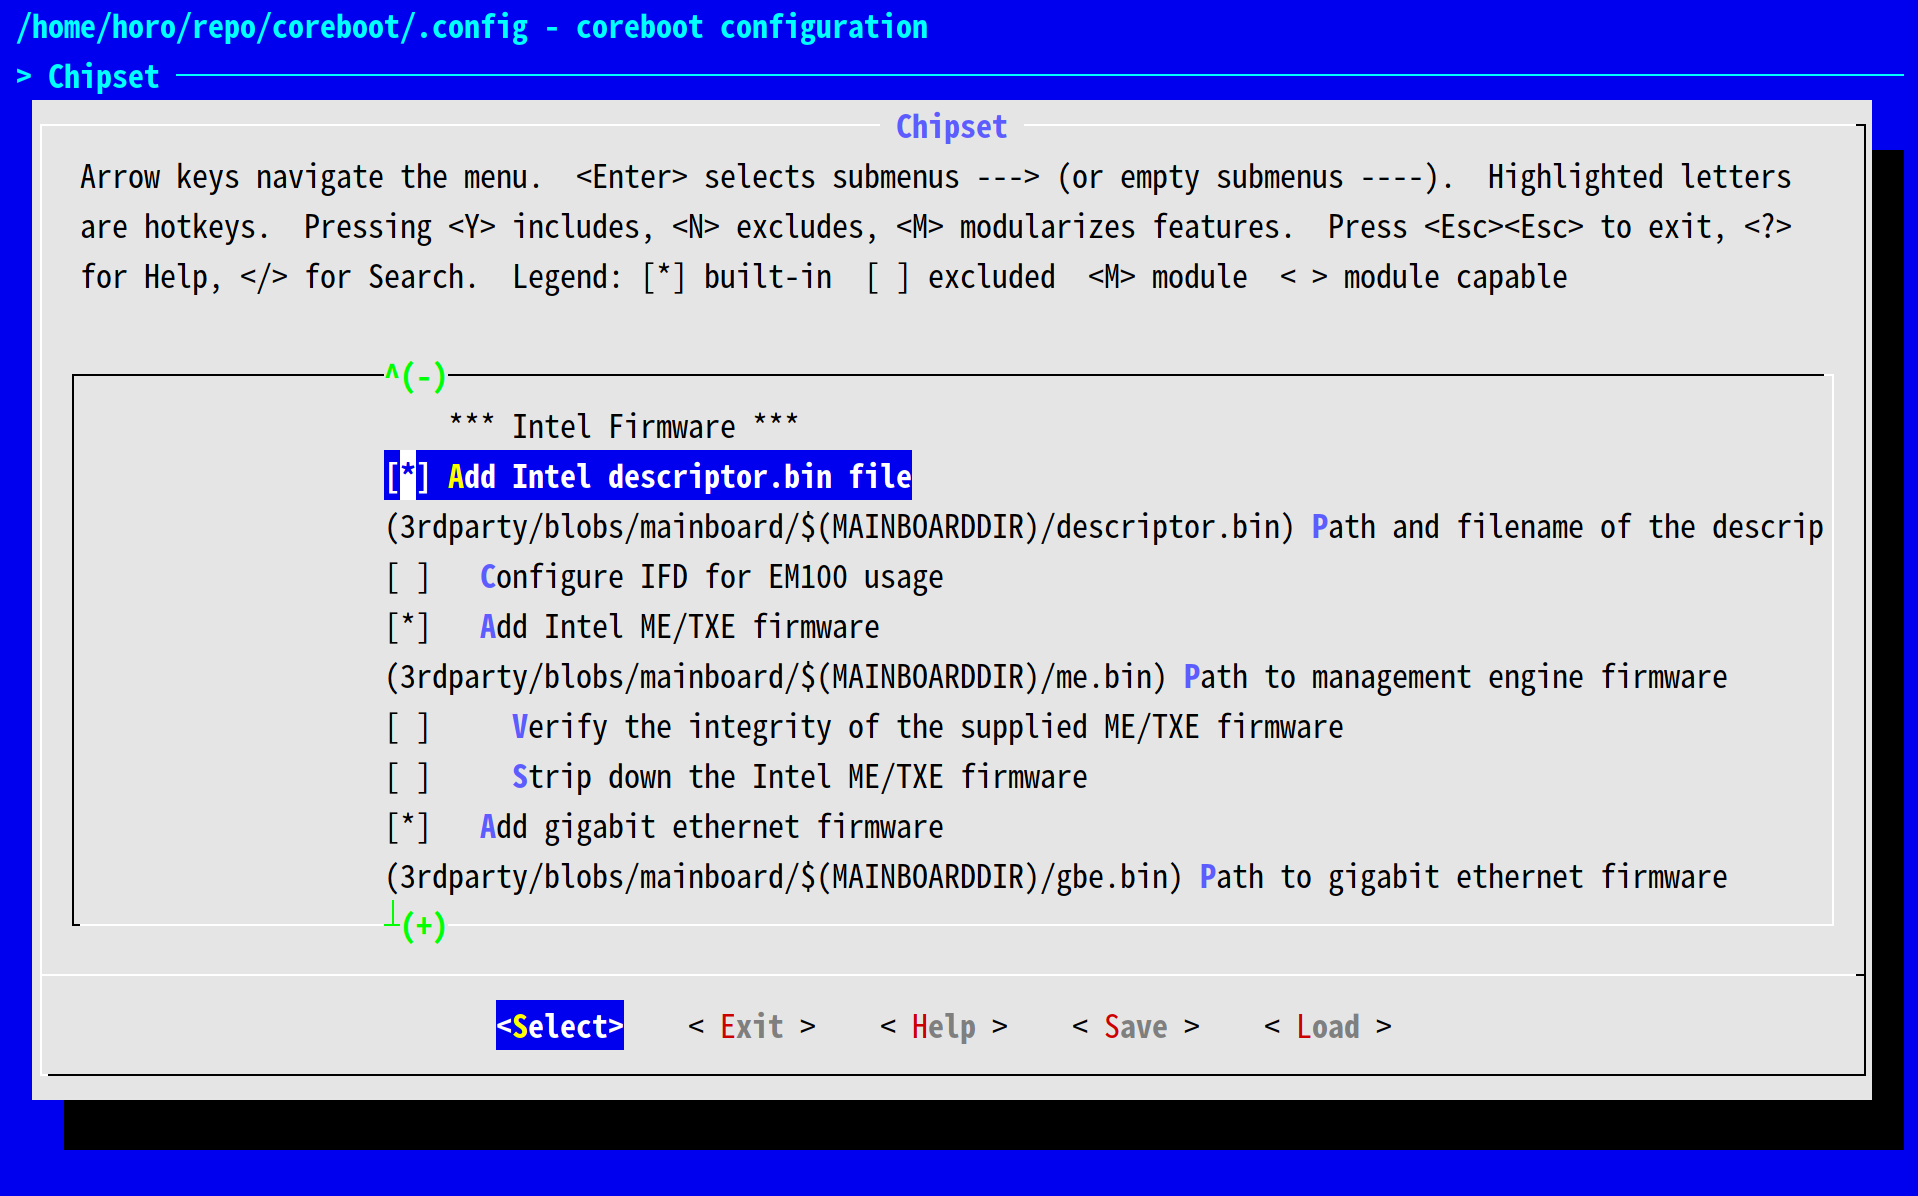
This is the Chipset configuration menu where you will point the build system to the blobs you just extracted.
---> Chipset[*] Include CPU microcode in CBFS(Highly recommended. This loads CPU bug fixes at the earliest possible moment).--- Intel Firmware[*] Add an Intel Firmware Descriptor---> Set the path to3rdparty/blobs/mainboard/$(MAINBOARDDIR)/descriptor.bin[*] Add Intel ME/TXE firmware---> Set the path to3rdparty/blobs/mainboard/$(MAINBOARDDIR)/me.bin[*] Verify the integrity of the supplied ME/TXE firmware(Enable this as a sanity check).- IMPORTANT: DO NOT select
[ ] Strip down the Intel ME/TXE firmware. The Cal Bryant guide suggests this because it assumes you are providing a clean ME blob. We are more deliberate: we have already created and verified our neutralized blob in the previous lesson. By providing the pre-neutralizedme.bin, we are simplifying the build process and ensuring the exact blob we prepared is the one being used. [*] Add gigabit ethernet firmware---> Set the path to3rdparty/blobs/mainboard/$(MAINBOARDDIR)/gbe.bin
Devices
Configure essential hardware like the display.
---> Devices---> Graphics initialization---> Select(Use libgfxinit)Display--->[*] Add a Video BIOS Table (VBT) binary to CBFS(This is needed for the graphics system to know how to handle the display panel).
Payload
Coreboot's job is just to initialize the hardware. Once it's done, it needs to pass control to another program to continue the boot process. This program is called the payload.
🎥 Watch (2 mins)
This video gives a concise overview of what Coreboot is and introduces the concept of payloads like SeaBIOS and Tianocore.
For our first build, we will use SeaBIOS, which is an open-source implementation of a traditional BIOS. It's robust, simple, and perfect for booting Linux-based operating systems like Qubes OS.
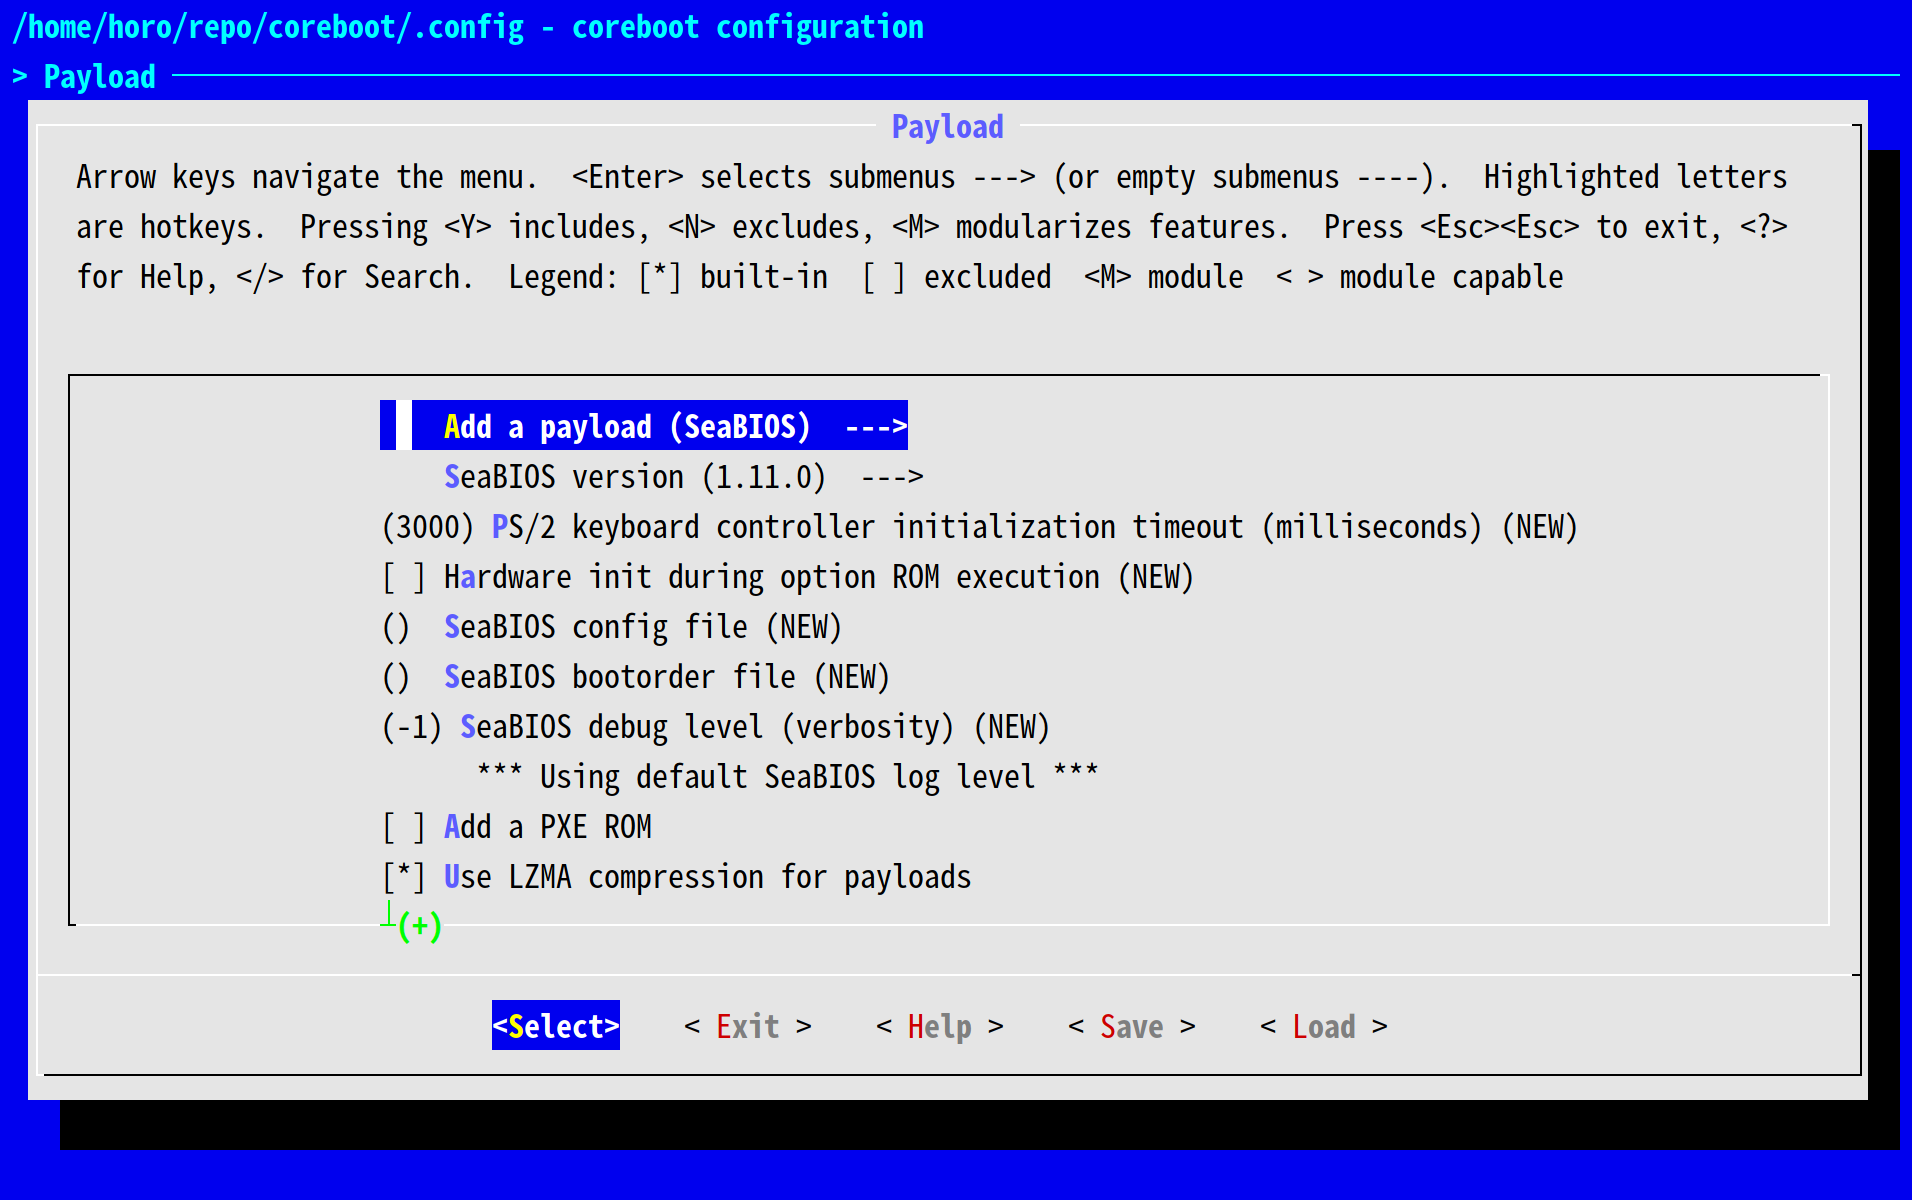
This is the Payload configuration menu where you will select SeaBIOS.
---> PayloadAdd a payload--->(SeaBIOS)- Leave the SeaBIOS version and other settings at their defaults for now.
A Note on Other Payloads: An alternative payload is Tianocore, which is an open-source UEFI implementation. You would need this if you wanted to boot modern versions of Windows or use features like Secure Boot. The Cal Bryant guide mentions needing to switch to Tianocore for Windows 10 and increasing the CBFS size to 2MB. We will stick with SeaBIOS for now, as it is perfectly suited for our goal of installing Qubes OS.
3. Saving the Configuration
Once you have set all the options as described above, press Esc repeatedly until you are asked to save your configuration. Select < Yes >. This will write all your choices into a file named .config in the root of your Coreboot directory.
You have now created the master blueprint for your new firmware.
Conclusion
Excellent work. This was a dense but critical lesson. You've gone from having a set of raw materials (source code, neutralized blob) to a complete, formal specification of the firmware you intend to build.
Key Takeaways:
- Coreboot requires proprietary blobs for the flash descriptor (
descriptor.bin), Gigabit Ethernet (gbe.bin), and the Intel ME (me.bin). - We extracted these blobs from our
neutralized-12MB.binfile to ensure we use the version of the ME that we have already disabled. - The
make nconfigcommand opens a menu to configure the build, which generates a.configfile. - Key configuration steps include setting the mainboard to x230, including CPU microcode, and pointing the build system to the correct blob files.
- A payload is the software Coreboot runs after it finishes initializing hardware. We have selected SeaBIOS, a traditional open-source BIOS, as our payload.
Next Up
With the blueprint (.config) finalized and all the ingredients (blobs) in place, the only thing left is to run the compiler. In the next lesson, you will execute the make command, which will read your configuration, compile thousands of lines of C code, and package everything together into the final coreboot.rom image. This is the image we will ultimately flash onto the hardware.
Can't find a good explanation? Sign up and we'll make it for you
Sign up