
Welcome to your first lesson in drafting a bodice pattern from scratch. Your goal is to create a foundational, fitted top pattern—often called a "bodice block" or "sloper"—that is tailored to your unique measurements. This block will serve as a versatile template for future designs.
Before we can draw a single line, we must address a fundamental concept in patternmaking: the space between your body and the fabric. If you were to draft a pattern using your exact body measurements, the resulting garment would be like a second skin, constricting your movement and even your breathing. This is where 'ease' comes in.
In this lesson, you will learn to define and differentiate the types of ease, and most importantly, you will calculate the precise "working measurements" for your fitted bodice. These adjusted measurements, which incorporate ease, are the critical numbers you'll need to begin drafting the pattern framework in our next lesson.
What is Ease? The Invisible Architecture of Fit
At its core, ease is simply the difference between your body's measurements and the finished garment's measurements. It's the extra room deliberately built into a pattern. However, not all ease is created equal. Patternmakers distinguish between two critical types: wearing ease and design ease.
- Wearing Ease is the minimum amount of room required for a garment to be functional. It allows you to breathe, sit, bend, and move your arms without straining the fabric or seams. For garments made from non-stretch woven fabrics, wearing ease is non-negotiable. This is the type of ease we will focus on for creating your foundational bodice block.
- Design Ease is the additional volume added to create a specific silhouette or style. It's the difference between a close-fitting sheath dress and a billowy, oversized shirt, even if both are made for the same person. Design ease is a stylistic choice, added after the foundational block is established.
Understanding this distinction is key. Your goal is to first create a perfect block with only the necessary wearing ease. This block then becomes a reliable foundation from which you can later add any amount of design ease to create different styles.
To see this concept in action, watch the following segment from the video "(Wearing) Ease in the Bodice Block".
(Wearing) Ease in the Bodice Block (Part 2, Bodice Block Essentials)
This video provides an excellent visual breakdown of the concept.
Watch the section from the explanation, where the presenter distinguishes between the two types of ease and shows how a garment with only wearing ease fits snugly, while another has added design ease for fullness.
How Much Wearing Ease for a Fitted Bodice?
The amount of wearing ease needed depends on the desired fit. Since you're creating a close-fitting bodice block, we will use standard, minimal values. These values ensure you have enough room for movement without adding stylistic volume.
Different drafting systems use slightly different amounts, but they generally fall within a well-established range. This "Ease Allowance Chart" provides a helpful overview of typical ease amounts for various garments.

For a standard, versatile bodice block, the following amounts are a reliable starting point:
- Bust: 5 cm (approx. 2 inches) of total ease.
- Waist: 2.5 cm (approx. 1 inch) of total ease.
These values will give you a block that fits closely to the body but isn't restrictive. You will use this block as a base, and for any future design, you can decide whether to add more ease for a looser fit.
Calculating Your Working Measurements
Now that you have your target ease amounts, you can calculate the "working measurements." These are the final numbers you will use to draft your pattern. You'll be adding the ease to your body measurements.
The logic of adding ease is straightforward. The total ease is added around the circumference of the body. Since your paper pattern will represent half of the body (a front piece and a back piece, which are then cut on folded fabric or as mirrored pairs), we need to work with half-measurements.
Here is the general principle for horizontal ease distribution:
Total Ease ÷ 4 = Amount added to each side seam (front right, front left, back right, back left)
However, for the initial drafting of the framework, it's simpler to work with the total working circumference. Let's walk through an example.
Example Calculation:
- Your Bust Measurement: 90 cm
- Your Waist Measurement: 70 cm
-
Calculate Working Bust Measurement:
-
Calculate Working Waist Measurement:
The most important number you need for the next lesson is the total width of your block. This is half of your working bust measurement.
- Calculate Bodice Block Width:
This 47.5 cm is the width of the rectangle you will draw in the next lesson, representing the combined width of your front and back pattern pieces.
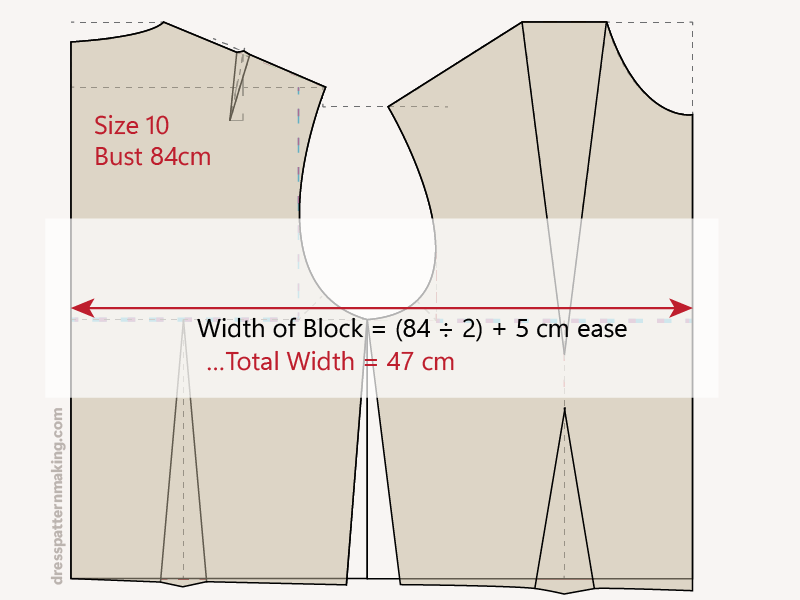
The image below from Dresspatternmaking.com illustrates a similar calculation. It takes half the bust measurement and adds 5 cm of ease. This means 5 cm is added to the half-pattern, resulting in a total of 10 cm (approx. 4 inches) of ease around the full body. This creates a "fitted" rather than "close-fitting" block, demonstrating how different ease amounts create different fits.
For a more detailed look at the principles of ease, including where and how it's distributed, the following article is an excellent resource.
The Complete Guide to Adding Ease: Where, How Much, and In ...
This article by Kehinde Oni provides a clear, methodical guide to applying ease, which will reinforce the concepts we've discussed.
Focus on these key sections: "The Rule," which establishes that ease is primarily added at the side seams. The section on "The Math," which explains the 'divide by 4' principle. The instructions "For a Fitted Bodice," which are directly applicable to your goal. Finally, read the "Takeaway" section for a concise summary of the core principles.
Your Turn: Calculate Your Measurements
Now, use the measurements you've already taken to calculate your personal working measurements. These will be the foundation for your custom pattern.
| Measurement Name | Your Measurement | Ease to Add | Your Working Measurement |
|---|---|---|---|
| Bust | __________ cm | + 5 cm | __________ cm |
| Waist | __________ cm | + 2.5 cm | __________ cm |
Once you have your Working Bust Measurement, calculate the final number you'll need for our next session:
- Your Bodice Block Width (Working Bust ÷ 2): __________ cm
Keep this number handy. It is the starting point for everything that follows.
Conclusion
In this lesson, you've moved from raw body measurements to actionable, draft-ready numbers. You now understand the critical difference between wearing ease (for function) and design ease (for style) and have calculated the precise amounts of wearing ease needed for your fitted bodice block. This process of defining parameters before drafting is the bedrock of methodical patternmaking.
Key Takeaways:
- Ease is the essential space added to a pattern for fit and movement.
- Wearing ease is the functional minimum, while design ease is a stylistic choice.
- A standard fitted bodice block incorporates minimal wearing ease—we're using 5 cm at the bust and 2.5 cm at the waist.
- Your working measurements (body measurements + ease) are the numbers used for drafting.
In the next lesson, you will take your "Bodice Block Width" and use it, along with your key vertical measurements, to draft the core rectangular framework for your pattern. This is the first exciting step in translating these abstract numbers into the tangible outline of your future garment.
Can't find a good explanation? Sign up and we'll make it for you
Sign up