
Hello! Welcome back to our course on Solana development.
In our previous lesson, we established robust patterns for managing state in a dApp. We saw how to use the Wallet Adapter's built-in React Context for global wallet data and how a library like Zustand provides a flexible, performant solution for custom client-side state.
Today, we will combine these concepts to tackle one of the most critical aspects of dApp user experience: managing the lifecycle of a transaction. The goal of this lesson is to learn how to design and implement a state machine to model the lifecycle of a transaction, from its creation to its final confirmation on the blockchain. By correctly modeling this process, you can build UIs that are predictable, provide clear feedback to the user, and gracefully handle the many paths a transaction can take.
1. The Complex Lifecycle of a Solana Transaction
From a user's perspective, a transaction might seem simple: click a button, approve, and it's done. As a developer, you know the reality is far more intricate. A transaction progresses through multiple stages, each with the potential for success, failure, or delay.
A simplified, ideal path looks like this:

This linear flow is a good starting point, but the reality on a high-throughput network like Solana involves more nuance.
To get a better sense of this journey, let's watch an overview of a Solana transaction's path.
Everything you need to know about Solana transactions!
This video, "Everything you need to know about Solana transactions!" from Abdullah Raza, provides a clear, high-level overview of a transaction's journey.
Watch the section on the 'Solana Transaction Lifecycle' from 00:53 to 02:39. Focus on the key stages the presenter outlines: forming the transaction, simulation, user signing, broadcasting, and final confirmation.
As the video highlights, the key stages are:
- Composing/Forming: Your dApp constructs the transaction, specifying instructions, accounts, and a recent blockhash.
- Simulating: (Optional but highly recommended) The transaction is simulated against the current ledger state to catch potential errors before the user even signs. This is a "pre-flight check."
- Signing: The user is prompted by their wallet to approve and sign the transaction with their private key.
- Sending/Broadcasting: The signed transaction is sent to an RPC node, which forwards it to the current network leader.
- Confirming: The transaction is processed by the leader, included in a block, and validated by the network.
Solana's Confirmation Levels
The "Confirming" stage on Solana isn't a single event. Due to its architecture, confirmation is a multi-step process. Understanding these levels is vital for providing accurate feedback to the user.
Simplifying the Solana Transaction Lifecycle
The article 'Simplifying the Solana Transaction Lifecycle' by Aman Satyawani provides an excellent breakdown of the entire process. We'll focus on its definition of the final status stages.
Read the short section titled 'Transaction Status Stages' near the end of the article. You can find it under 'Phase 5 and 6: Block Verification and Consensus'. Note the definitions for 'Processed', 'Confirmed', and 'Finalized'.
To summarize the confirmation levels:
- Processed: The transaction has been received by a leader and included in a block, but the block is not yet voted on. This is the first indication of success, but it's not irreversible.
- Confirmed: The block has been voted on by a supermajority (2/3) of validators. At this point, it's very unlikely to be rolled back. Most dApps consider this level sufficient for confirming success to the user.
- Finalized: The block has reached the maximum lockout period, meaning it's considered irreversible. This provides the highest level of security.
The Non-Linear Reality
The path is rarely a straight line. Users can cancel, network conditions can cause delays, and transactions can fail in different ways.
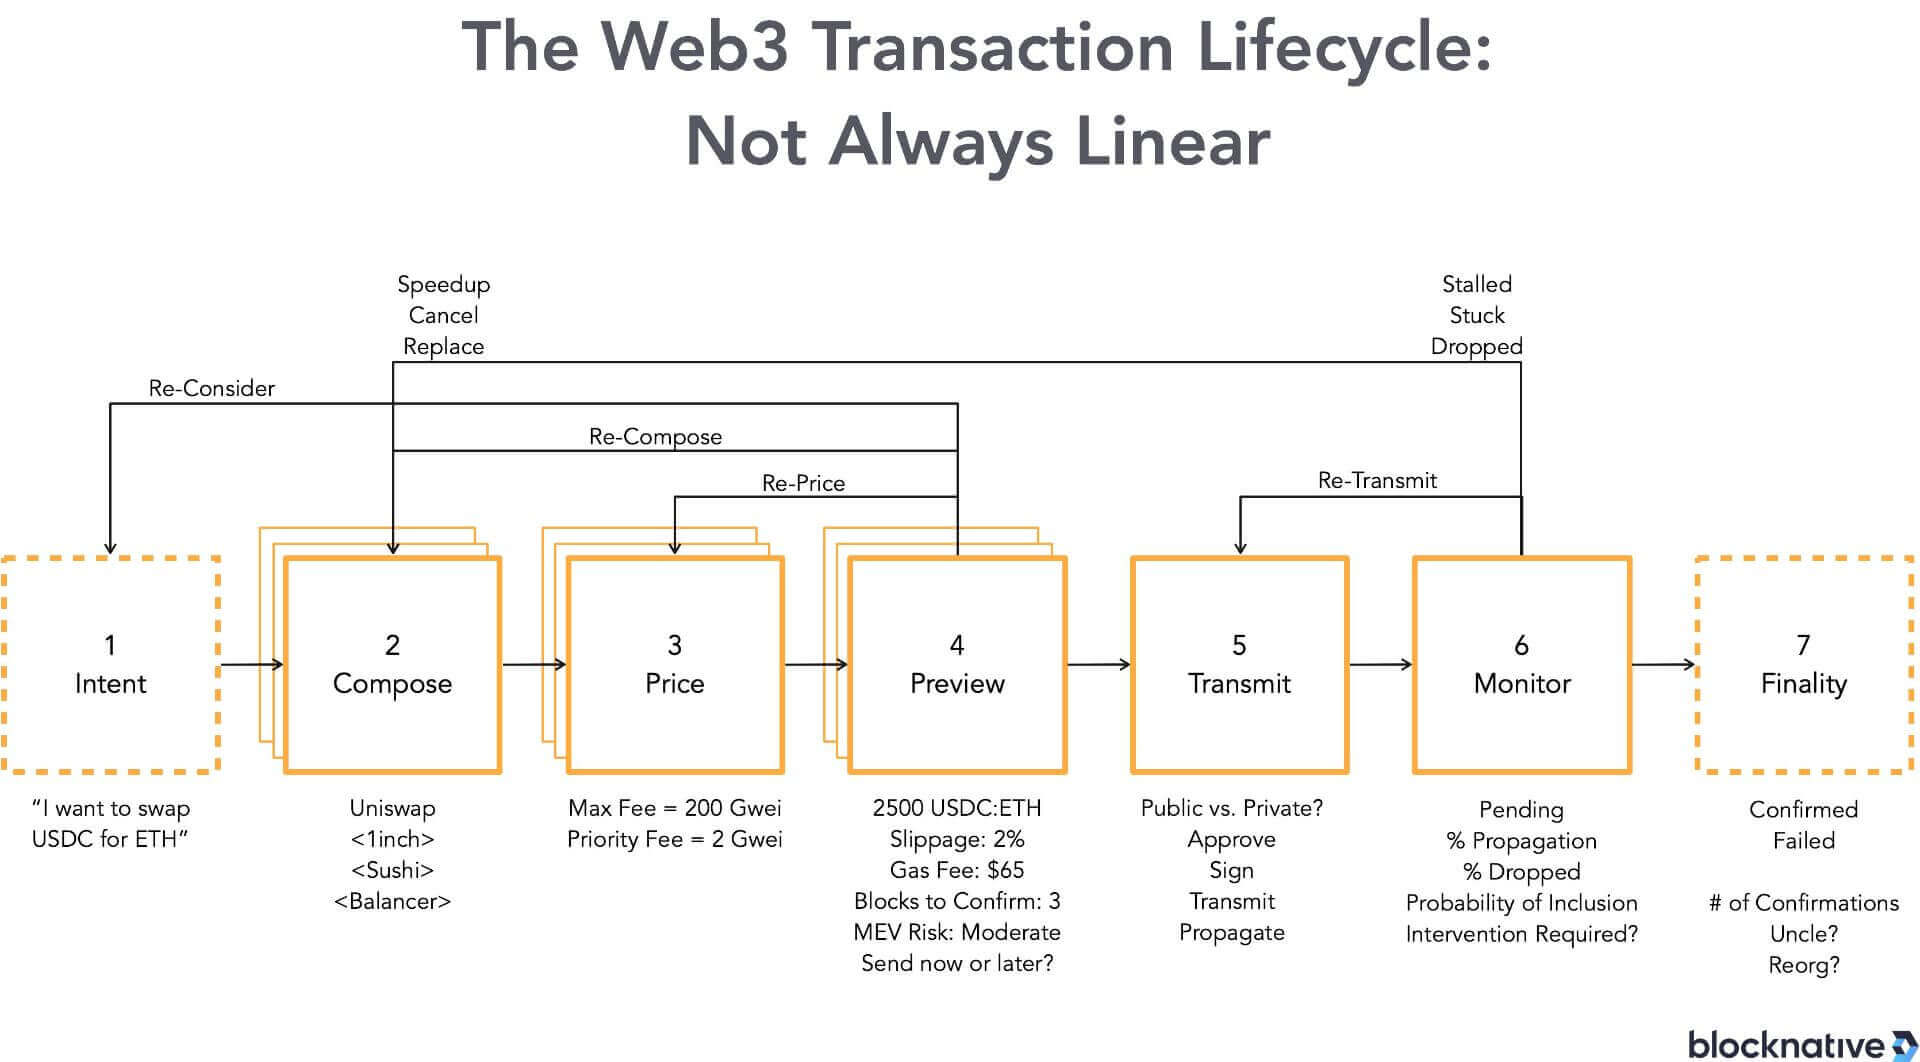
A transaction can be:
- Rejected: The user denies the signature request in their wallet.
- Failed: The transaction is processed on-chain but results in an error (e.g., a logic error in the program, insufficient funds). The user still pays the fee.
- Dropped: The transaction never makes it into a block, perhaps due to network congestion or a low priority fee.
Managing all these states with simple booleans (isLoading, isError, isSuccess) quickly becomes a tangled mess. This is where state machines excel.
2. The Finite State Machine (FSM) Pattern
A Finite State Machine is a model of computation that is always in one of a finite number of states. It can only transition from one state to another in response to specific events, and these transitions are explicitly defined.
Given your background in engineering, you've likely encountered FSMs before. In UI development, they provide a powerful way to manage complexity by making state transitions predictable and preventing impossible states (e.g., being in both a success and error state simultaneously).
This Library Makes State Management So Much Easier
The video 'This Library Makes State Management So Much Easier' from Web Dev Simplified gives a great introduction to state machines and the XState library, which formalizes this pattern.
First, watch from 00:00 to 02:06 to understand the core concept of a state machine using the traffic light analogy. Then, jump to 04:08 and watch until 06:50 to see how a state machine can model a complex asynchronous operation (a fetch request), which is very analogous to a blockchain transaction.
As the video demonstrates, an FSM gives us:
- Explicitness: All possible states are clearly defined.
- Control: Transitions between states are governed by strict rules.
- Robustness: It's impossible for the application to enter an invalid or ambiguous state.
- Centralization: All the complex logic for the flow is contained in one place.
3. Designing Our Transaction State Machine
Let's design an FSM for our Solana transaction. We'll need to define our states and the events that cause transitions between them.
States:
idle: The initial state. No transaction is in progress.simulating: The transaction is being simulated before signing.signing: Waiting for the user to approve the transaction in their wallet.sending: The signed transaction has been sent to the RPC.confirming: Waiting for network confirmation. We'll store the current confirmation level (processed,confirmed) in this state's data.success: The transaction has been finalized. We'll store the transaction hash.error: An error occurred. We'll store the error message.rejected: The user rejected the signature request.
Events:
SUBMIT: The user initiates the transaction.SIMULATION_SUCCESS: The pre-flight check passed.SIGN_SUCCESS: The user signed the transaction.SEND_SUCCESS: The RPC accepted the transaction.CONFIRMATION_UPDATE: The transaction reached a new confirmation level.FINALIZED: The transaction is finalized.REJECT: The user cancelled the signature prompt.FAIL: An error occurred at any stage (simulation, sending, confirmation).RESET: The user dismisses the result and returns to the idle state.
This leads to a flow like this:idle → simulating → signing → sending → confirming → success
With off-ramps to rejected or error at almost any step.
4. Implementing the State Machine with TypeScript and Zustand
Now, let's translate this design into code. We'll use the patterns from our previous lessons: TypeScript for type safety and Zustand for state management.
Modeling States with Discriminated Unions
A powerful TypeScript feature for FSMs is the discriminated union. We define a common property (e.g., kind or status) that allows TypeScript to narrow the type of the state object within our logic.
Robust Frontend Development for Web3 dApps: Best Practices
The article 'Robust Frontend Development for Web3 dApps: Best Practices' from Kitemetric demonstrates this exact pattern.
Read sections 1, 2, 3, and 10. Pay close attention to the code snippet in section 1 ('Leveraging Discriminated Unions for Type Safety'). Notice how each state is a type with a unique kind, and the final TxNormalState is a union of them all. Also, observe the reducer function in section 3, which uses a switch statement—a common pattern for implementing state transitions.
Following this pattern, we can define our states and events:
// --- States ---
type TxState =
  | { status: 'idle' }
  | { status: 'simulating' }
  | { status: 'signing' }
  | { status: 'sending'; txSignature: string }
  | { status: 'confirming'; txSignature: string; confirmation: 'processed' | 'confirmed' }
  | { status: 'success'; txSignature: string }
  | { status: 'error'; error: Error }
  | { status: 'rejected' };

// --- Events ---
type TxEvent =
  | { type: 'SUBMIT' }
  | { type: 'SIMULATION_SUCCESS' }
  | { type: 'SIGN_SUCCESS'; txSignature: string }
  | { type: 'SEND_SUCCESS' } // Note: In practice, SEND_SUCCESS is often assumed after SIGN_SUCCESS
  | { type: 'CONFIRMATION_UPDATE'; confirmation: 'processed' | 'confirmed' }
  | { type: 'FINALIZED' }
  | { type: 'FAIL'; error: Error }
  | { type: 'REJECT' }
  | { type: 'RESET' };
Implementing with a Zustand Store
We can create a Zustand store to hold our state machine. The store will contain the current state and a send function (analogous to dispatch in Redux) that takes an event and computes the next state.
Here is a simplified implementation:
import { create } from 'zustand';

// (States and Events defined as above)

interface TxStore {
  state: TxState;
  send: (event: TxEvent) => void;
}

const useTransactionStore = create<TxStore>((set) => ({
  state: { status: 'idle' },
  send: (event) => set((store) => {
    const { state } = store;

    // This reducer logic determines the next state based on the current state and the event.
    switch (state.status) {
      case 'idle':
        if (event.type === 'SUBMIT') return { state: { status: 'simulating' } };
        break;
      case 'simulating':
        if (event.type === 'SIMULATION_SUCCESS') return { state: { status: 'signing' } };
        if (event.type === 'FAIL') return { state: { status: 'error', error: event.error } };
        break;
      case 'signing':
        if (event.type === 'SIGN_SUCCESS') return { state: { status: 'sending', txSignature: event.txSignature } };
        if (event.type === 'REJECT') return { state: { status: 'rejected' } };
        if (event.type === 'FAIL') return { state: { status: 'error', error: event.error } };
        break;
      case 'sending':
        // Here you would start listening for confirmation
        // Let's assume we immediately move to confirming for simplicity
        return { state: { status: 'confirming', txSignature: state.txSignature, confirmation: 'processed' } };
      case 'confirming':
        if (event.type === 'CONFIRMATION_UPDATE') return { ...store, state: { ...state, confirmation: event.confirmation } };
        if (event.type === 'FINALIZED') return { state: { status: 'success', txSignature: state.txSignature } };
        if (event.type === 'FAIL') return { state: { status: 'error', error: event.error } };
        break;
      case 'success':
      case 'error':
      case 'rejected':
        if (event.type === 'RESET') return { state: { status: 'idle' } };
        break;
    }
    // If no transition is matched, return the current store state
    return store;
  }),
}));
In your React component, you would orchestrate the flow:
function MyTransactionButton() {
  const { state, send } = useTransactionStore();
  const { connection } = useConnection();
  const { publicKey, signTransaction } = useWallet();

  const handleTransaction = async () => {
    if (!publicKey || !signTransaction) return;

    send({ type: 'SUBMIT' });

    try {
      // 1. Compose & Simulate
      const transaction = new Transaction().add(/* your instruction here */);
      transaction.feePayer = publicKey;
      transaction.recentBlockhash = (await connection.getLatestBlockhash()).blockhash;

      const simulationResult = await connection.simulateTransaction(transaction);
      if (simulationResult.value.err) {
        throw new Error('Simulation failed!');
      }
      send({ type: 'SIMULATION_SUCCESS' });

      // 2. Sign
      const signedTransaction = await signTransaction(transaction);
      const signature = await connection.sendRawTransaction(signedTransaction.serialize());
      send({ type: 'SIGN_SUCCESS', txSignature: signature });

      // 3. Confirm
      const confirmation = await connection.confirmTransaction(signature, 'confirmed');
      if (confirmation.value.err) {
        throw new Error('Transaction failed confirmation');
      }
      send({ type: 'FINALIZED' });

    } catch (error) {
      if (error.name === 'WalletSignTransactionError') {
         send({ type: 'REJECT' });
      } else {
         send({ type: 'FAIL', error: error as Error });
      }
    }
  };

  // Render UI based on state.status
  switch (state.status) {
    case 'idle':
      return <button onClick={handleTransaction}>Submit Transaction</button>;
    case 'simulating':
    case 'signing':
      return <button disabled>Processing...</button>;
    case 'success':
      return <div>Success! Tx: {state.txSignature}</div>;
    // ... other cases
  }
}
Note: The code above simplifies the confirmation logic for clarity. A real implementation would use connection.onSignature or a loop with getSignatureStatuses to dispatch CONFIRMATION_UPDATE events.
Test your understanding!
Looking at the useTransactionStore implementation, if the current state is signing and a SUBMIT event is received (e.g., the user clicks the button again), what happens and why? How does this demonstrate the benefit of a state machine?
Show answer
Nothing happens. The switch (state.status) block for the case 'signing' only handles SIGN_SUCCESS, REJECT, and FAIL events. It has no rule for a SUBMIT event, so the reducer returns the existing state.
This demonstrates a key benefit of a state machine: it prevents invalid state transitions. The UI is locked in a "signing" state, and accidental double-clicks or other user actions that don't make sense in that context are simply ignored by the state logic, preventing bugs and race conditions.
Conclusion
In this lesson, we dissected the complex, non-linear lifecycle of a Solana transaction and designed a robust model to manage it using a Finite State Machine.
Your key takeaways are:
- A Solana transaction goes through multiple stages: composing, simulating, signing, sending, and confirming (processed, confirmed, finalized).
- The path is not always linear; transactions can be rejected, failed, or dropped, requiring your UI to respond accordingly.
- Finite State Machines (FSMs) are a powerful pattern for managing this complexity by defining explicit states and transitions, preventing invalid application states.
- Implementing an FSM with TypeScript's discriminated unions provides type safety, while a global state library like Zustand is an excellent tool for housing the state and reducer logic.
You now have a solid architectural pattern for handling any user-initiated, asynchronous flow in your dApp. In our next lesson, we will build upon this by diving deeper into the error state. We will learn how to handle transaction submission errors from the wallet or RPC and display user-friendly feedback, making your dApp not just robust, but also truly professional.
Can't find a good explanation? Sign up and we'll make it for you
Sign up