
Hello! Welcome back to the final lesson in our module on the surgical procedure itself.
In our previous lessons, we've dissected the surgical site preparation, from the initial incision and flap elevation, through the sequential osteotomy, to the precise placement of the implant, often guided by a CAD/CAM surgical template. We concluded with the implant securely in the bone, having achieved a certain level of primary stability, which we quantified via insertion torque.
Now, we must address the final, crucial step of the surgery: managing the interface between the newly placed implant and the surrounding soft tissues. This step is not merely about closing the wound; it's a strategic decision that dictates the entire subsequent healing trajectory and prosthetic workflow.
Today's lesson addresses the learning outcome: Describe the placement of a healing abutment (for a one-stage protocol) or a cover screw (for a two-stage protocol) to conclude the surgery. We will explore these two fundamental approaches, the components involved, and the clinical rationale that guides the surgeon's choice.
1. The Fork in the Road: One-Stage vs. Two-Stage Protocols
Once the implant fixture is seated in the bone, the surgeon must decide how it will spend its initial healing phase (typically 2-6 months) while osseointegration occurs. There are two primary strategies:
- Two-Stage (Submerged) Protocol: The implant is completely buried beneath the gum tissue to heal in a protected, undisturbed environment. This requires a second, minor surgical procedure later to expose it.
- One-Stage (Non-Submerged) Protocol: A component is attached to the implant that protrudes through the gum tissue, allowing it to heal while maintaining access. This avoids a second surgery.
The image below provides a clear visual distinction between these two approaches.

To establish a formal definition, let's turn to a concise description from the medical literature.
Dental Implants - StatPearls - NCBI Bookshelf - NIH
The StatPearls article 'Dental Implants' provides a clear, academic definition of the different surgical protocols.
Please read the first paragraph under the 'Technique or Treatment' section. Focus on the definitions provided for the 'two-stage' and 'one-stage' surgical procedures.
As the text explains, the choice between these protocols determines whether a cover screw or a healing abutment is placed to conclude the surgery.
2. The Two-Stage Protocol: Using a Cover Screw
In a two-stage procedure, the goal is to completely seal the implant from the oral environment. This is achieved with a cover screw.
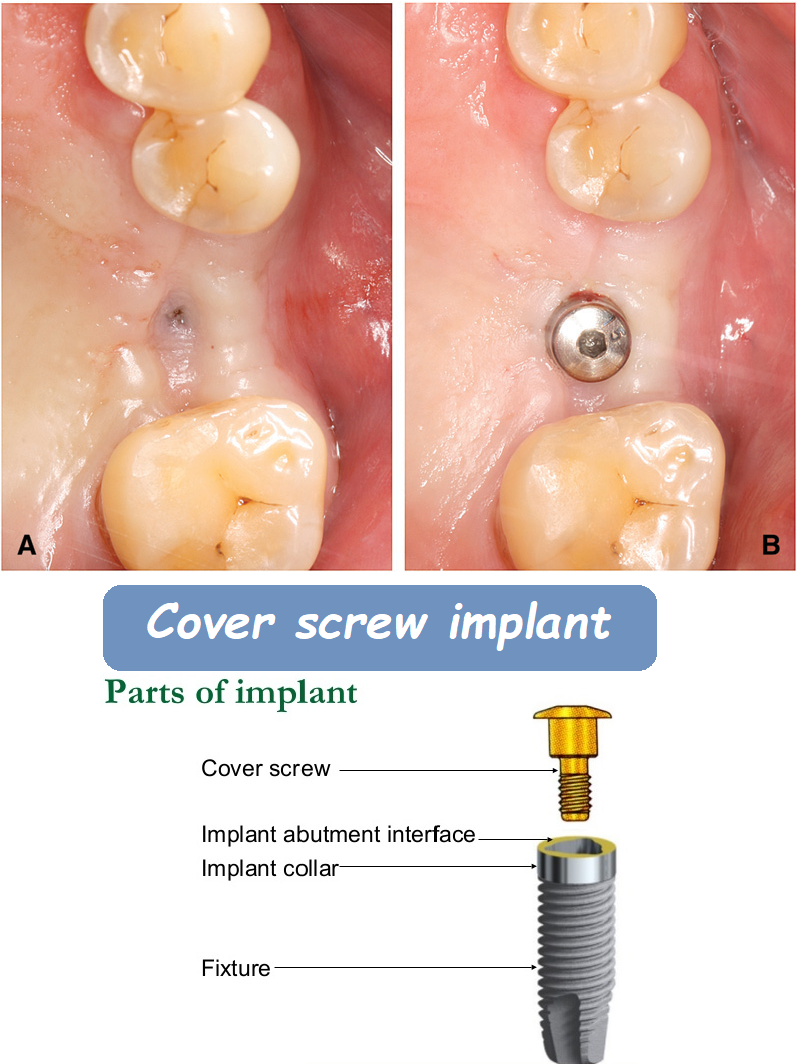
A cover screw is a very simple, low-profile component. Its sole function is to seal the internal, threaded connection of the implant fixture during the submerged healing period. This prevents the ingrowth of soft tissue or bone into the implant's restorative interface, ensuring it remains pristine for the later attachment of prosthetic components.
After the cover screw is hand-tightened, the surgical flap is repositioned and sutured, completely covering the implant.
When is a Two-Stage Protocol chosen?
This more conservative approach is generally preferred when:
- Primary stability is low: If the implant did not achieve a high insertion torque value (e.g., < 25 Ncm), submerging it protects it from any functional loads or micromotion (from the tongue, food, etc.) that could disrupt the delicate early stages of osseointegration.
- Simultaneous bone grafting was performed: If a guided bone regeneration (GBR) procedure was done alongside implant placement, a submerged approach provides a closed, protected environment that is ideal for the bone graft and barrier membrane to mature undisturbed.
The trade-off is the need for a second surgical visit. After osseointegration is complete, the surgeon must make a small incision to expose the implant and replace the cover screw with a healing abutment.
3. The One-Stage Protocol: Using a Healing Abutment
In a one-stage procedure, the surgeon aims to combine the implant healing phase with the soft tissue shaping phase. This is achieved using a healing abutment.
A healing abutment is a taller, typically mushroom-shaped component that screws into the implant fixture and extends through the gingiva into the oral cavity. It serves two critical purposes:
- Maintains Access: It keeps the implant accessible, eliminating the need for a second-stage uncovering surgery.
- Shapes the Soft Tissue: It guides the gum tissue to heal in a specific shape around the implant, creating a natural-looking "emergence profile" that mimics how a natural tooth emerges from the gums. This is called forming the gingival cuff.
The choice and placement of a healing abutment are more technically demanding than placing a cover screw. The following video provides an excellent, detailed walkthrough of the clinical considerations.
Dentist Hand Skills: Dental Implant Healing Abutment VS Cover Screw - Common Mistakes & Techniques
In the video 'Dental Implant Healing Abutment VS Cover Screw', Dr. Daniel Brisky provides a masterclass on the practical aspects of using these components.
Please watch the video from 04:35 to 12:26. This segment covers the core concepts of using a healing abutment. Focus on: Rationale (04:35 - 05:31): Note the primary stability value Dr. Brisky uses as his threshold (25 Ncm) for choosing a healing abutment and his reasoning. Size Selection (05:31 - 08:42): This is a critical section. Pay close attention to how the tissue height is measured and the biophysical consequences of selecting an abutment that is too short (bacterial trapping, inflammation, and bone loss). Suturing Technique (08:42 - 12:26): Observe how the soft tissue is secured around the abutment to create a tight biological seal.
As the video powerfully demonstrates, the one-stage protocol, while surgically more efficient for the patient, requires meticulous execution. The key points are:
- Sufficient Primary Stability is Mandatory: This is the non-negotiable prerequisite. The implant must be stable enough to withstand the minor functional forces it will be exposed to during healing.
- Abutment Height is Critical: The selected healing abutment must be tall enough to clear the crest of the bone and the full thickness of the soft tissue. An abutment that is too short allows the gum tissue to fold over it, creating an uncleansable pocket where bacteria can accumulate, leading to inflammation and potentially early bone loss. This is a crucial geometric and biological consideration.
- A Precise Tissue Seal is Essential: The sutures must adapt the gingival flap snugly against the polished surface of the healing abutment to prevent bacterial ingress along the interface.
Test your understanding!
A surgeon has just placed an implant and achieved an insertion torque of 40 Ncm. They measure the soft tissue thickness and determine it to be 3 mm. The implant was placed 1 mm subcrestally (below the bone level). The surgeon has healing abutments of heights 2.5 mm, 3.5 mm, and 4.5 mm available. Which is the most appropriate choice and why? What is the primary risk of choosing the 2.5 mm abutment?
Show answer
The total height needed for the abutment to emerge properly is the depth below the bone crest (1 mm) plus the soft tissue thickness (3 mm), totaling 4 mm. Therefore, the 4.5 mm healing abutment is the most appropriate choice. It will emerge completely from the tissue, allowing for proper cleaning and healthy tissue adaptation.
The primary risk of choosing the 2.5 mm abutment is that it would be too short. It would not even clear the bone and soft tissue. The gum tissue would heal over the top of the abutment, creating a deep, non-cleansable pocket. This pocket would trap bacteria, leading to chronic inflammation (peri-implant mucositis) which could progress to infection and bone loss around the implant (peri-implantitis), jeopardizing osseointegration.
4. The Decision Framework: A Summary
The decision to conclude the surgery with a cover screw or a healing abutment is a cornerstone of surgical implant dentistry. It's a risk-assessment calculation based on the conditions present at the end of the procedure.
| Factor | Favors Two-Stage (Cover Screw) | Favors One-Stage (Healing Abutment) |
|---|---|---|
| Primary Stability | Low (< 25 Ncm) | High (> 25-35 Ncm) |
| Bone Quality | Poor (e.g., D4 soft bone) | Good (e.g., D1-D3 dense bone) |
| Bone Grafting (GBR) | Significant GBR performed | No GBR, or only minor grafting |
| Patient Health | Compromised (e.g., heavy smoker, uncontrolled diabetes) | Good systemic health |
| Surgical Goal | Maximize protection of a compromised site | Maximize efficiency, avoid 2nd surgery |
Conclusion
We have now reached the end of the implant placement surgery. The implant is in its final position, and the surgeon has made a critical choice to seal it with either a cover screw for submerged healing or a healing abutment for non-submerged healing.
Key Takeaways:
- The final step of implant surgery involves choosing between a one-stage (non-submerged) or a two-stage (submerged) protocol.
- A two-stage protocol uses a cover screw to seal the implant, which is then completely covered by the sutured gums. This protects the implant but requires a second surgery to expose it. It is indicated when primary stability is low or extensive bone grafting is performed.
- A one-stage protocol uses a healing abutment that protrudes through the gums. This shapes the soft tissue and avoids a second surgery. It is only indicated when excellent primary stability has been achieved.
- The correct sizing of the healing abutment is critical to prevent bacterial trapping and subsequent inflammation at the implant interface.
Preview of the Next Lesson:
With the surgery complete, the biological process of osseointegration begins. The implant will now be left to heal for several months. In our next module, we will shift our focus to the post-surgical period. The very next lesson, "Describe the clinical healing period, including the implant uncovering procedure required in a two-stage protocol," will follow directly from today's topic, exploring what happens during the healing phase and detailing the second-stage surgery we've introduced here.
Can't find a good explanation? Sign up and we'll make it for you
Sign up