
Hello! Welcome back to our module on the surgical procedure for implant placement.
In the previous lesson, we covered the critical first step of creating surgical access by raising a mucoperiosteal flap to expose the underlying jawbone. With the surgical site now clearly visible, we are ready to prepare the bone to receive the implant.
This lesson focuses on the osteotomy—the creation of a precise socket in the bone. Our learning outcome is to explain the rationale for a sequential drilling protocol during osteotomy to create a precise implant bed while minimizing trauma. We will deconstruct why surgeons use a series of drills of increasing diameter rather than a single drill, exploring the interconnected goals of precision, trauma mitigation, and achieving mechanical stability.
Given your background in physics and simulation, you can think of this process as a delicate control problem: the surgeon must execute a pre-planned trajectory in a heterogeneous medium (bone), minimizing energy transfer (heat) and mechanical stress, to create a final state that maximizes initial stability.
1. The Conventional Osteotomy and Sequential Drilling
An osteotomy for a dental implant is the surgical preparation of a site in the jawbone to the exact dimensions required by the chosen implant. The "conventional" method for this, and the one most widely used, is based on a sequential drilling protocol.
Let's begin by establishing a clear definition of this technique.
The Effect of Different Osteotomy Techniques on Implant ...
This excerpt from the book chapter 'The Effect of Different Osteotomy Techniques on Implant...' introduces the conventional osteotomy and defines sequential drilling. It also briefly contrasts it with a similar method, 'step-drilling'.
Please read Section 4.1 'Conventional osteotomy technique' and the subsections 4.1.1 'Sequential drilling technique' and 4.1.2 'Step-drilling technique'. Focus on how sequential drilling is defined as a process of using drills of increasing diameter, and note the key distinction made between sequential and step-drilling in terms of controlling both diameter and depth.
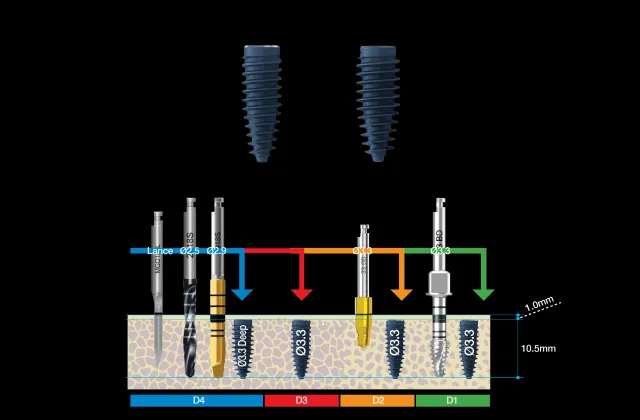
As the reading describes, sequential drilling involves preparing the implant site with a series of drills of progressively increasing diameter. Each drill follows the path created by the previous one, widening the osteotomy incrementally until the final desired diameter and depth are achieved.
Now, let's explore the fundamental reasons why this methodical, incremental approach is the standard of care.
2. Rationale 1: Precision, Angulation, and Positional Control
The final three-dimensional position of the implant is critical for both the biological success and the functional and aesthetic outcome of the final prosthesis. The sequential protocol provides the surgeon with maximum control to achieve the planned position.
The process starts with a very small "pilot" or "lance" drill, typically 1.5-2.0 mm in diameter. This initial, small-diameter hole serves as a precise guide for all subsequent steps.
- Ease of Initiation: Creating a small initial purchase point on the curved and often slippery surface of the bone cortex is much easier and more accurate with a small drill.
- Verifiability and Correction: After this initial hole is made, its position and angulation can be checked. A thin metal guide pin is often inserted, and the surgeon can visually assess its trajectory relative to adjacent teeth and opposing jaw. An X-ray can also be taken at this stage for confirmation. If the angulation is incorrect, it is relatively simple to change the angle of the small drill and correct the trajectory. Correcting a large-diameter hole, on the other hand, is significantly more difficult and results in a much larger final osteotomy, which can compromise stability.
The following video provides an excellent clinical demonstration of this entire process.
Dental Implant Drilling Techniques: Speeds, Angulations, and Implant Placement
This video from Colorado Surgical Institute demonstrates the drilling sequence in detail. Pay close attention to how the surgeon uses the initial small burr to establish and correct the implant's position and angulation before committing to larger drills.
Please watch the segment from 05:56 to 15:21. The surgeon begins with a very narrow 1.5mm burr. Notice how he emphasizes: Creating a small initial divot to define the entry point (08:30). The ability to easily move this initial spot if needed (09:10). Deepening the initial hole slightly and then using the burr itself as a guide pin to check angulation (10:30). How to correct angulation at this early stage before moving on (11:20). Only after confirming the path with the small burr does he proceed to the larger drills to finalize the depth and width (12:45).
This ability to "measure twice and cut once" is a cornerstone of the sequential drilling rationale. It transforms the procedure from a single, high-stakes action into a controlled, iterative process.
3. Rationale 2: Minimizing Biological Trauma
Creating an osteotomy is a controlled surgical trauma. The goal is to perform it in a way that preserves the vitality of the surrounding bone cells (osteocytes), as these cells are essential for initiating the healing process of osseointegration. The two primary forms of trauma to avoid are excessive heat and excessive mechanical stress.
Thermal Trauma
Drilling generates frictional heat. If the bone temperature rises above 47°C (116.6°F) for one minute, or to higher temperatures for shorter periods, it can cause thermal osteonecrosis—the death of bone cells. This would lead to a layer of dead bone surrounding the implant, preventing osseointegration and causing early failure.
Sequential drilling helps manage heat in several ways:
- Reduced Friction per Step: Each drill removes only a small amount of bone, reducing the overall friction and heat generated at any given moment.
- Effective Irrigation: The protocol mandates the use of copious sterile saline irrigation. This coolant must reach the cutting tip of the drill. A sequential process, often performed with a "pumping" motion (moving the drill in and out), allows the coolant to flush out bone debris and effectively cool the site.
- Lower Drill Speeds: Bone drilling is performed at low speeds (typically under 2000 RPM) but with high torque, which is different from cutting enamel. This reduces heat generation compared to high-speed drilling.
Dental Implant Drilling Techniques: Speeds, Angulations, and Implant Placement
Let's return to the 'Dental Implant Drilling Techniques' video to see the discussion on drill speeds and irrigation, which are central to thermal control.
Watch the first two minutes of the video (00:00 - 01:56). Note the distinction between a very high speed for the initial surface punch and the much lower 'biological drilling' speed (e.g., 50 RPM) for the main osteotomy. The key takeaway is the principle of low speed and high irrigation to protect the bone.
Mechanical Trauma
Excessive pressure or vibration during drilling can create microfractures in the surrounding bone, impairing its vascular supply and healing capacity. Using a single, large-diameter drill would require significant force, risking uncontrolled fracture and stress. The sequential protocol, by removing bone in small, concentric layers, minimizes the required force at each step, ensuring a gentle and controlled preparation.
4. Rationale 3: Adapting to Bone Quality for Optimal Primary Stability
Perhaps the most sophisticated rationale for the sequential protocol is that it is not a rigid recipe but an adaptable strategy. A key goal of the surgery is to achieve high primary stability—the initial mechanical friction-fit of the implant in the bone. This stability prevents micromotion, which is crucial for successful osseointegration.
The ideal level of primary stability, often measured clinically by the implant's insertion torque, is achieved by creating a precise relationship between the osteotomy diameter and the implant diameter. This relationship is highly dependent on the local bone density.
- Dense Bone (D1/D2): Found typically in the anterior mandible. This bone is very hard. If the osteotomy is too narrow, the insertion torque can become excessively high (>80 Ncm). This can create extreme compressive stress, leading to pressure necrosis and subsequent bone loss. In these cases, the surgeon may perform "over-preparation," using all the drills in the sequence or even a special "bone profiler" to ensure the implant can be seated without excessive force.
- Soft Bone (D3/D4): Found typically in the posterior maxilla. This bone has low density. If the surgeon drills the osteotomy to the full diameter of the implant, the primary stability will be very low. In these cases, the surgeon employs an "under-preparation" or "undersizing" protocol. They intentionally stop the drilling sequence early, using a final drill that is significantly narrower than the implant. As the (often tapered) implant is then inserted, it laterally compresses the soft bone, increasing its local density and achieving a much higher insertion torque and primary stability.
This scientific paper provides the evidence base for this adaptability.
Influence of Drilling Protocol on Primary Implant Stability ...
This research article, 'Influence of Drilling Protocol on Primary Implant Stability...', experimentally investigates exactly what we are discussing: how adapting the drilling protocol affects primary stability in different bone densities.
Please read the following sections: Introduction: To understand the importance of primary stability and the factors that influence it. Results: Focus on the main finding stated in the first paragraph: 'Undersized drilling protocols resulted in higher insertion torque values, whereas oversized protocols yielded lower values...'. You don't need to analyze the figures in detail, but appreciate how they demonstrate this principle across different bone types and implant designs. Discussion: Read the first paragraph of the discussion. It provides the clinical interpretation of the results, explaining why a clinician would choose to under-prepare in soft bone or potentially over-prepare in dense bone.
Clinically, a surgeon can get tactile feedback during drilling and can even assess bone density by examining the bone shavings collected in the drill's flutes.
Dental Implant Drilling Techniques: Speeds, Angulations, and Implant Placement
This final clip provides a fantastic clinical pearl on how a surgeon assesses bone density in real-time to decide on the drilling strategy.
Watch the segment from 19:01 to 21:17. Note the visual difference between bone shavings from dense (D1, white and chunky) versus soft (D4, just blood) bone. This real-time feedback helps the surgeon decide whether to continue with the full drilling sequence or to undersize the preparation.
Test your understanding!
A surgeon is placing a 4.0mm diameter implant.
Scenario A: The implant is in the anterior mandible, an area known for very dense D1 bone.
Scenario B: The implant is in the posterior maxilla, an area known for soft D4 bone.
How and why would the surgeon's choice of the final drill diameter likely differ between these two scenarios to achieve optimal primary stability?
Show answer
-
Scenario A (Dense D1 Bone): The surgeon would likely use a final drill diameter very close to the implant diameter (e.g., 3.8mm or even 4.0mm). This is a form of standard or over-preparation. The rationale is to prevent excessively high insertion torque, which could cause pressure necrosis, damage the implant, or even fracture the bone. The goal is to seat the implant with a firm, but not damaging, level of torque (e.g., 30-50 Ncm).
-
Scenario B (Soft D4 Bone): The surgeon would intentionally use a final drill diameter significantly smaller than the implant (e.g., 3.2mm). This is under-preparation. The rationale is to use the tapered body of the implant to laterally compress the low-density cancellous bone during insertion. This compaction increases the local bone density around the implant, dramatically increasing the insertion torque and achieving the necessary primary stability that would otherwise be impossible in such soft bone.
Conclusion
We have explored the multi-faceted rationale behind the sequential drilling protocol. It is not merely about making a hole; it is a carefully choreographed technique designed to balance competing objectives.
Key Takeaways:
- Sequential drilling involves using drills of progressively increasing diameter to prepare the osteotomy site.
- The primary rationales for this protocol are:
- Precision and Control: It allows for easy verification and correction of the implant's 3D position at an early, low-stakes stage.
- Minimizing Trauma: It reduces mechanical stress and, crucially, allows for effective irrigation and heat management to prevent thermal necrosis of the bone.
- Adaptability: It is not a fixed protocol but a strategy that can be adapted (undersized or oversized) to the local bone density to achieve optimal primary stability.
Preview of the Next Lesson:
We have established that controlling heat is a critical part of the osteotomy procedure. In the next lesson, we will perform a deep dive into this specific topic, addressing the learning outcome: "Explain the biophysical principles of thermal control during osteotomy and the methods used to prevent thermal bone necrosis." We will look more closely at the physics of heat generation and dissipation in bone tissue.
Can't find a good explanation? Sign up and we'll make it for you
Sign up